Install DNN to my Windows Hosting
DNN (formerly DotNetNuke) is an open-source content management system (CMS) that can be used to build your website. Follow the steps below to manually install DNN to your Windows Hosting.
Warning: If your site's root directory has conflicting application content, these files will need to be removed prior to installing DNN. If you're unsure which files or folders to remove, contact your website developer or server administrator before making any irreversible file removal.
- Download the latest version of DNN. Look for the link to DNN_Platform_x.x.x_Install.zip, and download it to your local computer.
- Create a new MSSQL database and a new database user. In a text editor, write down your database details.
- In your Plesk file manager, select the
 menu for your domain's root directory, and then select Change Permissions.
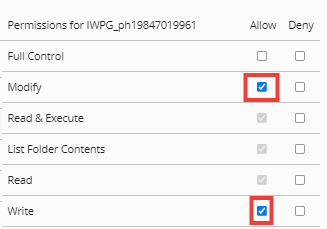
 - The Directory permissions menu will appear. On the left, select Application pool group. On the right, select the Allow checkboxes for Modify and Write, and then select Save.

- In your file manager, select your domain's root directory to open it .
- While in your root directory, select the
 menu, select Upload File, and then upload your DNN_Platform_x.x.x_Install.zip file.
 - Once uploaded, select the zip file, and then select OK in the pop-up window to extract the file.
- Open a browser, and visit to your site.
- Complete the account information form by entering the following:
- Username: Used to access the DNN CMS.
- Password: Used to access the DNN CMS, along with the username.
- Email: Where you will receive notifications, and where password reset emails are sent.
- Website Name: Your website title.
- Template: Choose a template from the drop-down.
- Language: Select a preferred language.
- In Database Information, select Custom and then enter the following, using the database information you wrote down earlier.
- Database Type: Ensure SQL Server/SQL Server Express Database is selected.
- Server Name: Your database hostname.
- Database Name: The name of the database you created.
- Security: Select User Defined.
- Database Username: The database user you created.
- Database Password: The database password you created.
- Run Database As: Ensure Database Owner is selected.
- Select Continue. Once the Installation Complete! message appears, select Visit Website.
You can access your DNN login page by going to http://[your domain name]/login (for example, http://coolexample.com/login).
More Info
- For more information on DNN, visit the DNN Community.