Request a read receipt in Outlook
A read receipt is a notification that confirms that a sent message was opened by the recipient.
Select the appropriate tab based on the email platform you’re using.
While you can automatically receive read receipts for every email in Outlook, Outlook on the web does not. You’ll need to request a read receipt for each email you send.
- Sign in to Outlook on the web. Use your Microsoft 365 email address and password (your GoDaddy username and password won't work here).
- Select New Mail.
- Compose a message.
- Determine whether you're using the Classic or Simplified ribbon.
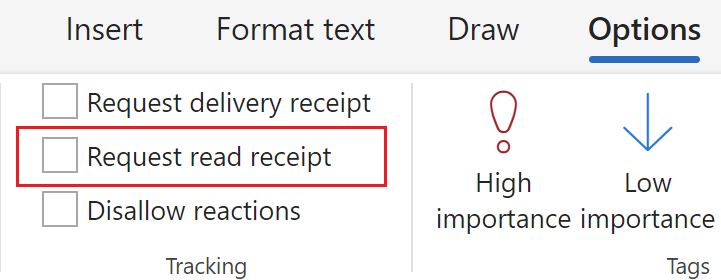
- If you're using the Classic ribbon: Select Options, and then, above Tracking, next to Request read receipt, select the checkbox.

- If you're using the Simplified ribbon: Select Options, and then, next to Request read receipt, select the checkbox.
- Select Send.
Your email will be sent with a read receipt request.
There are now 2 versions of Outlook for Windows: new Outlook and classic Outlook. Before continuing to the steps below, check which version you’re using.
New Outlook
If the steps in this section don't work, you might not be using new Outlook yet. Try the steps in the Classic Outlook section instead.
Upon activation, you can add additional email plans, such as Email Essentials, Email Plus, or Online Business Essentials.
- Open Outlook.
- Select New Mail.
- Compose a message.
- Determine whether you're using the Classic or Simplified ribbon.
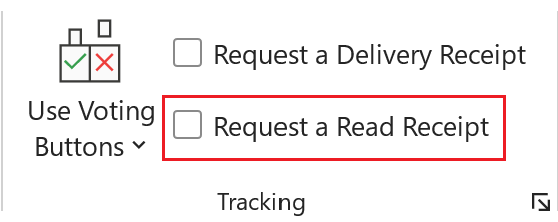
- If you're using the Classic ribbon: Select Options, and then, under Tracking, next to Request read receipt, select the checkbox.

- If you're using the Simplified ribbon: Select Options, and then, next to Request read receipt, select the checkbox.
- Select Send.
Your email will be sent with a read receipt request.
Classic Outlook
If the steps in this section don't work, you might not be using classic Outlook. Try the steps in the New Outlook section instead.
- Open Outlook.
- Select New Email.
- Determine whether you're using the Classic or Simplified ribbon.
- If you're using the Classic ribbon: Select Options, and then, under Tracking, next to Request read receipt, select the checkbox.

- If you're using the Simplified ribbon: Select Options,
 More commands, and then Request a Read Receipt.
 - Select Send.
Your email will be sent with a read receipt request.
To automatically send all messages with a read receipt, go to File, and then select Options. Under Tracking, next to Read receipt confirming the recipient viewed the message, select the checkbox. To save your changes, select Ok.
There are now 2 versions of Outlook for Mac: new Outlook and Legacy Outlook. Before continuing to the steps below, check which version you’re using.
New Outlook
If the steps in this section don’t work, you might not be using the new Outlook yet. Try the steps in the Legacy Outlook section instead.
Upon activation, you can add additional email plans, such as Email Essentials, Email Plus, or Online Business Essentials.
- Open Outlook.
- Select New Mail.
- Compose a message.
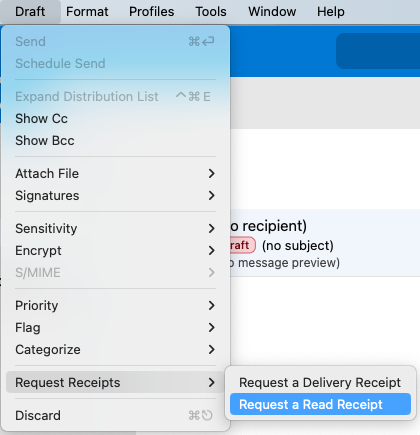
- In the menu at the top of your screen, select Draft, then Read Receipts, and then Request Read Receipt.

- Select Send.
Your message will be sent with a read receipt request.
Legacy Outlook
If the steps in this section don’t work, you might not be using Legacy Outlook. Try the steps in the New Outlook section instead.
- Open Outlook.
- Select New Email.
- Compose a message.
- At the top of your message, select Options, then Request Receipts, and then Request a Read Receipt.

- Select Send.
Your email will be sent with a read receipt request.
Related steps
- Find out how to switch to the new Outlook for Windows from Microsoft.
- To access Outlook on the web, sign in to your Microsoft 365 account.