As a small business owner, one of the best ways for you to reach more customers is to meet them where they are — and increasingly, this is on social media. Facebook remains one of the most popular social media platforms, with over 2 billion visitors each day, so it can be an incredibly powerful channel for your business. With a Facebook business page, you can promote your online store and increase your sales by getting your content in front of a global audience.
This step-by-step guide is designed to teach you everything you need to know to create, manage, and promote your new Facebook business page.
Related: How to sell on Facebook Marketplace
What is a Facebook business page?
A Facebook business page is a special type of Facebook account dedicated to businesses. Like other Facebook profiles, business pages are free to create. When you create a Facebook business page, you can share content about your business, promote your store, and interact with your potential customers. You can also leverage additional ecommerce tooling, such as Facebook ads and Facebook Shop, to promote and even sell your products through Facebook.
Facebook users interested in your store can “like” your business page to follow your activity more closely — but since business pages are typically public, customers don’t have to follow you to see your page actively.
How to set up a Facebook business page
In this section, we’ll review all the steps required to create a Facebook business page.
Create a personal Facebook account
Before creating a business page, you must have a personal Facebook profile. Even if you already have a personal profile, you may want to create a separate profile specifically for your business. However, your personal profile and your business page are considered separate, so you don’t need to worry about information or activity from your personal profile accidentally appearing on your business page.
To create a Facebook account:
- Go to Facebook.com.
- Click Create new account.
- Enter your name, email, password, and a few personal details.
- Click Sign Up.
Create your new Facebook business page
Once you’ve logged into your Facebook profile, you’re ready to create a page:
- In the left-hand toolbar, click the See all button to expand the full menu.
- From the expanded menu, find the Create section and click Page.
Provide basic details about your business
Next, it’s time to add some general details about your business, which you will see populate in the preview as you work:
- Page Name: Enter the public title for your Facebook business page. Most commonly, this will be your business name and it is vital for your brand awareness.
- Category: Choose one or more categories that best describe your business.
- Bio: Enter a brief description of your business. Treat this like a headline that gives visitors insight into your business and what makes you special. You can modify this bio later.
Once you’re satisfied with this information, click Create Page.
Fill out contact and location info
You can now share the various ways that potential customers can contact your business through your new page. Be sure to include contact information like a website URL, phone number, and business hours, so customers can visit your online store to learn more about you.
If you don’t have a website yet, you may want to build an online store to help establish a more permanent presence beyond your Facebook page. To get started quickly, use a website builder tool to get up and running without having to invest in expensive and time-consuming web development services.
If your business has a brick-and-mortar location, you can also enter your address and share hours of operation. Click Next to proceed with setup.
Click Next to proceed with setup.
Customize your profile picture, cover photo, and action button
You can update the profile picture and cover image to customize the appearance of your Facebook business page. To get started, you use your business logo as the profile photo and an image of some of your products or your brick-and-mortar location as your cover photo. Before uploading any photos, consult the recommended image size to avoid unpleasant distortion of your logo pixels or other visuals.
You can also add an action button to your page, which is a call to action (CTA) for visitors to your page. To add an action button:
- Click Add Action Button.
- Choose from the various options for customizing the button text, such as asking users to visit your website, contact you via Messenger, and more.
- Choose where the button sends users (i.e. what happens when people click the button) — you can direct users to your Facebook Shop, connect them to another tool that integrates with Facebook (such as your ecommerce site of choice), or link to a website.
- Next, finish setting up the button. The specific steps will vary based on your previous selection. In this example, we are directing the user to a website.
When you are happy with your photos and action buttons, click Next to proceed.
Related: The ultimate guide to social media image sizes
Add finishing touches
Before finishing up your Page setup, you can add a few optional finishing touches, such as:
- Connecting WhatsApp to your business Page to make it easier for customers to get in touch with you.
- Inviting your friends to follow your Page to jumpstart your following by inviting your Facebook friends network to follow your Page.
- Opting into notifications and promotional emails to make sure you’re aware of activity on your Page and receive information about other related Meta services.
You can always complete these steps at a later time if you’re in a rush!
Claim any duplicate pages
If you have multiple business pages, you may be able to merge them under certain conditions, including:
- They have the same name and represent the same business.
- They have the same physical address.
- They belong to the same Business Manager account.
You can check on Facebook’s Merge Request page to see if you have any pages that can be merged.
Add collaborators/admins
To make it easier to keep up with posting content and responding to customer inquiries, it can be helpful to give others access to manage your Facebook business page. To add a collaborator:
- Go to your business Page and click Manage.
- Click Page access and then select Add New.
- Follow the prompts and enter the name or email address of the person who should have access to manage the Page.
- You can choose to give this person partial or complete control over your Page. Partial access covers most day-to-day activity, like posting content or messaging customers. With full control, this person can add other Page managers or even delete the Page. Click Give Access once you’ve made your selection.
Review, polish, and publish
Your page is now ready to go. Take another look at the page itself and make any additional updates. Otherwise, you’re ready to start posting!
Things to know about managing a Facebook business page
Creating a Facebook business page is only the beginning — there’s a lot more you need to know to really make the most of this social media platform. In this section, we’ll review some common management tasks you might encounter while running your page.
How to pin a post
You can (and should!) post frequently on your business page to engage with your followers. Like personal Facebook posts, posts are generally ordered in reverse chronological order (i.e., from newest to oldest). However, if you have a post that you want customers to find more easily, such as a special announcement or promotion, you can pin it to the top of your page.
To pin a post, select the three-dot menu icon in the top right corner and click Pin post.
You can later unpin a post when you’re ready to remove it from the top of your page.
How to schedule posts
Scheduling posts can help your business operate more efficiently and effectively. Because of the transient nature of Facebook’s content, it’s important to post your messages at the ideal time, so scheduling posts to go out at your audience’s ideal time can make a big difference on post engagement. Additionally, if you’re prepping for a big sale or promotional event, it’s worth getting everything set up in Facebook ahead of time so you aren’t rushing to post (and potentially missing an important deadline).
To schedule a post:
- From your business Page, click Meta Business Suite in the left-hand toolbar. You can also access this link by selecting your business profile picture.
- Click Planner in the left menu.
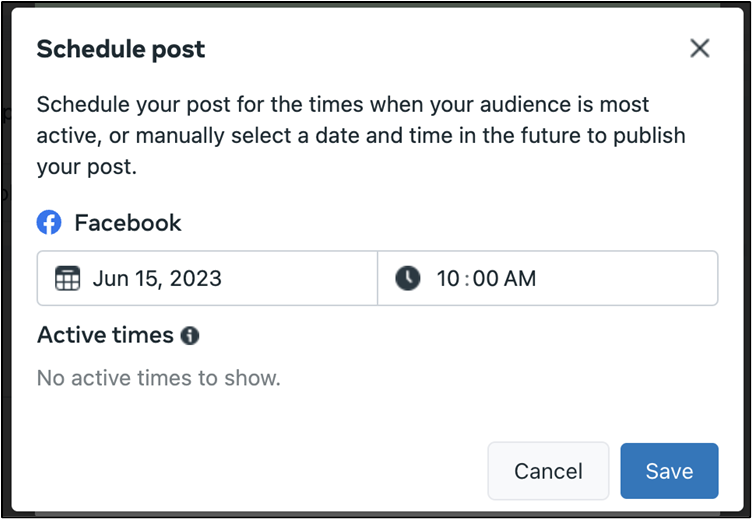
- Hover over the date for your planned post, click Schedule, and then select Schedule Post from the drop-down menu.
- Select the date and time when you want to post. As your Page gains followers, Facebook will make recommendations for times when your followers are most active on Facebook. Click Save.

- Create your post. When you’re satisfied with the content, appearance, and other settings, click Schedule.
How to use Facebook Messenger for customer support
Small businesses should take advantage of Facebook Messenger as a customer support channel since it is freely available to all Facebook users and is quite simple to use. Encourage the potential customers who are visiting your new Facebook business page to communicate with you via Messenger. Your customers will appreciate how easy it is to get in touch with you, versus having to leave Facebook to start a new conversation over email or phone number. Consider using your page’s action button to ask customers to get in touch with you via Messenger.
Additionally, you can program Messenger to respond to common inquiries (such as business hours, store hours, or return policies) with automated responses. This boosts your customer service experience and operational efficiency by ensuring that customers get the information they need quickly without a lot of tedious, repetitive work on your part.
How to use Facebook Insights
Facebook Insights provides valuable information about your page’s performance, followers, and the effectiveness of your content. This information will become more valuable over time as your page gets more interaction from your growing group of followers.
You can access Insights by going to your Facebook business page and clicking Professional dashboard in the left-hand side toolbar.
The Insights hub contains four subpages. Take a little time to review each category now so that you’ll know where to go later when you need to find a specific detail about your page.
- Home: An overview of your page performance, with high-level summaries of each of the following categories.
- Your page: Insights into how Facebook users are discovering and interacting with your page, including information about your reach (i.e. the number of Facebook users who have seen your content) and engagement (i.e. how Facebook users have interacted with your content).
- Content: A list of your recent page content. You can drill-down into a piece of content to see specific metrics about how users have interacted with it, both positively (e.g., reactions, comments, shares, etc.) and negatively (e.g., hiding the post, etc.).
- Audience: Information about your Facebook followers. This area won’t be populated with insights until you have at least 100 followers.
How to delete a Facebook page
If needed, you can temporarily deactivate or even completely delete your Facebook business page. In most cases, deactivate instead of deleting — deactivation should cover most situations where you need to take an extended break from your business but still gives you the option to come back and reactivate later. If you delete your page, it’s gone forever after a 30-day reactivation period.
To deactivate or delete your Facebook Page:
- From your business Page, click Settings in the left-hand toolbar. You can also access this link by selecting your business profile picture.
- Click Privacy, select Facebook Page information, and then click Deactivation and deletion.
- Choose whether you want to deactivate or delete your Page. Remember, deactivating your Page is reversible, but deleting is permanent, so choose carefully! If you’re uncertain, choose to deactivate your Page. Click Continue once you’re ready to proceed.
If you choose to deactivate your Page, you will be asked to choose a reason for leaving. Some additional information and options may be presented based on your choice. You can also opt out of Facebook emails. Make your desired selections and click Deactivate.
If you decide to delete your Page, you can download information or transfer it to another service like Google or Dropbox. Before you can finalize deletion, you must enter your Facebook password and confirm that you really want to delete your Page.
After deleting, you have 30 days to change your mind. You can reactivate a deactivated Page at any time. If you decide to reactivate your Page, you can do so from your Pages settings.
How to create a page username
Creating a username makes your page more appealing to potential customers. Your username will be added to the end of the business page URL (i.e. facebook.com/your-username). Having a page username adds a little extra polish and professionalism to your page and helps with your SEO — and it’s quite simple to set up.
To create a page username:
- From your business Page, click Settings in the left-hand toolbar. You can also access this link by selecting your business profile picture.
- Click Username.
- Update the username field. Unlike your Page name, your username must be unique, so you may need to modify it slightly.
- Click Save Changes and then enter your password to confirm this change.
Promoting your Facebook business page
Now that you know the basics of creating and managing a new Facebook business page, it’s time to learn more about what will make your page truly successful. It’s not enough to write a few posts now and then — to do your best, you’ll need to have a real marketing strategy and invest time in interesting, consistent content, encourage engagement with your existing followers, and find ways to attract new followers to your page.
Create engaging content
Facebook is all about sharing, consuming, and interacting with content — this applies to your Facebook business page, too! Posting engaging content that is relevant to your target audience will attract new followers and, importantly, keep your existing followers interested in your page.
For best results, establish a regular schedule for posting content to give your followers a consistent experience. Experiment with different types of content — text, images, video, or a mix — to keep things interesting. Check back with your Insights often to see what content is working and where you might need to make some changes.
Related: 16 tips on creating video content that works
Discussions, comments, and engagements
The whole point of creating engaging content is to get your followers to, well, engage with it — ideally through reactions, comments, and other discussion-promoting interactions.
While some content will be one-directional (e.g., sharing information about a sale or holiday hours, etc.), you should also create content that encourages discussion, such as posing questions or directly asking for comments about the post. Participate in the comments section yourself by responding to questions, reacting to positive interactions, and otherwise fostering a community of engagement with your followers.
Use Facebook Ads
While your Facebook business page can gain followers through your personal Facebook account and organic growth, Facebook marketing aka Facebook Ads is a great way to further expand your reach and attract new followers to your page.
With Facebook Ads, you can target specific demographics based on your target audience, ensuring that your ad reaches Facebook users who are most likely to become followers and (hopefully!) customers of your business. You can create ads and measure their effectiveness in the Ad Center, which you can access from your Facebook business page.
Share your business with the world
With its massive, global user base, Facebook is a smart choice for promoting your business and connecting with new and existing customers. After reading this article, you are ready to create a page, set up and manage a page, create compelling content, and grow your followers. Remember to keep learning from data and analytics that Facebook makes available to you, so that you can learn more about what resonates best with your audience, stay on top of trends, and reach even more customers.
FAQ for Facebook for business
How to set up a Facebook business page?
To set up a business account on Facebook, select "Create New page" in the templates menu. This tutorial for social media marketing doesn't require a credit card. Pro tip: Optimize as a public figure to enhance visibility.
Does a Facebook business page have to be linked to a personal account?
Yes, a Facebook business page must be linked to a personal account. Use your account to access templates and manage your business account effectively.
How to create a business Facebook page without a personal account?
You cannot create a new business page without a personal account. A personal profile is required to manage business templates and handle social media marketing strategies.


