WordPress is a popular content management system (CMS) that offers an affordable way to establish a one-of-a-kind online presence. In this post, I’ll outline how to build a WordPress website the easy way.
While many people associate WordPress primarily with blogging, it’s also a great choice for building a small business website. In fact, WordPress powers 43% of all websites currently online — from lifestyle blogs to the biggest news sites.
The 5 basic steps to create a WordPress website
If you’ve decided to build your website with WordPress, you’re in good company — the world loves WordPress.
Let's get started.
Creating a WordPress website
If you're feeling confident and are keen to get started, you can download WordPress for free from WordPress.org.
From here you need to work through the steps of:
- Creating an online database.
- Setting up PHP.
- Uploading your WordPress files to your hosting service.
- Configuring everything via the online interface.
You can find official WordPress instructions here.
The easier way
Don't stress if this all sounds a bit complicated, as there is a much easier way. Hosting companies like GoDaddy let you install a WordPress website with just a few clicks, ensuring that everything is pre-configured and ready to go.
One advantage of using Managed WordPress is that GoDaddy automatically installs all the latest WordPress upgrades and security patches.
They also make it easy to access back up and restore features, to help protect your site and get it up and running again quickly should you run into any trouble.
Even with one of these pre-configured WordPress installations, there's still a bit of a learning curve when creating a WordPress website compared to using your typical website building tools.
But it's worth the extra time and effort to create a perfectly customised website that can grow with your business.
Related: Hacking a rising threat for Australian entrepreneurs
1. Install Managed WordPress
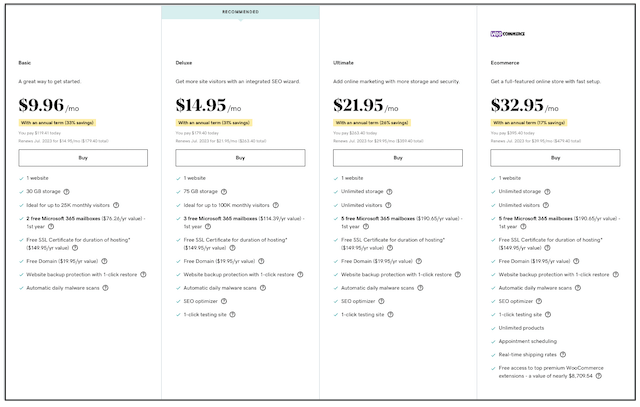
GoDaddy offers several tiers of WordPress hosting, adding important features such as search engine optimisation (SEO) and e-commerce to the higher tiers. All plans come with automatic daily malware scans and an SSL security certificate.
To get started creating your WordPress website with GoDaddy, choose a plan, then log in to your GoDaddy account.
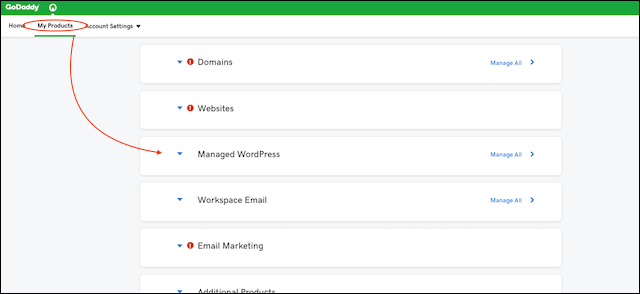
Select My Products then click the arrow to the left of Managed WordPress. Next, click Manage to the right of the hosting account you want to use (if you only have one, this will be easy).
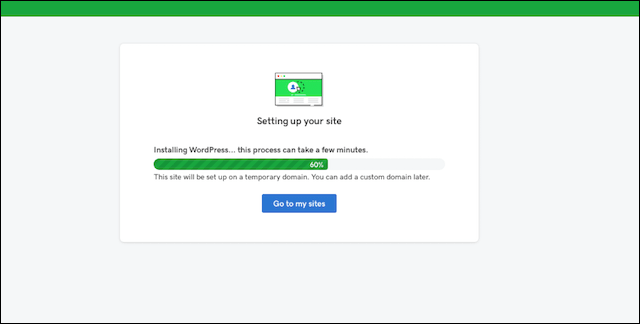
GoDaddy automatically downloads WordPress while you get a fresh cup of coffee. Compare this installation process to the five-minute installation WordPress.org provides (linked above).
2. Set up your WordPress website
Now you can either use the QuickStart Wizard to get started or configure your site on your own. You’ll find step-by-step instructions for both options here.
If you use GoDaddy's QuickStart Wizard, it will ask a few questions about you and your business, then suggest a theme you might like (this can be changed later). The Wizard also installs useful WordPress plugins including Page Builder. This is an enhanced drag-and-drop page editor that lets you customise your site without needing to dive into any code.
Once WordPress is installed, you can access it any time by typing www.YourDomain.com/wp-admin into your browser bar.
Use the login and password you created during installation to log in. Alternatively, you can access the WordPress admin pages via your GoDaddy account.
3. Choose a WordPress theme
At this point, you can customise the theme provided by GoDaddy or browse the unlimited number of themes online — some free, some that cost. It’s important to note that some WordPress themes are not compatible with Managed WordPress (i.e. any theme that relies on one of these plug-ins).
A WordPress theme is like a style template for your website — colours, typefaces and design are automatically applied to new pages so it's quick and easy to expand your site.
Themes make it easy for you to create a consistent look and feel across your site.
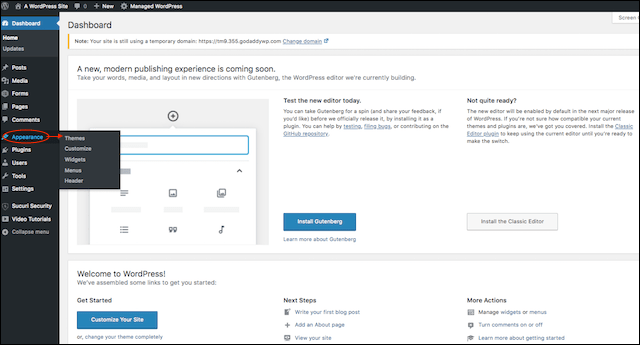
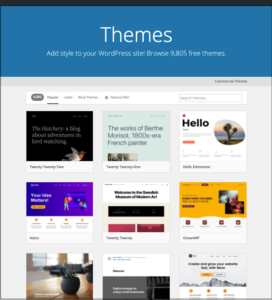
To install a WordPress theme from the WordPress admin dashboard, go to Appearance> Themes and then click the Add New button at the top. There are thousands of free WordPress themes, so take your time choosing one to ensure that it's right for you. Use the Preview button to take a theme for a test drive without installing it. You'll find complete instructions on how to install a WordPress theme here.
Choosing a theme is an important decision, so take your time.
There are thousands of WordPress themes, so it's important to choose carefully. You want a theme that aligns with the goals of your website and sends the right message to visitors.
If you're creating a WordPress site for a bakery, it would obviously have a very different look and feel to a site for an accountant.
Thankfully, GoDaddy makes it easier to narrow down your options with the WordPress Theme Directory.
If you click Appearance, Themes, Add New you're presented with a range of helpful categories for searching the directory:
- GoDaddy recommended
- Popular
- Latest
- Favourites
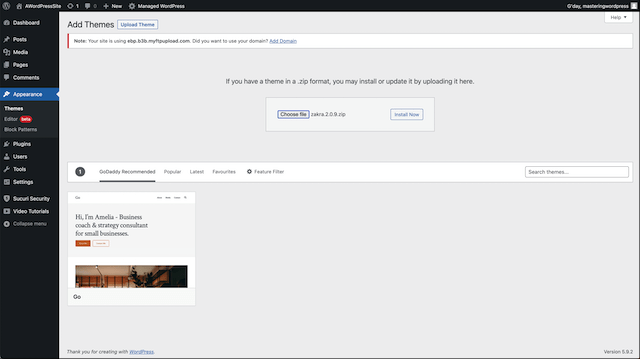
This is a great place to start your search for the perfect theme. If you want to drill down further, there's also a handy Feature Filter to narrow down your options using a wide range of criteria. You can specify:
- The type of website you’re building
- The features you need
- Your layout preferences
Tick your requirements and then click Apply Filters to see the results.
Alternatively, you can use the Search themes bar on the right and search by name or by category. Searching for 'bakery' narrows your choices down to a much more manageable 60 options.
Previewing your theme
Thankfully, you don't need to install a theme to see how it will look. Just hover the mouse over any theme that catches your eye and click Details & Preview.
Now you can take the theme for a spin and read about its features. For our site, let's go with 'Classic Bakery.'
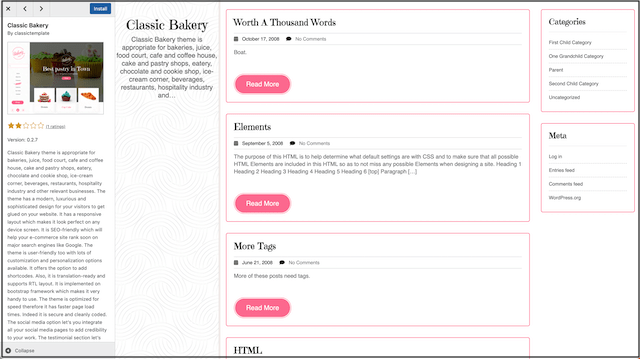
If you like the look of a theme, then you can click at the top Install to add it to your library of WordPress themes. If you're sure this is the one, you can click Activate to apply the theme to your site.
While the themes in the WordPress Theme Directory are free to install, some come with options you have to pay for.
These often include help documents, advanced features and ongoing performance and security updates. Because WordPress is a top target of hackers, the security updates alone are worth the cost.
Paying for the premium version can also give you access to help from the theme's creator if you run into trouble.
For example, the 'Classic Bakery' welcome page includes Premium Demo and Go to Premium links, where you can learn more about what's included in the Premium tier and buy it if you like what you see.
Choosing from the WordPress Theme Directory helps ensure that your WordPress theme is:
- Secure
- Well-coded
- Up to date
But they're not your only option.
You’ll find a great variety of paid WordPress themes from developers on sites like TemplateMonster, MOJO Themes and Envato Market.
You can also check out WordPress e-commerce theme providers like WooCommerce and InkThemes.
Alternatively, you might have downloaded a free or paid WordPress theme elsewhere, saved on your computer as a .zip file. You can click Upload Theme and upload the .zip file. Click Install now, wait for the theme to install and then click Activate to apply it to your site.
Once again, keep in mind that if you choose a free theme, the theme's creator is unlikely to offer regular updates or tech support to help you get (and keep) everything running smoothly. If you're paying for a WordPress theme, be sure to ask about your support options before you buy.
When choosing a theme, don't just consider the style. Also, consider:
- The layout and navigation options.
- Whether or not it’s responsive, or mobile-friendly (this is a deal-breaker).
- Features like custom background, footer widgets, right-to-left language support, etc.
With your theme in place, you’re ready to create a website that will look unlike any other site online.
4. Customise your WordPress theme
Once you've installed and activated a WordPress theme, it's time to dive into the settings and make it your own.
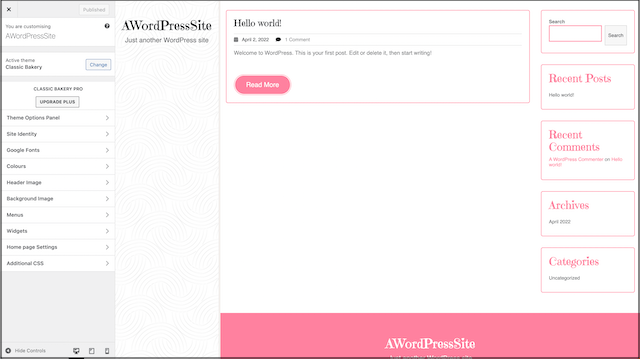
In your WordPress dashboard, start by clicking Customise under the Appearance menu on the left.
Adding your logo
Here you can click Site Identity and select a logo for your site. You can choose from a wide range of stock photos, upload your own logo or look through your Media Library of images you've already uploaded.
The maximum file size and dimensions for your images are 100 MB and 100 by 100 pixels. It's important to stick to these recommendations to ensure that your images look great on your site.
Related: How to make a logo in 6 steps
Changing the title and tagline
From the Site Identity menu, you can change the Title and Tagline of your website.
You can also upload a 512 by 512 pixel Site Icon which visitors will see in their browser tabs, bookmark bars and within the WordPress mobile apps.
Colour and imagery
Going back to the Appearance menu, you can also add your own Header image and background image, as well as change the colour scheme.
It's okay to play around with the options to see how your website will look. The changes won't come into effect unless you click Publish.
Setting your menus

Click Menus to control how visitors navigate their way around your site.
If your theme doesn't have any menus by default, click Create New Menu to make one. Give the menu a name like 'Navigation,' tick Primary Menu and then click Next to start adding links to your new menu.
Start by adding a Home link, then later you can add links to other pages as you create them, such as About Us and Contact. Ticking 'Automatically add new top-level pages to this menu' will save you some time here.
By default, the new menu is located down the left side of your site. Going back to the Menus menu, you can click View Location, select your menu and then experiment with options if they're available.
The Classic Bakery theme only lets you place the menu on the left, while other themes might let you choose on the right, or across the top.
5. Choose your WordPress plugins
While WordPress is already jam-packed with great features, adding plugins make it easy to add more to your site. They're great for customising your site and ensuring it meets all your needs. Many plugins are free, often with a premium option.
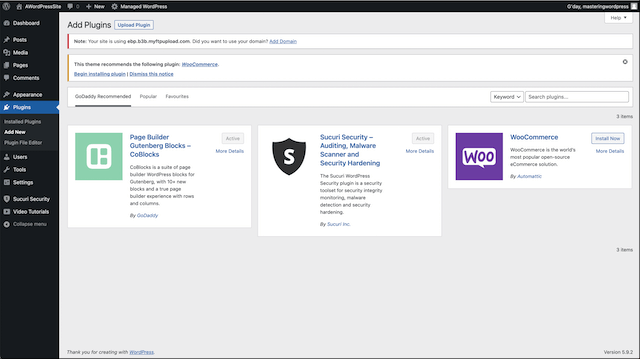
Clicking on the Plugins tab in the WordPress dashboard lets you see which plugins are already installed. It also makes it easy to find and install more. To get you started, you can explore:
- GoDaddy Recommended
- Popular
- Favourites
Choosing the right plugins for your WordPress site depends on the purpose of your site.
If you're building an e-commerce site for selling things online, the WooCommerce plugin makes it easy to create and manage an online store. It will help not just build your frontend pages but also handle the backend, such as payments and inventory management.
If you're starting a blog, the Akismet Anti-Spam plugin automatically checks comments and contact form submissions against a spam database, to block them from publishing malicious content.
Regardless of the purpose of your website, there are a few WordPress plugins that can improve any site.
Element & WPForms
Element is a drag-and-drop website editor, which makes it easy to build great-looking pages for your site. Meanwhile, WPForms lets you create a contact form so that you can connect with people who visit your site.
Yoast SEO
Along with impressing human visitors, you also need to consider search engine optimisation (SEO), which helps your site rank higher in search results. The Yoast SEO plugin is specifically designed to help you improve your on-page SEO to drive more organic search traffic to your website.
Sitemap plugins
Once you've created all your pages, creating a WordPress sitemap helps visitors and search engines better understand the structure of your site.
Yoast SEO also helps with sitemaps, or you can look to alternatives like All in One SEO and Google XML Sitemaps.
Analytics plugins
Finally, the MonsterInsights plugin makes it easy to connect your WordPress site with Google Analytics, so you can see how visitors are finding and using your site.
Speed plugins
Don't go overboard, as each plugin can make your site run a little bit slower. To speed things up, the Smush plugin optimises your images while maintaining their quality. The WP Super Cache plugin can also help reduce page load times.
Glossary
While it's easy to create a great website with WordPress, sometimes the jargon can get a bit confusing.
Here are a few terms you might run into when building and running your site:
Hosting
The place where your website is stored online and a requirement for anyone who wants a website. GoDaddy offers a range of hosting options depending on your needs.
Domain name
The address people type in to find your website, for example commbank.com.au or woolworths.com.au. GoDaddy makes it easy to buy the perfect domain name for your site, as well as create email addresses based on your domain name.
Related: 10 tips for choosing the perfect domain name
Dashboard
The dashboard is the nerve centre of your WordPress website, letting you manage every aspect. The dashboard can’t be seen by visitors; you need to log in see it using a link like YourDomain.com.au/wp-admin/.
Block
When you're creating your WordPress site, a block is a distinct structural element on a page or post. Blocks make it easy to add and edit specific types of content such as:
- Headings
- Paragraphs
- Tables
- Images
- Videos
- Galleries
Widget
A widget is a modular pre-configured block which can be dropped into specific areas of your site, making it easy to add elements like menus, sidebars, headers and footers.
Landing page
Rather than send every visitor to your home page, you can direct different people to different landing pages by using separate URLs in ads and social posts. This way, you can give them exactly what they want.
For example, you might create different landing pages depending on whether you want visitors to sign up for a service, buy a product or join a mailing list.
Why WordPress?
WordPress is a powerful and flexible CMS with a wide range of third-party support. It’s an open source project, which means it’s not owned or sold by any one company — in fact, the platform itself is free. An army of developers around the world continue to improve WordPress, contributing their time and expertise for a community effort.
WordPress is the perfect foundation on which to build a business website or online store, since those developers have created plug-ins to make WordPress do all sorts of useful things like:
- Add contact forms.
- Connect your website to Google Analytics.
- Collect email newsletter signups.
- Button up your website security.
- Backup your website.
- Manage inventory.
- Accept payments.
- Handle product shipping and fulfilment ... and much more.
While WordPress is free, keep in mind that you will still need to pay for website hosting, a domain name and an SSL security certificate. Certain plug-ins also entail paying a fee.
Start your WordPress website now
WordPress is for much more than blogging. It's flexible enough for anyone to build a great website to meet all their needs when doing business online.
It's not hard to get a WordPress website up and running — especially if you use your hosting provider's pre-configured WordPress option. These take the hassle out installation and configuration. With this taken care of, you can get on with the task of finding the perfect theme and building your gorgeous new site.
UPDATE: This article on how to build a WordPress website was first published on 12 December 2018 and updated 21 July 2022.

