Creating a website is a wonderful way for entrepreneurs to promote their businesses and bring in new leads. Once you make a website, you can gain new customers 24 hours a day, 365 days a year. New clients can inquire about your services, book sessions and buy products whenever, wherever and however they like.
eCommerce in Canada is on the rise. By next year, 10 percent of the country’s $352-billion retail purchases will be made online.
This number will only continue to grow.

Those long, cold Canadian winters might be a contributing factor, but shopping online is easy. It starts when we get swept away by a sponsored Facebook or Instagram ad. One harmless click leads to a website, which quickly transforms into eShop browsing and eventually a purchase. And then we’re counting down the days until the new cashmere sweater we couldn’t say no to arrives by courier.
When we get our item, we’re keen to notice the packaging. Does it mirror the feeling we got when we were browsing the site? Are there any extras with the sweater, like a tote bag or a thank-you card?
That first experience will either turn your customer into a one-time shopper or a loyal brand ambassador.
Believe it or not, many Canadian entrepreneurs are reluctant to add a dazzling website with eCommerce functionality to their business strategy. But the truth is, online shopping transcends geographical boundaries. We can buy Icelandic jewellery, Australian pottery and American-made leather handbags anytime we like.
By creating a website, you’re putting yourself out there, increasing your competitive edge and opening yourself up to the world. You never know who is going to stumble upon your site.
Related: Why do I need a website for my business?
Toolbox:
Website planning checklist
Quick guide: Build a website yourself in 6 steps
Cheat sheet: Make a WordPress website in 5 steps
How to make a website in 5 steps
This is a comprehensive guide to beginning a website. From start to finish, we’re on this journey together. We’ll touch on marketing, design, sales and helpful tools that will make running a website a breeze.
These five steps will give you the foundation to make your online debut a success. Come along as we learn everything from choosing a name to optimizing your new site for search engines (SEO) to using email and social media to bring in new customers.
Step 1. Plan your website
Estimated time: 5 to 7 hours

Hockey legend Wayne Gretzky once said, “You miss 100 percent of the shots you don’t take.” The Great One knew the importance of identifying goals and creating a plan to work towards them.
Let’s start with a few questions
As you sit down to make your plan, ask yourself the following questions:
Who are my competitors?
Create a list of five or more similar businesses and use Google to find their digital footprints. Look at their websites and social media accounts. You want to get a feel for their online presence.
What do their websites look like?
When you’re exploring their websites, imagine that you’re a first-time customer who has just stumbled across the site.
- Think about the functionality. What works? What doesn’t work?
- How engaging are the photos and text?
- Does the site have everything you need or are you filled with more questions than answers?
- What jumps out at you?
Make a list of pros and cons. This list will give you a competitive advantage as you create a new, fresh website. You can come out on top.
How can I differentiate myself?
Now make a list of what makes your business different. If you’re launching a website for a beauty product line, think about what makes your product one-of-a-kind.
- Is it the biodegradable packaging?
- Are your products ethically sourced?
- Are they designed, made AND packaged in Canada, to give it that 100 percent Canadian craft appeal?
By focusing on what your business cares about, you can attract customers who care about those things as well.
Next, identify your goals
The Green Kiss is a great example of a company that has strong goals and values.
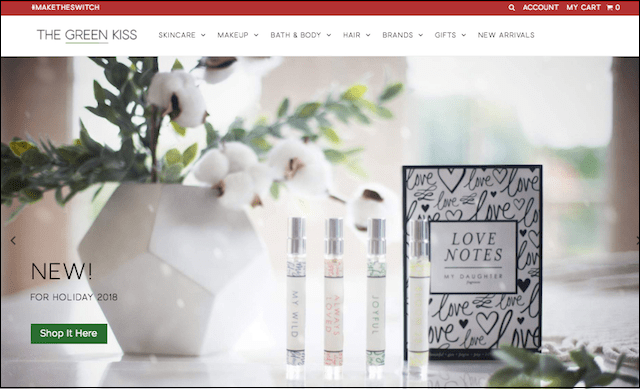
As stated on the beauty company’s website:
“Our promise of natural beauty goes above and beyond the industry standard, and we are proud of it. Our guidelines allow for only the most natural, ethical, and synthetic chemical-free products available. We curate our store by hand and each item is tested by our team of professional makeup artists for effectiveness and results with daily wear. This ensures that everything you buy from us meets and exceeds your expectations. You want to look beautiful, take care of your skin and make your health a priority. Our purpose is to make that as easy as possible.”
The Green Kiss makes their point of differentiation crystal clear.
The Green Kiss’s hashtag, #MakeTheSwitch, acts as a call to action. They’re encouraging readers to do something. And that something consists of buying healthier cosmetics. Their purpose is so clear that their loyal customers can easily communicate the company’s story and mission to others.
This is what you should aim for as you plan your new website.
A few additional tips for creating goals:
Be specific
If a goal is too broad or not well-defined, it’s harder to achieve. Specific isn’t “Sell more stuff.” It’s “Increase sales by 5 percent by the end of this calendar year.”
Set benchmarks or “mini-goals”
Create short-term and long-term goals. By establishing what you want to achieve and when, you’re able to measure your growth and success. This can also help you identify areas of improvement.
Be realistic
Jot down what you think you can achieve and make note of what you want to achieve. A person running a business alone isn’t going to sell $1 million in their first year. If you’re honest with yourself about your goals, you’re more likely to reach them.

Reflect
Ideas are often born out of reflection. By thinking about your website and the outcomes you want from it, you can create the customer experience you want to create.
Take a stroll through a park. Find a quiet place in your house. Or slip into the white noise of a café. While reflecting, you can dream big. You never know when and how these big ideas will fit into your plan, but at least you have them ready when needed.
Now that you have your goals, know your competition and have some points jotted down for what you want to achieve, let’s look at your target audience.
Related: It pays to plan before you make your own website
Understand your audience
You can’t be everything to everyone. Nor do you want to be — that would be exhausting. By clearly understanding and identifying your primary and potential audiences, you’re able to focus on the types of customers who are most likely to buy from you.
If you were launching a children’s clothing store, your primary audience would be parents and those who are expecting.
Your potential audience would be much larger than the primary audience. It includes grandparents, aunts and uncles — those close family members who pamper the new addition to the family with cute kid apparel. The audience radiates from there and reaches friends, extended family members and coworkers.
Identifying your target buyers

When a raindrop hits a puddle, rings ripple away from the centre. The rings get larger as they spread out.
Imagine that each individual ring is a segment of your pool of likely buyers. Think of the children’s clothing store example. The centre of the ring would be your primary audience, parents and those who are welcoming a new addition to the world. The next ring would be your secondary audience — grandparents, aunts and uncles.
Now, write down your primary and secondary audiences. Once you have them listed, complete the following for each:
- Age and gender (e.g. Men and women over the age of 24).
- Interests and hobbies (e.g. Hockey).
- Geography (e.g. Vancouver, British Columbia).
- Personal characteristics (e.g. Athletic, outdoorsy, independent).
- Profession and income (e.g. Business and sales, more than $45,000 a year).
- Education (e.g. University).
- Housing (e.g. Rental).
- Transportation (e.g. SUV).
This little exercise will help you tailor your messaging and make every communication personal. As a result, recipients will be more likely to act, be it by buying, sharing or subscribing to your monthly newsletter.
Tone of voice
Every website has a voice. The moment you start reading, you immediately pick up the tone. Let’s say your products are socks. Should the tone of your website be:
- Humorous?
- Serious?
- Playful?
- Imaginative?
Are the socks you’re selling vintage, Canadiana, contemporary — or all three? What type of person is likely to buy what you sell, either for themselves or someone else? Once you understand this, you’ll be able to speak directly to new and returning customers in words, photos and videos they understand.
The art of the hook
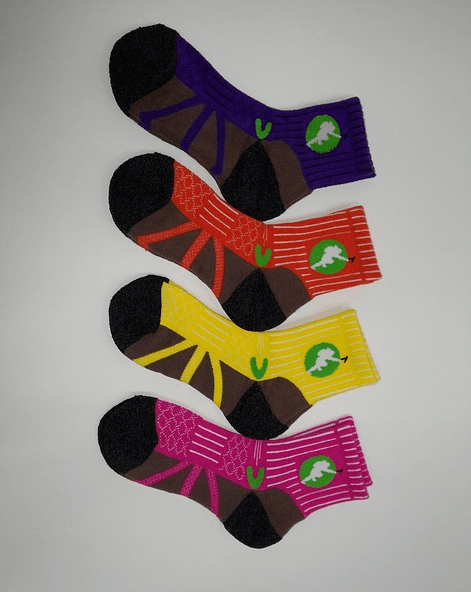
To grab your audience’s attention, you’ll need to master the art of the hook. That short description that equally informs, entices and encourages an action. Consider the following options as an example:
Option 1: Try our bamboo-blend men’s socks. There are 16 colours to choose from and they’re available in every size.
Option 2: Woven with the skill of Rumpelstiltskin himself, these soft organic bamboo socks will provide a guaranteed 24 hours of comfort. Long days have never felt so good. Colours change seasonally, and go fast! Available for a limited time only.
Which message do you think would appeal to your audience? Experiment with different messaging to see what works best. The more you become familiar with what hooks your customers, the easier it’ll become.
Choose a domain name
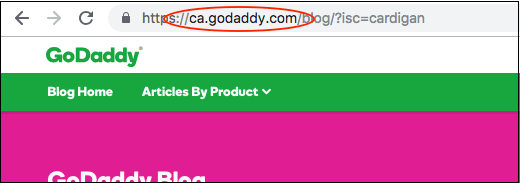
Domain names (e.g. GoDaddy.com) are extremely important. Your domain will serve as your web address, so you’ll want it to be good. Think of it as an identifier that will help people find you online.
.com is the most famous option here, but not the only option.
If the primary objective of your company is to sell your services and products to Canadian customers, consider a domain ending with .ca. This geographical identifier will drive Canadian traffic to your website and it make it easy for locals to remember.
But you also have many other options. If the focus of your site is primarily eCommerce, why not end your domain name with .store or .shop? There are hundreds of new domain extensions — including .quebec — and they give you the chance to get a domain name that’s closely linked to your brand.
These new options haven’t been around as long as .com, so there are still plenty of great names available. You can find the complete list of domain extensions here.
Check to see if the domain you want is available now
Extensions aside, your domain name should have your business name or flagship product right in it and be catchy enough to hook your audience. Easy, right?
Here are a few more tips you should consider when searching for your ideal domain name:
Keep it simple
If your No. 1 choice for a domain name is taken, don’t add an extra letter at the end to make it work (e.g. shoess.ca). It looks like a typo and your audience might not remember that you altered your company name.
Short is sweet
Unless your company is literally called The World’s Best Clothing Company, your domain name shouldn’t be TheWorldsBestClothingCompany.com. The shorter it is, the easier it will be to remember correctly. But it also has to be accurate and linked to your company.
Incorporate keywords
If it’s possible, try to include keywords related to your products or services. Not sure about the right keywords for your particular business? This terrific post explains it all.
Ditch numbers and hyphens
Only include numbers if they’re a part of your company’s name (e.g. Corso 32) and never use hyphens. Avoid using the year at the end of your company (e.g., CatCafe2018.com). The easiest way to date yourself is by including the year you launched your website.
Do your homework
Your first idea isn’t necessarily your best idea. Test out your top domain name ideas with your friends and family. Think of them as a focus group for your success. You can also try one of the business name generators here for ideas.

Dare to be different
Your domain name should reflect your brand, and chances are your brand is unique. Let your creativity shine.
Once you find a great name that’s available, don’t wait too long to make up your mind. There are hundreds of domain names being registered every day. The longer you wait, the more likely it is that your ideal domain name will be scooped up.
If that happened already and the domain is not available, you can always try to look up the owner of the domain with GoDaddy’s WhoIs tool. Then just email them to ask if they would consider selling the domain.
Look for design ideas
By this point, you have:
- Locked down your goals.
- Gained a solid understanding of your audience.
- Registered a domain name.
You’re getting antsy and want to jump right in to designing your site.
Hold your horses. We’re not there yet.
Remember when I mentioned looking at your competitors’ websites and seeing what they’re offering? Now it’s time to dig a bit deeper.
As you’re navigating a competitor’s website, look for the following:
- Fonts or typefaces that speak to you.
- Appealing colour palettes.
- Calls to action that grab you.
- Multimedia integration. Are there videos? Are there infographics? How are photographs used?
- How many pages are there? Too many? Too few?
- Is it easy to find your way around? Or are you having to pause and figure out where to go?
- Is it a quick read? Or is it the equivalent of Tolstoy’s “War and Peace?”
- Open the site on your phone or tablet. Is it just as easy to use there as on a desktop?

Overall, how does the site make you feel? If you’re inspired, let it empower you to create a remarkable website of your own.
The main objective of thinking about the functionality and appeal of a competitor’s website is to make informed decisions about your own website design. By making notes about what works and what doesn’t work, you’re armed with information that will prepare you as we move forward.
FYI: Trends are trends for a reason. They come and they go. What works now might not work three years from now. Be prepared to embrace change, because your audience will change. And so will you.
Recap: Plan your website
Let’s review the first phase of starting a website:
- Check out the competitors’ websites.
- Write down your goals.
- Understand your audience.
- Choose a domain name.
- Explore and bookmark design ideas.
Step 2. Choose between DIY and DIFM
Estimated time: Depends! Do it yourself and your site could be up in a few hours. If you hire a pro, it could take a week to a few months, depending on what you want.
We live in an age when literally anyone can build a website. If you like saving money, there are numerous do-it-yourself (DIY) website builders to choose from, not to mention the hugely popular WordPress.
For those who don’t have the time or interest in building a website themselves, there’s the Do It For Me (DIFM) option of hiring a web professional.
Let’s look at each of these options in detail.
Related: How to open an online store
How to make a website yourself
You’ve looked at your competitors’ websites and have wondered, how do I do that? You have all the necessary elements documented to move ahead and begin. But how?

Consider this juncture a fork in the road:
- One path encourages you to dive right in and do-it-yourself.
- The other path involves hiring a professional to create the website of your dreams.
There are pros and cons to each, and different ways to approach each path.
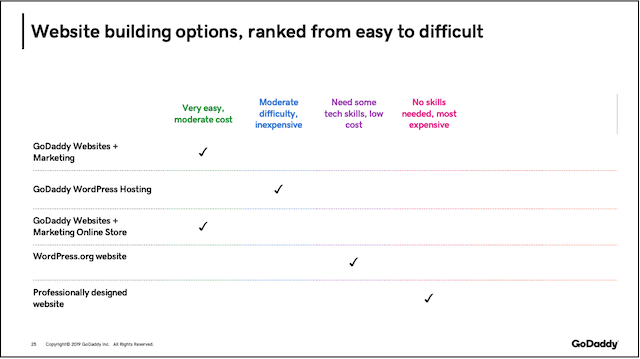
Do-it-yourself website builders
Building a website is a lot of fun. If you’re looking to do-it-yourself, there are a few avenues you can take: Use one of the many easy website builders on the market or DIY with WordPress.
Easy website builders
Perfect for: Getting a website or eStore up quickly with no tech skills.
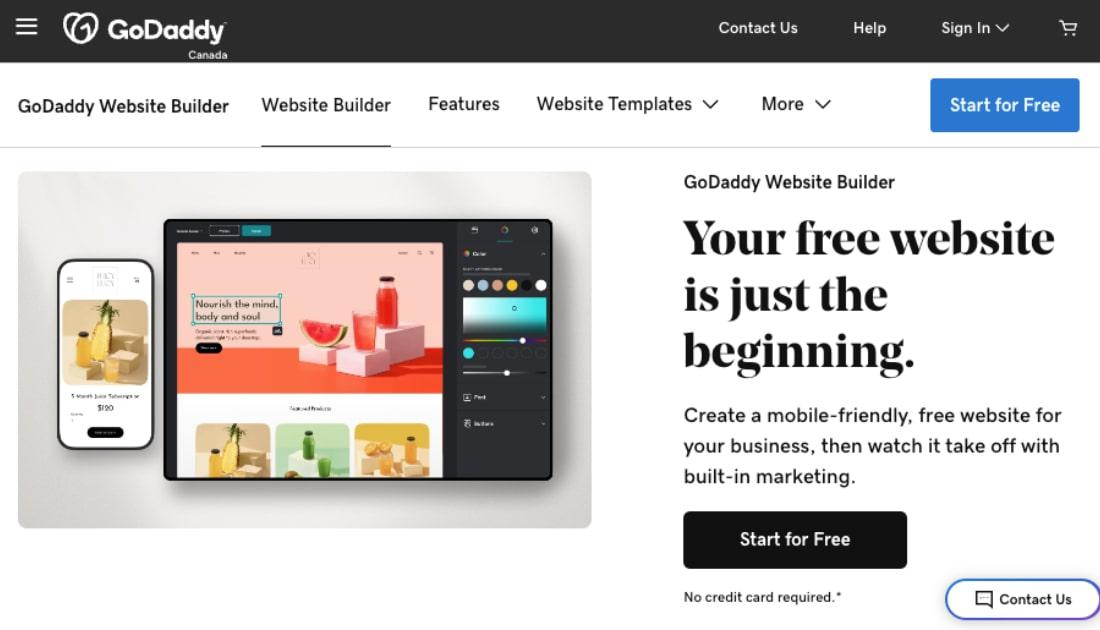
On a scale from 1 to 10, how would you rate your technical skills? If you’re not feeling confident and want to launch a site immediately, consider GoDaddy's easy site building tool, Website Builder.
GoDaddy Website Builder has a free 7-day trial so you can try it risk-free.
With GoDaddy Website Builder, you just answer two questions and the builder provides a completely customizable template for you to start tinkering with. All you need to do is swap out the text and pictures with your own.
GoDaddy Website Builder includes:
- A large gallery of free, high-resolution Getty photos.
- A blog (optional), along with email marketing and easy social media integration.
- Reliable web hosting.
- SSL encryption to keep your site off Google’s blacklist.
- Award-winning 24/7 help if you need it.
Related: Check out this post on what is web hosting.
The swipe-to-style builder gives you that professional, polished site even if you’re not a world-class coder. And you can be sure your new website will look and work great on any device — from smartphone to tablet and desktop computer.
The wonderful world of WordPress
Perfect for: A highly customized site; requires some time, effort and web hosting.
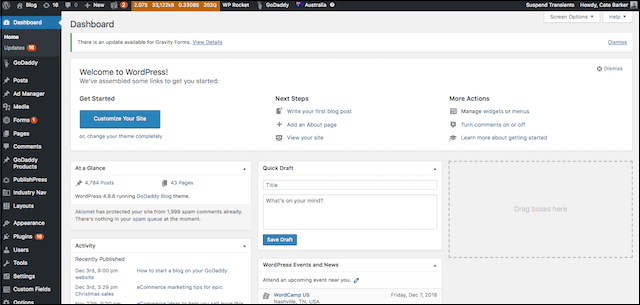
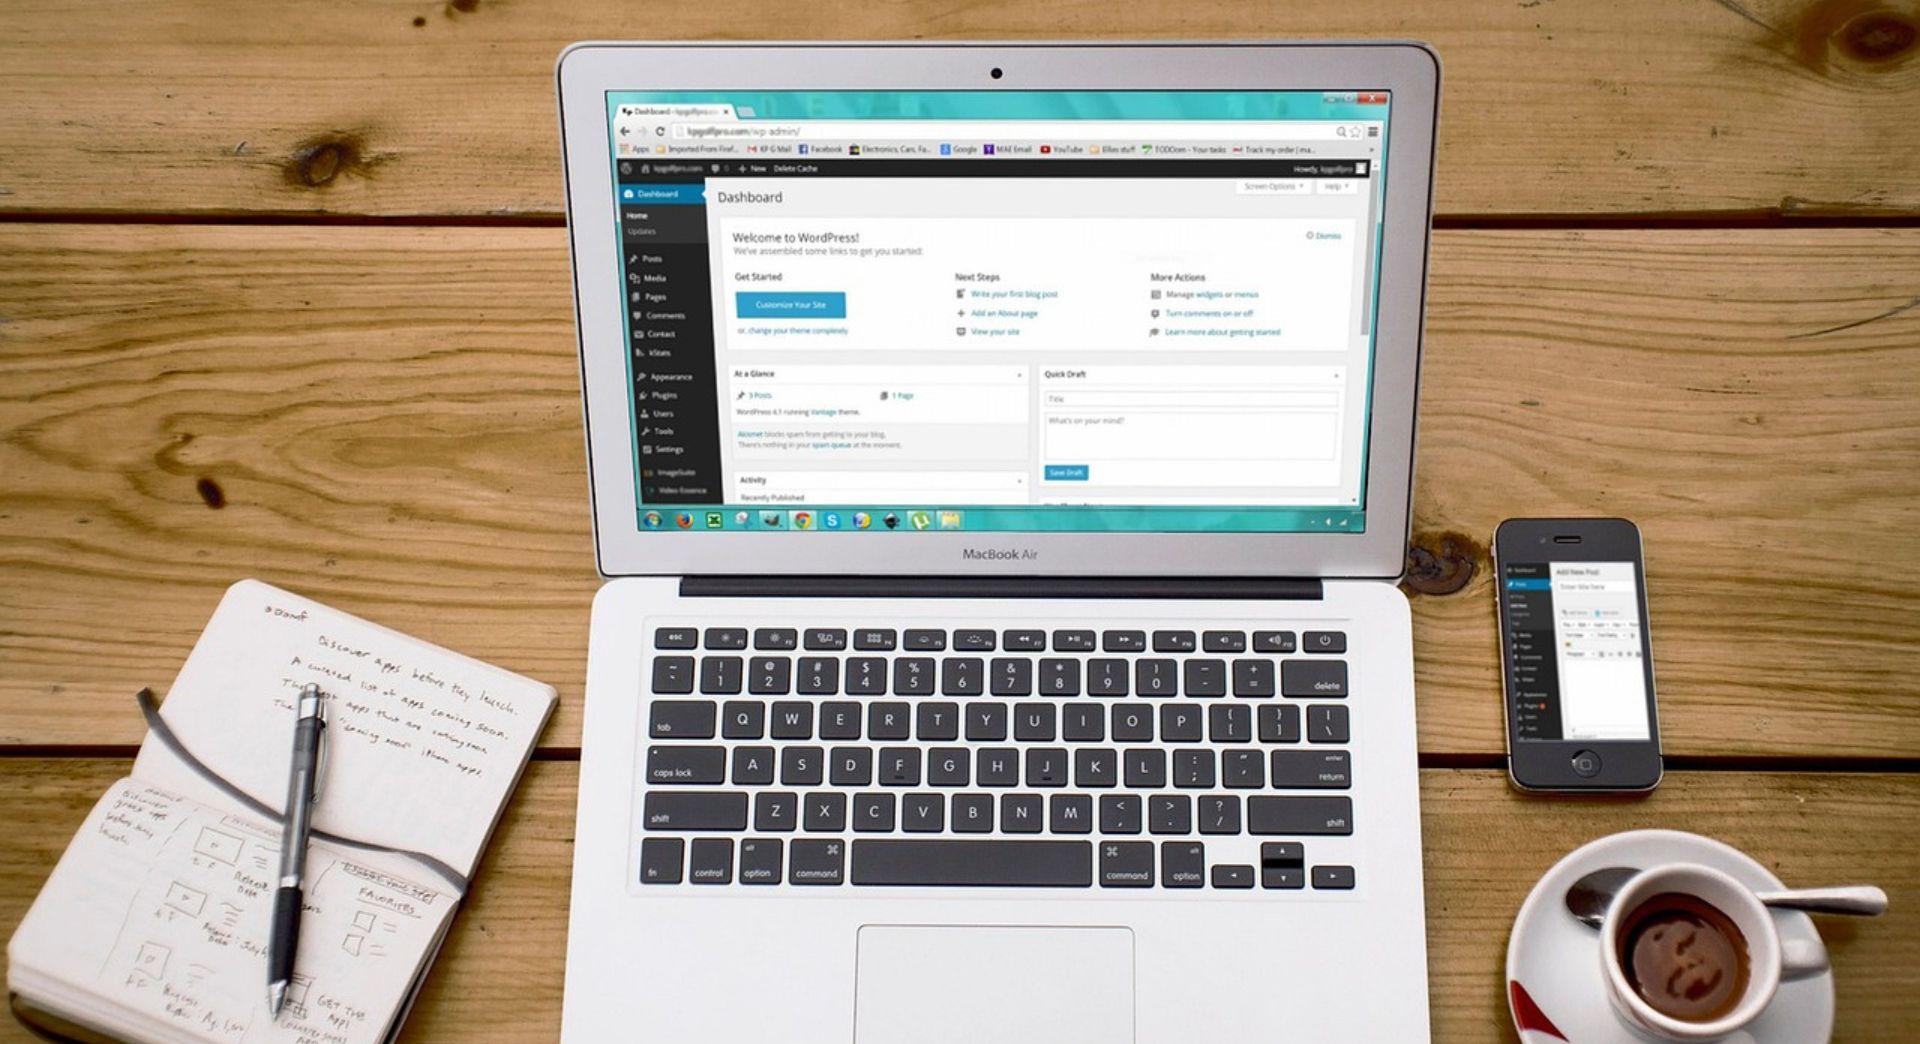
If you’re the type of person who likes to get your hands dirty, WordPress is the ideal builder for you. It’s the most popular content management system (CMS) in the world, used both by Fortune 500 companies and small startups eager to get their companies off the ground.
People love WordPress because:
- The builder itself is free from WordPress.org (although you will need to pay for a domain name and web hosting).
- It provides endless flexibility to create a one-of-a-kind site via plug-ins.
- There are thousands of themes (i.e. pre-coded website templates) available, both free and paid.
Please note that WordPress doesn’t come with customer support, although there is an active global community ready to help.
Not technical but still want the power and flexibility of WordPress? Check out Managed WordPress from GoDaddy. You get all the fun of WordPress without any of the technical upkeep. Includes 24/7/365 help.
9 tips for the do-it-yourselfer
Before you fire up that site builder, make sure the website you ultimately build will be usable on multiple devices.
If you decide to use WordPress, you’ll need to choose a theme that is responsive so it automatically adjusts to fit your visitor’s screen (not all WordPress themes are mobile-friendly). For those using one of GoDaddy’s builders, all themes are responsive, so you’re safe.
With more and more Canadians using mobile devices, it’s not worth building a website that can’t be used on them.
A few more tips as you begin to design your new site:
- Think of your website as a canvas. Don’t clutter it. Keep the design clean and straightforward.
- Select a colour scheme that matches your company brand or logo colours. If you need one done in a cinch, GoDaddy's free logo maker has hundreds of design templates to choose from.
- Use crisp, clear photos — you don’t need a high-end camera. Smartphone photos can produce stunning images that are website-ready. It just takes practice.
- Don’t use more than two or three fonts or type styles for your website. Choose ones that are easy to read. And as a rule, never use Comic Sans.
- Website navigation should be easy to understand. Figure out the five or six things customers will want to know first — services, pricing/shop now, location, etc. — and make these your menu options.
- Create quality content. Make the time to answer customer questions everywhere — on your website, in blog posts and in conversations on social media.
- Be easy to find. You can choose how you want to be contacted — email, phone, Facebook — just make sure your contact information is on every page of your website.
- If you’re on social media, your web pages should prominently feature clickable links to your business profiles.
- Optimize for search engines like Google.
A custom-designed website
If your plate is full with the day-to-day obligations of running your business and you have the budget for website design, finding a professional website designer is a great alternative to the do it yourself model.
Think of a web designer as an extension of your team. You pay them for skills you don’t have.

Web designers are experts in their fields and they know what trends are on the horizon. As in every field, there are best practices. Just as the digital landscape is always changing, so is web design.
Before jumping in with both feet, test the waters and do some research. Consider all of the options, including Website Design Service from GoDaddy (which comes with a custom free domain). They’ll create, host and update your site quickly and affordably. Plus, it Includes 24/7/365 help and a free domain name with any annual plan.
It’s a service you’ll be saying ‘thank you, thank you, thank you’ for, as you concentrate on your business.
Here are a few questions to mull over as you research website designers and design companies:
- Who have they worked with? Do you like the websites they’ve created?
- Are they team players? Are they quick to respond to requests? Check customer testimonials for both of these.
- What are the initial costs for building the site you want?
- Will they maintain your website? If so what are the costs?
- Can you make changes to the site yourself? Or will you have to send even small additions to the designer?
- What services do they offer — writing, graphic design, coding, SEO, social media marketing, photography? Are these services done in-house or do they outsource and hire freelancers?
- How well do they understand your type of business? Have they worked for similar businesses?
- Do they guarantee your website will look and work great on any device, whether smartphone, tablet or desktop computer?
It’ll feel like love at first sight when your chosen web designer answers the questions above in such a way that you feel satisfied and confident that they’ll deliver exactly what you’re looking for.
Pro tip: Make sure your web designers aren’t spreading themselves too thin. If it looks too good to be true, it probably is. Doing it all doesn’t mean doing it well. Quality over quantity; always.
Recap: Choose between DIY and DIFM
Before you move on to the next step, make sure you’ve completed these tasks:
- Decide whether to design the website yourself or hire a professional.
- If you opt to create the website yourself, will you use an easy site builder or WordPress?
- Before choosing a web designer or company, make a list of must-haves. Then do interviews.
Step 3. Fill your new site
Estimated time: A few days
Next up? You’ll need to create, gather or ask for the content that will go in your website. This includes:
- Written product descriptions, your business story and calls to action.
- High-quality photos of your products, services and staff.
- Videos (e.g. How-to, unboxing).
- Forms for contacting you or requesting an estimate.
- Interactive features such as an online appointment scheduler or customer portal.
- Images of awards you’ve won.
- Customer reviews.

Think of the type of content that propels you to sign up for a newsletter, impulsively buy a pair of pants or share a company’s Facebook post. What moves you to action — a video, a blog post?
As you reflect on your own behaviour, you’ll begin to understand consumer habits. Ask your colleagues and friends why they do what they do online. Sometimes it’s the way a product description makes them feel. Often, it’s a great review from a customer.
Compelling words and stunning photographs are a winning combination.
If everyone buys for different reasons, you’re probably wondering why you’d invest time in crafting content for your website. Through content, you’re putting your best foot forward. You’re telling your story, reinforcing your brand and giving your customers something to engage with and think about.
Content is also the way you woo search engines — the secret to long-term business success.
Start with a good story
We all love stories. By telling yours on your website, you invite first-time visitors to connect with you personally.
To write your story, explain why you started your business in one paragraph. The more personal, the better.
Next you should:
- Pull together whatever resources you already have — photos, podcasts, articles about your company, videos of your products being made or of you and/or your team in action.
- Write complete descriptions of each of your services/products (get tips here).
- List the ways your company impacts the community, environment or your industry.
- Ask for reviews from your current customers (be sure to ask for permission to share these online).

Where you slot this content into your new website is up to you. Just be sure your new site includes at least these five core pages:
Home
The Home page is usually the first thing visitors see. Think of it as a first impression. It needs to be welcoming, informative and inspire your guests to act — be it by following you on social media, buying a product or requesting a service. Be sure to include all your contact information here. This page should have a call to action such as Shop now or Book an appointment.
Pro tip: This is a good place to show off your three best customer reviews.
About Us
The About Us page is where your business story goes. If there’s a lot of rich history, you might want to create a timeline with archival photographs. If your company is new, talk about why you started and what you hope to achieve. Focus on what makes you different from other similar companies.
Products/services
If your goal is to make sales, this is the page that deserves the greatest investment of time. Be sure to balance photography with good descriptions and incorporate important need-to-knows (e.g. how to care for clothing items, how long to allow for a particular service, etc).
Reviews
Customer reviews are very powerful so you’ll definitely want to include them on your website.
People trust reviews almost as much as they trust advice from friends and family.
Keep in mind that reviews only build trust when they’re authentic and honest. New customers can spot fake reviews in seconds.

One fun way to include reviews is to feature photos of customers using your services or products. If they’re happy, you want them telling the world about it via social media (and on your website).
Contact Us
Here you should list all of the ways your customers can get in touch with you. Use a form to collect information about who’s trying to connect, including their contact information.
But don’t solely rely on the form. Include your email address, phone and physical address (if relevant) as well, just in case the form has a glitch.
Create meaningful content
You’re the perfect person to create content for your website. You know your business inside and out. If you doubt your writing chops, push those thoughts aside. You have everything it takes to create wonderful content.
Here are a few tips to get you started:
Audience
Direct your writing to your audience. Every word on your website is for them. Be clear, concise and speak their language. Use terminology they will understand.
Voice
This is an extremely important part of writing. The voice of your content needs to be true to your brand, but it also needs to resonate with your customers. It’s a balancing act.
Let’s say you’ve opened a yoga studio. The general assumption about yoga is that it’s peaceful, calming and mindful. Your writing voice wouldn’t be fast-paced like an auctioneer. Stick to your brand, and you’ll find your voice.
Layout
Your website gives you the flexibility to break up your content with images and lists. If your site is word-heavy, utilize white space to break it up.
Get creative
Online reading habits differ from print reading habits. When reading online, we tend to skim, instead of diving into several paragraphs of product description. Keep it short and relevant. Get creative with your words and have fun with your style.
Photos and video
Powerful photos and videos can take your website to the next level. If you’re operating an online store, quality photography is essential. Your customers want to see what your products look like and how they work.
Don’t be afraid to get creative with your photography — especially if you have a clothing line.

There’s just one rule for photos: quality over quantity. You can take hundreds of photographs, but if they’re poor quality, using them on your website can do more harm than good. A strong brand relies on stunning photography. Ensure that your images are in focus and that they don’t have fingerprint smudges.
Video also increases your customer’s connection to the product because it brings them a little closer to it. In the case of clothing for example, video can be used to demonstrate how the dress shirt fits the model’s body as she walks, how the fabric hangs and moves. You’ll notice that clothing retailers are taking a triple-threat approach (text, photography and video) to content creation.
Pro tip: As a general rule, avoid using stock photography or YouTube videos. It takes away from the authenticity of your brand. When you use original photography and video, visitors see things on your site they can’t see anywhere else. They’ll connect with you on a deeper level.
BUT if you feel like you really need to use stock photography, there are a number of sites to choose from, such as Stocksy, iStock and Can Stock.
Related: 9 types of video content to help move customers through the sales funnel
Hiring someone to create web content
Don’t have any time or interest in writing, photography or videography? You could outsource these tasks by hiring freelancers through sites such as UpWork or Fiverr. If you’re working with a professional web design service, they might offer these services for a fee.

Pros of outsourcing:
- Frees up time to focus on other aspects of your business.
Cons of outsourcing:
- Finding the right freelancer might take time; you could go through a few to find the right one.
- It costs less to produce the content yourself.
- You might have to edit or redo parts of the piece to get it right.
- There’s always the possibility of the freelancer missing the deadline or asking for an extension. This could set your plans back.
Pro tip: Introduce the freelancer to your company as you would a new employee. Establish brand identity guidelines that detail the tone and rules you’d like them to follow. Provide your freelancer with important keywords for SEO.
Recap: Fill your new site
This part of the process will take some time but is worth every minute you spend on it.
- Write your story.
- Pull together photos, videos and other content you already have.
- List the pages you’d like your new website to have.
- Decide whether to create your own content or hire a freelancer.
Step 4. Selling online
Estimated time: A few days
Whether you’re a seasoned sales veteran with a brick-and-mortar shop or just starting a craft business from your kitchen table, you’re going to want to understand eCommerce.
Convincing people to try your product or service on the web isn’t like standing in front of them and making your pitch.

Your strategy needs to be strong to retain current customers and attract new ones.
Related: What it takes to open an eCommerce store in Canada
The importance of great visuals and descriptions
Your products or services are the heart of your online store. So it’s vital that your website feature high-quality images and persuasive descriptions. These two elements alone can make or break an online sale.
In order to really succeed, you have to find a way to communicate your products and services. This is done through compelling photography, captivating product descriptions and video.
Here are a few photography tips:
- When possible, use natural light. Photograph your product near a window (avoid direct sun).
- Try various styles and depths, such as flatlays. Always shoot in landscape and portrait modes.
- Start by using your smartphone, then slowly invest in equipment such as tripods, lights and flashes.
Your products have a certain look and feel. When writing descriptions, tap into your company’s tone and use language that will grip your audience. You don’t need to get too specific or technical.
Think about the feelings your products exude.
The raspberry galettes you’re selling smell, look and taste wonderful, but what else do they evoke? Is it summer on the Seine … or tea and a good book on a snowy day? Try to understand why your customers would want to buy your products.
Payment processes
Selling from your website requires a few key things: a payment gateway to process payments, SSL encryption to hide bank details from hackers, etc. Fortunately there are many easy ways to get them. A few tips:
- Offer multiple methods such as PayPal, credit cards, debit cards and Apple Pay.
- Keep the payment process simple, collecting just the info you need. Too many hurdles will deter a sale.
- Include coupon and discount options.
- If you have technical skills, you can install a free SSL certificate. Otherwise, you’ll need to buy one.

When the transaction is over, say ‘Thank you’ — both on the screen and via email when your site automatically sends the customer’s receipt. It’s a courtesy that goes a long way and the customer can rest assured that their purchase was received.
Related: How to process online purchases on your website
Shipping
Knowing your audience means knowing their shipping preferences. Depending on the size of your company, you might be able to offer free shipping — a very powerful incentive for today’s buyers. If this isn’t possible for your business, consider flat-rate or weight-based shipping.
Shipping costs can make or break a sale.
Be transparent and let your customers know what the cost is. Once you start tracking analytics, you’ll be able to see how many potential customers are leaving their carts due to shipping costs. This intel will guide you in the right direction.
Pro tip: Try Online Store from GoDaddy for free. Test-drive features like secure payment for all major credit cards, PayPal and Apple Pay, as well as various shipping methods during your month-long trial.
Reviews and testimonials

Give your customers the opportunity to rave about your products and services.
When reviews are authentic and the feedback is positive, it builds credibility.
Social media is a great tool to extract testimonials. Through Instagram, you can repost a customer’s praise on your own channel. Not only will this get more people to try you, it gives you valuable social media content.
You can also send your customers a questionnaire and ask for reviews. Let them know that their feedback will be featured on your website. They’ll appreciate the opportunity to contribute.
Terms and conditions
Terms and conditions is the fine print every website must have. It contains important information that protects you and the buyer. It also builds trust.
Here are a few topics that often appear in terms and conditions:
- Shipping policies, returns and refunds.
- Unique fees and extra taxes.
- Copyrights and intellectual property.
- Disclaimers and cancellation clauses.
Spend some time and do some research to determine the elements you want to include in your terms and conditions. As your business changes, so will your terms. Update this section as needed.
Not too sure where to begin? TermsFeed has a free terms and conditions template you can use to get started.
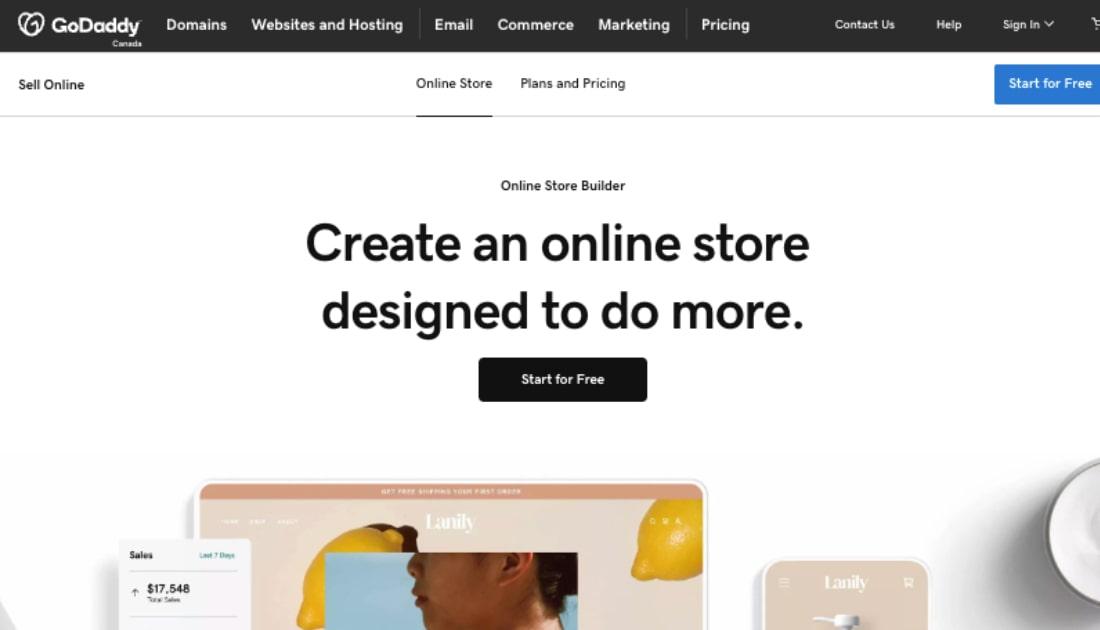
Get going fast with Online Store
Building an eCommerce website from scratch can be time-consuming, especially if you’re light on tech skills. You want your eStore to be efficient and easy to maintain. It should feel seamless to your customers, who want an effortless checkout process.
Launching a beautiful store has never been easier. And you don’t have to wonder if your site is looking its best on mobile devices. GoDaddy handles all that.
All you need to sell online
As no two businesses are the same, GoDaddy has done industry-specific research to customize its web store recommendations. GoDaddy Online Store was built by people who understand design, template development and the prominent features of a website. They know what drives traffic, increases sales and keeps customers coming back.
This easy store builder:
- Has room for up to 5,000 products.
- Features a prominent call to action button on every page.
- Securely accepts all major credit cards, PayPal and Apple Pay.
- Can be synced with Square's point-of-sale inventory management system.
- Has built-in shipping options, including real-time carrier calculated shipping.
- Comes with an appointment scheduler that allows clients to book and pay online.
- Features a streamlined checkout for easy purchasing from mobile devices.
- Comes with 24/7 live customer service.
Here are two additional special features that come with Online Store:
Social media
Social media is a great way to increase sales and stay connected with your audience. Choose a social media channel that you connect with and will regularly use. (A channel that goes dormant can harm your business.)
Facebook is usually the pick of the litter and GoDaddy will create a page for you that is stylistically in line with your Online Store. How great is that?
Email marketing

Email remains one of the least expensive but most effective marketing tools around. The email marketing tool included with Online Store makes communicating this way easy. Just add a Subscribe Now form to your store to start building a database of customers who want to hear from you.
Online Store comes with a tool you can use to create and send emails in minutes.
The tool also enables you to track the metrics of your campaigns to see what works and what doesn’t. Sending too many emails can turn your customers off and push them to unsubscribe. By watching response rates, you can regulate your email blasts to avoid unnecessary subscription drop-offs.
Or opt for a WordPress eStore
Those who want a highly customized eCommerce store, without the technical tasks usually associated with WordPress, should consider GoDaddy’s Managed WordPress.
The Quick Start Wizard will guide you through the process of building your new store. To start, choose from dozens of pre-built templates designed for hundreds of industries — all completely customizable.
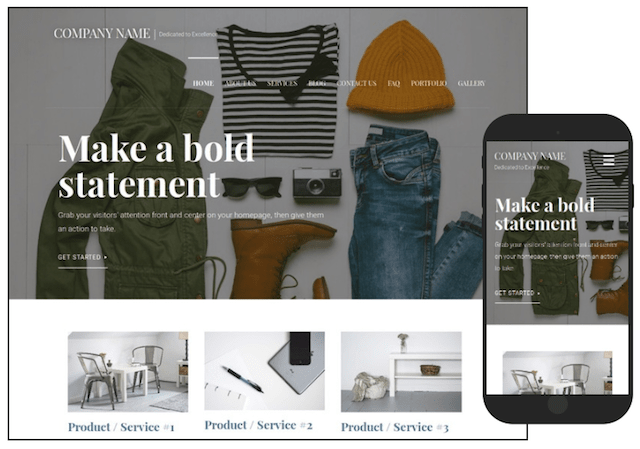
Depending on the number of products you have, you can customize your site and have your eStore open for business by the end of the week.
Long gone are the days when you thought, “I wish my site could have that feature."
With Managed WordPress, you can:
- Skip the 5-minute download and setup process; GoDaddy does this all for you.
- Accept all major credit cards, PayPal, bank transfers and cash on delivery.
- Launch a blog to help more customers find you online.
- Enlist Google’s help in bringing more visitors to your eStore.
- Display social icons throughout your store and link them to your social media channels.
- Relax with free daily backups and one-click restore (in case of a security breach).
- Schedule appointments and send appointment reminders.
- Use many of the other plug-ins available to add special features.
- Get help from web professionals 24/7.
Managed WordPress is a great solution for those of us who are non-technical but still want to use the world’s most popular CMS.
Recap: Selling online
To review, we covered the basic steps involved in launching an eStore:
- Write product descriptions and take photos.
- Review your shipping options and payment methods.
- Create your Terms & Conditions.
- Two eCommerce site building options.
Step 5. Now bring people to it
Estimated time: 3 to 5 hours to start + periodic maintenance

The internet has turned the whole world into one gigantic marketplace. It’s vibrant and competitive. But just because you’ve launched a website, that doesn’t mean anyone is going to find it. There are millions of them and it’s easy to get lost.
Search engines such as Google and Bing have created mathematical algorithms to sift through all the sites online and find what a user is looking for within fractions of a second.
Search engine optimization (SEO) increases the chances search engines will serve up your website.
SEO is the practice of making systematic changes to your website in order to make it easier for search engines to find. It’s key to bringing people to any website.
Pro tip: Be in the know and follow Google’s SearchLiaison account on Twitter for search-related news.
The nuts and bolts of SEO
A search engine is like an online bookstore. But instead of books, it indexes the websites it knows about and suggests sites that might have whatever the searcher is looking for. This is why your content needs to be strong.

You want it to be crystal clear to search engines exactly what your website or store offers. If you’re trying to sell yoga pants and you omit the words ‘yoga pants’ from your website, you’re not going to rank well.
Here are the basic elements of SEO you should know about and be able to apply:
Page content
Fresh text, photos and videos of interest to your customers will bring people to your site. In the world of data, traffic only matters if it’s the right kind of traffic. When you’re writing content, try to imagine what your ideal customer would want to know.
Internal links
Link-building is the process of sprinkling links to other pages or blog posts throughout your website. Think of it as a referral system. You’re making connections you want your customers to make without asking them to do the legwork.
Site navigation/menu
Keep it simple. If a search engine has difficulty navigating your website, you’ll fall in the rankings.
Pro tip: Schedule regular website check-ins to make sure your links aren’t broken and that everything is properly connected.
Site map
If your website were a destination and search engines were tourists, a site map would be the guide. This isn’t the navigation menu that your site visitors will use to find their way around your website; this one’s for search engines. It’s a handy directory made up of every page on your website that helps search engines understand what your site is about. (GoDaddy Website Builder and GoDaddy Online Store automatically create a site map for you.)
Keywords
By using specific keywords on your website, you’ll be able to bring the right kind of people to it. If you’re not sure where to start with your keywords, you might want to consider Google Keyword Planner. It’s a great resource that can show you what keywords will work best for you.
A few keyword tips:
 Be specific. When you think like a customer, you know that their searches are specific. They’re not just looking for insurance; they’ve narrowed it to “Halifax car insurance.”
- Be natural. Ginger your keywords throughout your content. If it’s forced, it won’t be effective.
Make the most of your images
Customers can often identify you by the style of photography on your website. What they don’t see is how image tags contribute to your SEO. By strategically naming your photos, you send coded messages to Google. Here are two best practices:
- Avoid a generic photo file name like ‘photo1.jpg.’ If it’s a photo of a crew neck cashmere sweater, name your image ‘crew-neck-cashmere-sweater.jpg’ with each word lowercase and separated by a hyphen. These tags tell search engines what your site contains.
- Your Image ALT text should mirror your image file name. Using the example above, the Image ALT tag would be “Crew Neck Cashmere Sweater.” This time you’re omitting the hyphens and capitalizing the first letter of each word.
Double-check your work. Does the image match the file name and the Image ALT text? You wouldn’t want to make the mistake of labelling a V-neck cashmere sweater as a crewneck.
Pro tip: If you’re using a lot of images, use a compression tool before uploading them to your website. It will decrease page load time, which often makes your site feel sluggish. It’s also best practice to use a DPI of 72 for website images.
Tag! You’re it!

Google likes tags. They’re an important part of SEO. Below you will find three types of tags. Keep them in mind as you create your content.
Title tags
Keep titles to the point. They’re usually 65 characters or less and depict the page’s contents. A title tag can be found in two places: in the browser’s bar and in search results.
Meta tags
Think of meta tags as words that are read by search engines. Your visitors won’t be able to see them, but to a search engine, it’s a summary of what your website is about. They also contain your keywords.
Header tags
When you’re creating a web page, you can break up long passages by using headers and subheads (H1s, H2s, etc.). The keyword for each page should be in the header and one subhead.
The beauty of backlinks
As you’ve been building your website, you’ve been cross-linking to other pages on your website. These are called internal links and they’re great because they help your customers get around your site.
What’s harder to achieve is getting another website to link to your site. This is known as a backlink. The more backlinks your website has, the more credible it is in the eyes of search engines.
Here are three ways to get backlinks:
Pitch yourself
If you’ve been running a business for a long time, you’ve probably pitched story ideas to local media outlets. Do some research on hyperlocal publications and industry-specific websites in your region and offer to be a guest blogger. This is where you write a blog post for them. In exchange, you get to include one or more links back to your website in your post.
Connect with influencers

Instagram is a perfect place to connect with influencers. These are the people who have loads of followers that are ‘influenced’ by the products and services they use.
If you have an Instagram account, see who keeps @-ing you. If you notice that someone is constantly promoting your products, reach out to them and send them a new item. You can create guidelines for the collaboration, such as asking them to write a blog post about it that includes links to your website.
Get philanthropic
When you donate to a non-profit organization, you can often create a contributor’s page, which has a link to your website and includes your keywords.
Paid advertising
With paid advertising, you’ll increase your reach and give your company additional exposure. But will your ads be well-received?
According to Nielson, Canadians distrust digital ads more than their neighbours south of the border. But this doesn’t mean that you shouldn’t do digital ads at all.
You just need to be strategic, keep your ads genuine and build trust.
For the most part, paid advertisements are listed before an organic result. To see an example, open up a new browser window and type in ‘photography.’ If the first item that comes up has an “Ad” box next to it, you know the company has paid for it to be listed in the top spot for the keyword ‘photography.’
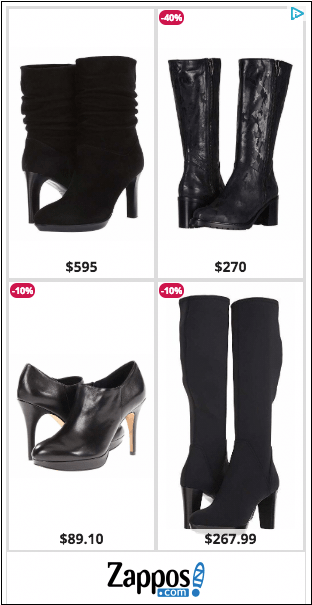
Here are the two most popular types of paid advertising:
- Pay-per-click (PPC)
- Cost per thousand (CPM)
PPC is clear-cut. You only pay when someone clicks on your ad. However, these can be pricey, as cost per click is determined by the keyword and its value.
CPM, on the other hand, has a flat-rate model. If no one clicks on your ad during the course of your ad campaign, that money is gone.
PPC vs. CPM
Let’s weigh the pros and cons of PPC and CPM ads to discover which one might work best for your business.
PPC Pros:
- Your success is easy to measure.
- Transparency. If a visitor clicks, you pay.
- It’s flexible; you can adjust your budget at any time.
PPC Cons:
- Costs can increase, as you’re bidding against your competitors for a top spot.
- Not all clicks are equal since they don’t all lead to a sale.
- Tracking conversion requires more manual work.
CPM Pros:
- Budget-friendly price points.
- You get what you pay for; guaranteed number of ads.
CPM Cons:
- Lost dollars. Costs are locked in and if no one clicks, you’re still paying for it.
- Depending on where the ads are placed on the website, they can be ignored.
- Ad blockers can also hurt your campaign results.
Research the various ways you can execute your first digital advertising campaign. It might feel like trial and error at first, but when you start to see results based on informed decisions, you’ll be able to adjust your tactics to receive an even better return.
Tips for local businesses

As mentioned earlier, having a website makes your business visible to the entire world. But some businesses don’t want to sell to the whole world. They just want to service their neighborhood or city.
There are ways to let Google know you only serve people who live in a particular area.
Localizing your SEO and thinking about it geographically can bring local searchers to your website. If one of your goals is to increase traffic to both your digital and physical stores, this will assist in achieving that goal.
Read this post to learn more about SEO for Canadian businesses that serve local areas.
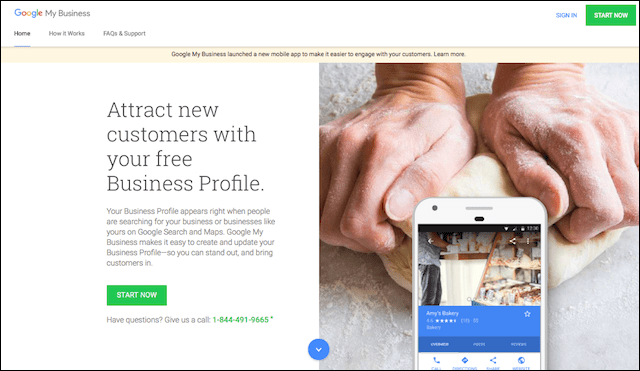
Google itself has some great suggestions on how to improve your chances of showing up in local searches:
- Create a Google My Business profile.
- Completely fill out your information.
- Keep your business hours current.
- Verify your business location.
- Manage and respond to Google reviews.
- Add photographs to illustrate your products and services.
- Engage with your Chamber of Commerce and other online business resources in your area.
With a little effort, you can let search engines know you cater primarily to people who live in your geographic area. They in turn, will send more of them your way.
Recap: Now bring people to it
Your work isn’t done once you’ve created a website or eStore — you need to bring people to it. To review:
- Use Google’s keyword tool to select keywords.
- Boost your backlinks.
- Make your images speak with ALT text.
- Tweak your tags.
- Investigate geographical SEO.
- Research paid digital advertising on social media platforms and websites.
Next steps
Well done! The initial steps are behind you. The view from here is beautiful, isn’t it? Now keep reading to discover how you can build on your accomplishments.

1. Secure your website
There was a time when SSL encryption was optional, but that ended in July 2018 when Google announced it would start labeling any website without it as ‘Not Secure.’
Imagine what prospective customers will think if they see Not Secure next to your web address!
Getting an SSL certificate for your website shows visitors you’re concerned about their data security and protects you against the catastrophe of a data breach. It also elevates your search rankings. Learn more about small business cybersecurity by reading this post.
Related: Checklist: How to perform a website safety check
2. Email marketing is your friend
When your customers adore you, they want to open every piece of email from you. They want to know when:
- Your sales are starting.
- Your styles are changing.
- You’ve shared a new blog post.
They want to hear about the projects you’re working on. When your customers adore you, your emails get opened and they don’t go into the junk pile. Phew!
Related: Increase email response with market segmentation

What’s great about email marketing is that it’s cost-effective. Its predecessor — snail mail — can be costly. There’s design, production, printing and mailing. It’s also harder to track results with snail mail.
Pro tip: If you love creating postcards or uniquely designed printed pieces, you might want to consider including these items in the packages you send to your customers. It saves on postage costs and gives your customers something to look at. And if your postcard is a mini work of art, your customers will put it on their fridge instead of tossing it in the recycle bin.
3. Make connections with social media marketing
If it didn’t appear on Instagram, did it really happen? Of course it did! But that’s not the point. Being social brings you closer to current and prospective customers. You can even use them as a sounding board for new concepts and ideas.

Plus social media marketing feels good.
The more you connect with your base, the more you’ll see just how valued you are. There could even come a time when followers who haven’t purchased a single item are watching you, talking about you and sharing your posts because they believe in — you’ve guessed it — you!
Check out this post to learn which social networks are most popular among Canadians.
4. Email is better in business class
When your email address includes your domain name, it instantly becomes professional and trustworthy. It demonstrates that you’re serious about building your brand. Read “The benefits of using a branded email address for business” for details.
5. Consider blogging
We touched on the power of blogging earlier in this post but it’s worth reiterating why it’s such an important tool for your website. It positions you as a thought leader and provides you with a place to share insights and comment on trends as they happen.
Blogging puts you squarely in the path of people who are searching for businesses like yours.
You can also display your collaborations on your blog and feature guest posts by other like-minded thought leaders. Did we mention that blogging is also great for SEO?
6. Dig into the data
Numbers don’t lie, they just tell different stories depending on how you read them. When you combine the power of Google Analytics with heat mapping, you’re able to get a better picture of how customers and visitors navigate your website. It takes your data up a notch.
From here, you can evaluate what’s really working. And as you’re discovering what’s performing well, flip the lens and look at what needs improvement. Tweak, reassess, try it again and review/compare your data monthly.
Conclusion
So there you are. This guide has covered everything you need to launch a website:
- Planning and research.
- Deciding how to build it.
- Creating text, photos, videos and anything else you want in it.
- How to sell online, including payment processing.
- Bringing people to your shiny new website or eStore.
What used to be a costly enterprise is now not only inexpensive but possible to handle yourself. All it really takes is time and dedication.
Hungry for more information? Head to the GoDaddy Blog for detailed posts about how to start a small business, promote it online and sell more products/book more services. It’s a great resource for entrepreneurs and startups beginning their business journeys.
Toolbox
Website planning checklist
To get a pulse of where you’re at with your website, answer the following 10 questions. If you answer Y to eight or more questions, your site is ready to go live. If not, keep at it and revisit the checklist when you’ve completed more steps.
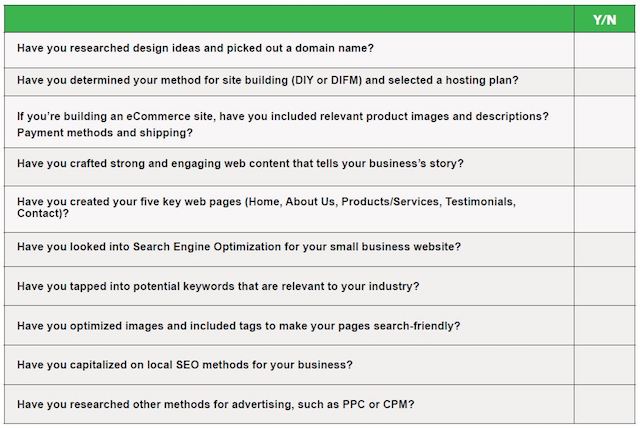
Finished? Great! Count the Ys you marked to see if you’re prepared to launch your site.
0 – 4 Sounds like you’re just beginning your journey. If you’re in need of guidance or have questions about some of the steps, get in touch with GoDaddy. Our experts are very supportive and enjoy contributing to your success.
5 – 7 You’re headed in the right direction! Narrow in on one area and work your way through it.
8 – 10 You’ve got this! Want to elevate your game? Consider adding email marketing to your arsenal.
QUICK GUIDE: Build a website yourself in 6 steps
Want to try try your hand at starting a website with GoDaddy’s swipe-to-style website builder? Follow these steps.
1. Begin a free trial
To start your one-month trial, click on Start for Free on the Website Builder product page.
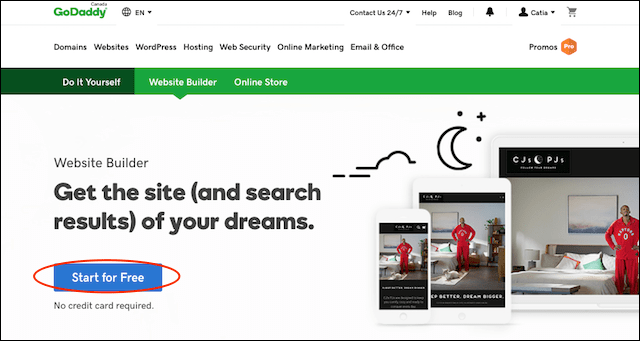
Play around with the builder for a full week before you commit. If you like what you see, you can add your payment information and keep the website. If not, just let the product expire. (You’ll want to save any photos or text you upload, as they will disappear when your trial expires).
2. Sign in or create an account
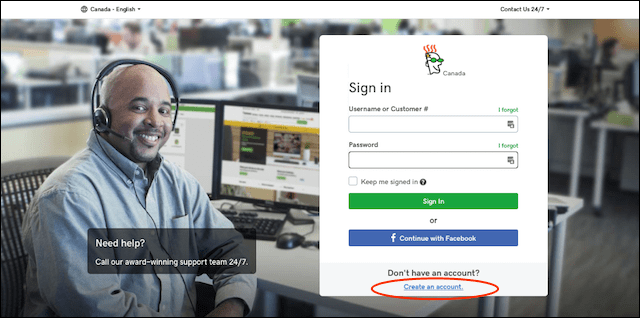
If you already have a GoDaddy account, you can sign in either directly or through your Facebook account. If not, create a new account by clicking on Create an account. Again, no need to enter payment information at this stage.
3. Choose a business category
Next you’ll be asked to choose a category for your website. You can enter the first few letters of your business type — Clothing or Home Service, for example — and a drop-down list of options will appear. Select one to finish the entry. Then enter the name of your business in the next field.
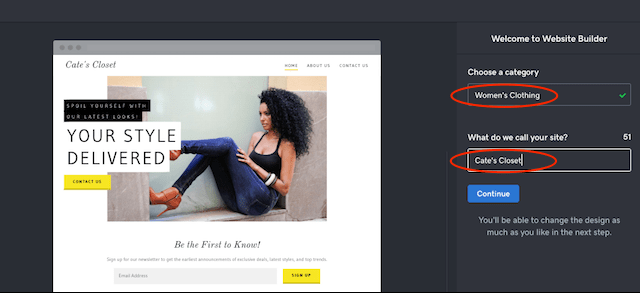
Click Continue and a pre-built website template tailored to your industry will appear on the screen.
4. Customize your website
Click the Customize button. In a few seconds, a sidebar appears on the right with the tools to change the theme, pages and site settings.
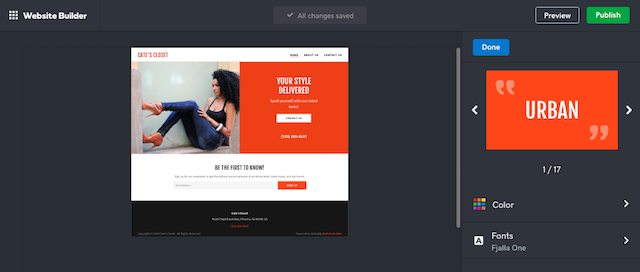
By clicking on the Theme panel, you can reset the layout, colours and font. Click through the 17 themes until you find one you like. Click Done.
Similarly, you can change the Pages and Home settings to reorder your site men/navigation and to group items using the drop-down menu.
5. Adjust your site settings
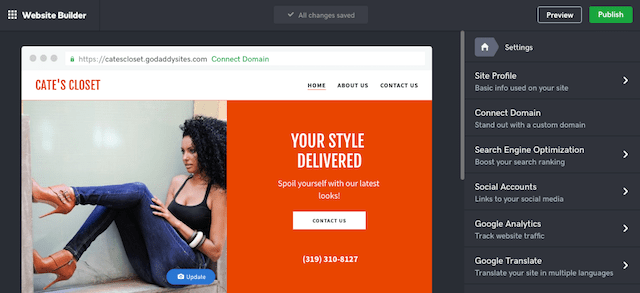
Located below Theme and Pages, the Site Settings tab allows you to change your:
- Site Profile (business name, street address, email, phone, etc.).
- Domain name associated with the website (optional).
- Search Engine Optimization.
- Social Accounts.
- Google Analytics and Google Translate.
- Cookies, tracking options and more.
You can return to Site Settings to make changes at any time — if you should change locations, for example.
6. Preview and publish
After customizing the template with your own text and photos, click the Preview button in the top right to see what your new website will look like on a desktop computer, as well as on a smartphone.
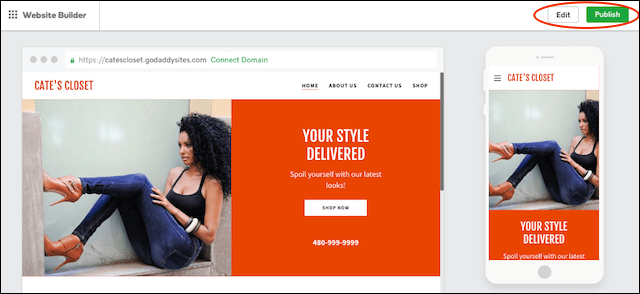
Continue making changes to your site for as long as you wish by toggling between Preview and the Edit button in the top right.
When you are ready to make your website public, click the Publish button in the top right corner. Your website is up and running!
CHEAT SHEET: Make a WordPress website in 5 steps
If you’re looking for an easy way to build and maintain a WordPress website or eCommerce store, follow these steps.
1. Pick a Managed WordPress plan
No matter who you are, if you want to use WordPress, you’ll probably need to pay someone for hosting. GoDaddy offers several tiers of WordPress hosting, adding features to the higher tiers.
To get started creating your WordPress website with GoDaddy, purchase a plan and answer a couple of basic questions.
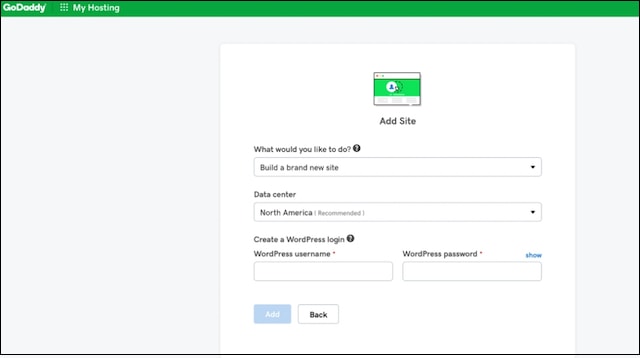
Next, GoDaddy automatically installs WordPress while you get a fresh cup of coffee.
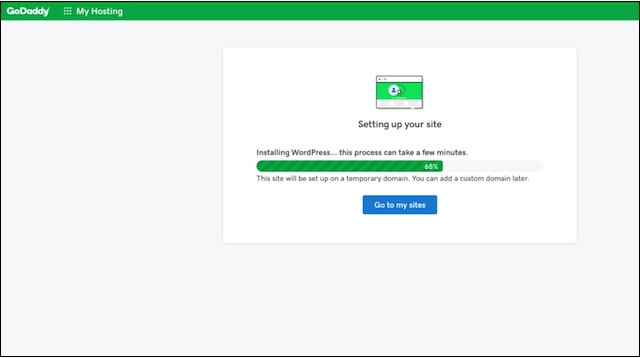
2. Set up your WordPress website
Now you can either use the Quick Start Wizard to get started or configure your site on your own. You’ll find step-by-step instructions for both options here.
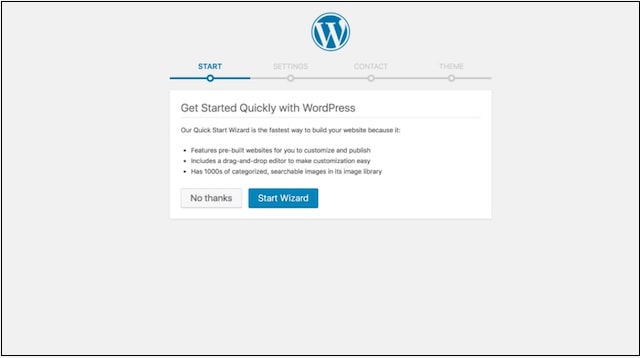
Once WordPress is installed, you can access it anytime by adding ‘/wp-admin’ to the end of the domain you’re using.
Use the login and password you created during installation to log in. Alternatively, you can access the WordPress admin pages by clicking the WP Admin button.
3. Customize your website
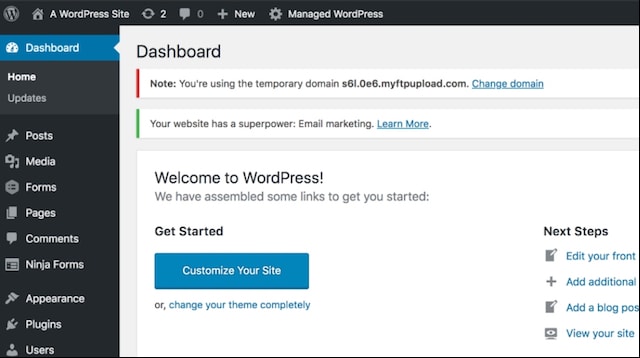
To start tailoring your new site, you can either click Customize Your Site from this screen or Appearance in the left sidebar then select Themes.
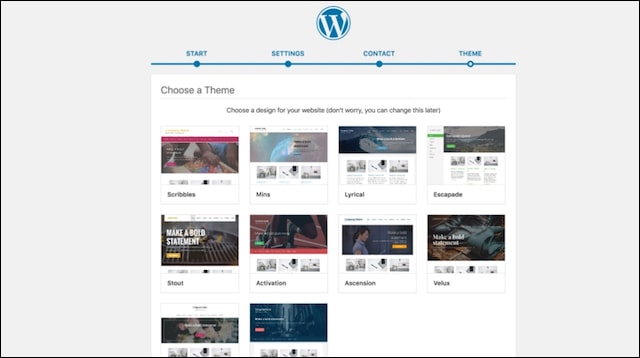
Click through the themes until you find one you like. Keep in mind that all colours and photos can be changed. So what you're looking for is a general "look" that suits your business. Click Select.
4. Adjust your site settings
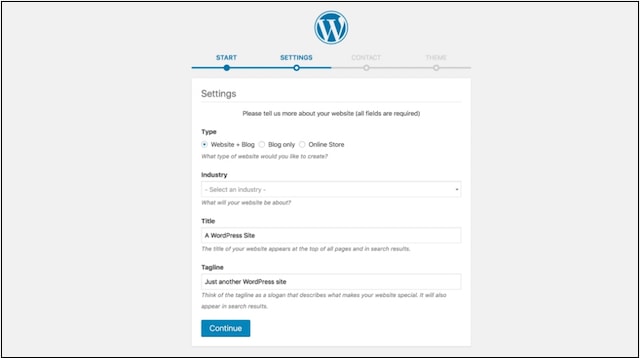
The Settings screen allows you to adjust general blog settings, including your industry as well as the name of your website and your business tagline (if any).
5. Preview and publish
As you customize your site with text, photos and videos, click the Preview button in the right sidebar to see what your new website will look like on the web. Continue making changes to your site for as long as you wish, using Preview to check your work from time to time.
When you are ready to make your website public, click the Publish button. Your website is up and running!
This make a website eBook was originally published on 27 January 2019 and was updated on 29 October 2019.

