Irrespective of the size of a business, marketers understand the power of creating and managing a meaningful blog for their target customers. Blogging engages prospective customers who otherwise might not find your business. Don’t let your limited understanding of how to make a blog be a roadblock to greater success.
36 percent of Fortune 500 companies blog for thought leadership, product promotion and engagement.
Here is how a blog on your website can help your business:
- Improve the search rankings of your website, moving them closer to the top of Page 1.
- Establish your authority in the industry, building trust among readers.
- Answer questions and provide information to prospective clients.
You cannot deny the numbers — 47 percent of buyers read or watch three to seven pieces of content before making a purchase.
Start blogging for your business
Follow these steps to start blogging to gain exposure and new leads for your business.
Choose your blog name.
Pick the top-level domain (TLD).
Purchase blog hosting.
Find a CMS to build your blog.
WordPress setup.
Customise your new blog.
You’re ready to publish.
In this article, we will learn step-by-step how to make a blog from scratch.
Follow these seven steps to make a blog

Photo: Thought Catalog on Unsplash
There are millions of blogs — from lifestyle and travel blogs to corporate blogs — on the internet right now. Clearly anyone can do it. Here are the steps.
Step 1. Choose your blog name
The first step in learning how to make a blog is to name it. Choosing your blog name is as thought-provoking an exercise as selecting the name for your baby.
First you must decide whether you want an explicit name or an abstract name for your blog.
The direct approach
A clear name is the one that has a keyword in it to add SEO benefits. In this case, what’s your business about? For example Veg Recipes of India, Safal Niveshak and BloggerTipsTricks — it is clear what each is about.
The creative approach
On the other hand, you may find it difficult to resist a quirky or super-catchy blog name that can help you stand out. Take for instance ShoutMeLoud, Labnol and crazyegg.
The word “labnol” has no meaning. Still, it is one of the most popular blogs in India.

If you are a solopreneur and want to build your personal brand with blogging, it could use your name as the blog name. For example:
You may see how smart it is to have the keyword amalgamated with your name, as in the case of DigitalDeepak.
Enter your name here to see if the domain name is available
Editor’s note: If you are adding a blog to an existing website and you already own a domain name, there is no need to register a new one for your blog. You can create a sub domain off your primary domain for your blog.
Tips on choosing your blog name
Whether whimsical or clear, a blog name should be easy to understand, spell, pronounce and remember. Imagine yourself telling someone your blog name; he should be able to type it in later without any confusion.
Pro tip: Can’t think of anything good? Use NameMesh, Naminum or Domainscope to come up with fresh ideas for your blog name.
Step 2. Pick the top-level domain (TLD)
TLD is the Top Level Domain or domain extension — or, in simple words, the part of your online address that appears after the dot. The most popular TLD in the world is .com. You may also have heard of .in, India’s official domain extension. Learn more about what a domain name is and how it’s used here.
Although there was once just a handful of extensions to choose from, there are hundreds now. For example:
You can read this for help finding your perfect domain name.
Step 3. Purchase blog hosting
Once you have decided your domain name and registered the same, you need blog hosting.
Most people rent space on a server, as buying their own is too expensive.
A hosting server is required to store your website’s files and connect your blog to the internet. Think of domain name as the address of your house and hosting as the plot you rent to build your house. So what’s your house here? Your blog or website.
Editor’s note: If you are adding a blog to an existing website, it is not necessary to purchase blog hosting as you already have hosting.
Step 4. Find a CMS to build your blog
A CMS is a content management system or “a software application or set of related programs that are used to create and manage digital content." WordPress is used by 30 percent of all websites worldwide, from Arun Prabhudesai’s hobby blog to the news site Reuters.
You can think of a blog as having multiple layers:
Framework: The main component of your site is the Content Management System (CMS). A CMS manages how your blog is displayed without making you learn coding to run your blog or website.
Look and feel: The WordPress theme you choose.
Content: Text, photos and videos on your blog or website that tell what it is about.
We will talk about the other two layers of your website very soon in this article. Once you have decided your CMS to be WordPress you need to download and set up WordPress
Step 5. WordPress setup
WordPress can be installed and used by anyone — even a non-techie willing to spend the time. To install WordPress manually, download it here and follow these instructions. Or you can start faster with GoDaddy Managed WordPress. GoDaddy handles the WordPress setup, as well as the ongoing core updates and security patches for you.
Managed WordPress lets you skip the technical tasks.
If you use GoDaddy hosting for your website, you can install WordPress with a single click by following these instructions.
Step 6. Customise your new blog
The best part of using WordPress is that you can customise every layer of your blog (framework, look/feel and content) by choosing from the plethora of themes, plug-ins and widgets on the internet.
Themes
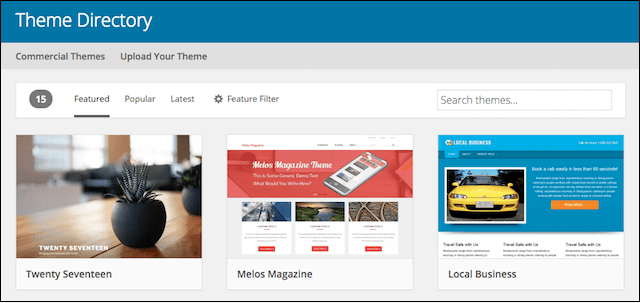
To determine the look and feel of your blog, you can either stick with the theme that comes with WordPress or choose from thousands of free and paid WordPress themes available online.
The most significant difference between a free and a premium (paid) theme is the customer support (which is a big deal in this case) and regular technical updates.
Be sure to choose a theme that:
- Has good reviews.
- Is regularly updated.
- Comes with documentation to help you set it up.
Choosing a theme is important, so take your time to find the right one.
Plug-ins
Just like your mobile comes with some standard features and you download apps to enhance its functionality, plug-ins are the extended features you can add to your blog. It is recommended to choose a good:
- Security plug-in such as Wordfence Security.
- Backup plug-in like UpdraftPlus (backups come with Managed WordPress).
- Contact form plug-in such as Contact Form 7 or Ninja Forms.
- Social share plug-in. Use a simple one like Sumo.
- SEO plug-in, the most famous being Yoast SEO.
- Visitor tracking plug-in such as MonsterInsights.
With these plug-ins, you can build a solid, secure WordPress blog that gets attention.
Step 7. You’re ready to publish
Now your blog is ready to showcase your views, advice and products or services. Here are the three quick steps to writing your first blog post:
- Start with the keyword research to learn what readers are looking for.
- Make your content calendar, outlining the topics you plan to cover for the next six months (hint: Start by answering your customers’ top questions, one per post).
- Write the article using this as a guide.
Read “18 tips for starting a WordPress blog” for start-to-finish directions on all three.
Wrap up: How to make a blog

Photo: Jerry Wang on Unsplash
Congratulations! Your blog baby is taking shape. Yes, creating a blog is no less than giving birth to a new one. From the inception of the idea, you fall in love with your blog. Each stage costs your sweat and blood. And a day comes when your idea gets released into the world, and you can watch it growing.
I hope now you’re fully equipped with all the resources of making a blog. All the best for your blogging journey!


