With eCommerce becoming popular among businesses, you might consider building an online store to sell your products around the world. However, you may be uncertain about the requirements and process of using an eCommerce website builder to launch your digital store. Here we’ll explain how to build one using GoDaddy’s Online Store in eight steps.
Editor's note: GoDaddy now has a hosting centre located in India, enabling faster load times and better security for customer websites (which includes all website built with Online Store). You can read more here.
Open an online store in 8 steps
GoDaddy’s Online Store offers you a quick, uncomplicated and economical option for building your own online store.
-
Get started for free.
-
Answer two questions.
-
Fill your shop.
-
Choose your payment methods.
-
Set up shipping.
-
Enable taxes.
-
The finishing touches.
-
Preview and publish.
Read on to learn how to use GoDaddy’s eCommerce website builder to start selling on the web.
Before you build
The first pre-requisite when you think of creating your eCommerce website is market research. You also need to:
- Check out the online stores of other businesses similar to yours.
- Make note of things you like/dislike about them.
- List critical features you want to have on your website.
This will help you analyse the needs of the market and formulate a plan for the look, feel and features that you want in your website. Use this planning worksheet to guide your planning before you build.
Steps for using an eCommerce website builder
You can quickly launch an online store using the easy and affordable Online Store from GoDaddy. You just add your own text, choose photos from a large gallery of images and add the features you need for tapping the worldwide market.
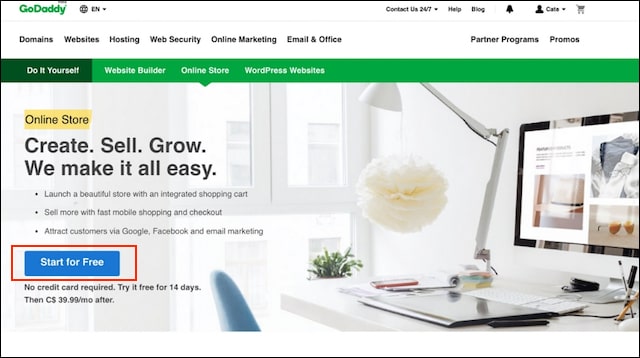
1. Get started for free
Sign up for a free trial of Online Store without obligation — you won’t even be asked to enter payment information. If you’re not a fan at the end of 14 days, just let your trial expire.
2. Answer two questions
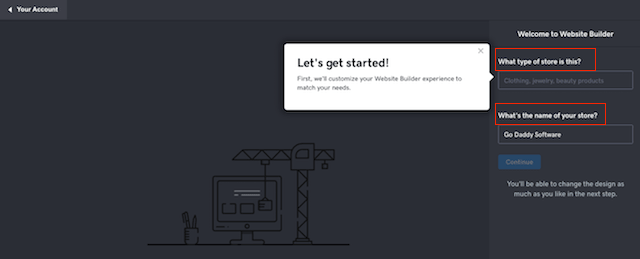
Click on the Manage Store button to open the control centre, then answer two questions:
- What type of store is this?
- What’s the name of your store?
The builder will suggest a pre-built store design based on your answers to these simple questions. You can change the colours, typefaces and layouts to suit your taste and the type of business you have.
Every Online Store features a header photo with your business contact info & Shop Now button, along with these sections ready for you to customise:
- Products and services
- About Us
- Contact Us
- Social media links
Refer to this article for more on filling out these sections.
3. Fill your shop
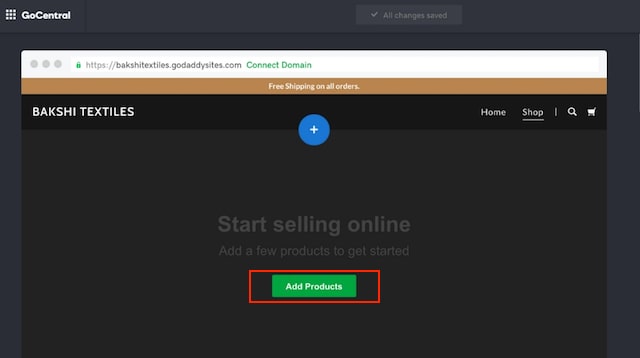
In the control centre, you can get started by clicking on the Add Products button.
In the window that opens, you can describe each product by giving its name and options, adding up to 10 photos. This is also where you’ll set the price and tag the item for automated inventory management if desired.
There is a built-in help available in case it is needed, as well as round-the-clock customer support in case you have questions.
Use the Save button at the bottom of the page when you’ve finished entering details for each product. Online Store holds up to 5,000 products.
4. Choose your payment methods
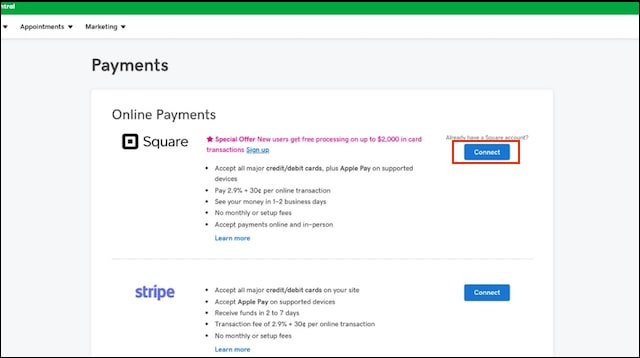
After this, move back to the control centre and go to the “Payments” section. In order to review and set up payment options, you need to click on the Connect button next to the options you want and make the needed changes in the page that opens. You can also enable offline payments here.
Your GoDaddy Online Store comes with digital encryption to protect your customers’ personal and banking details from online theft. It also displays a security seal, which has been shown to increase order completion.
5. Set up shipping
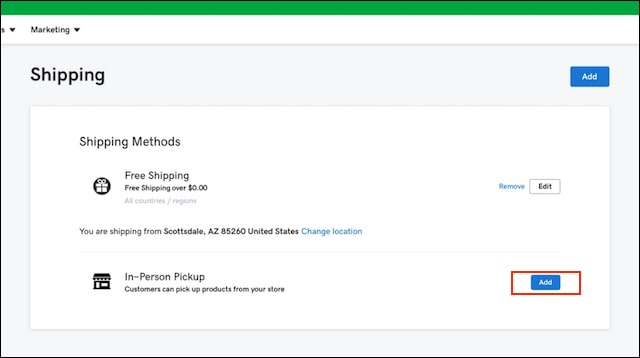
At the control centre again, you can select the shipping options you’d like to offer by clicking on the Add button given next to each shipping option. Your choices include flat rate or weight-based shipping, which charges different amounts based on how much an order weighs. You can even offer in-store pickup.
6. Enable taxes
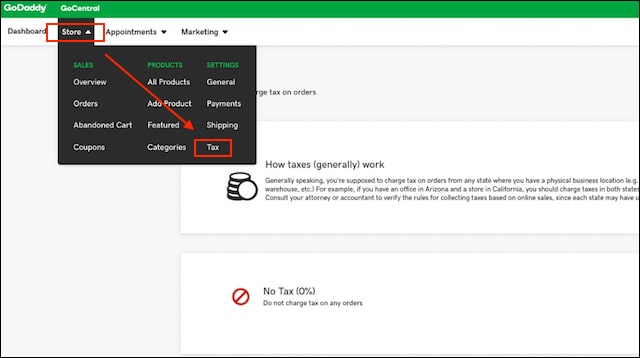
In order to collect sales tax, you need to go to the “Store” option given in the control centre and select tax from the drop-down menu.
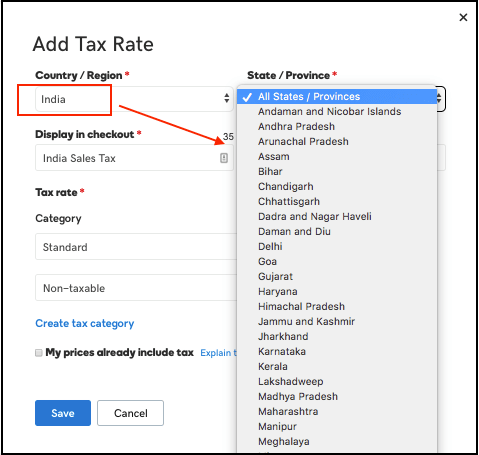
In the box that appears, select your Country/Region and State/Province from the drop-down menus.
Then type the tax percentage required for that location into the box. Don’t forget to enter your tax identification number in the box provided.
You can add multiple locations to your online store, each with its own tax rate. Find details here.
7. The finishing touches
You can then check out the other stuff available in the control centre to promote and manage your store:
- Enable text notifications so you’re alerted whenever an order comes in.
- Drive sales with cart recovery emails that go out automatically whenever a customer places items in their carts but leave without purchasing.
- Advertise through Facebook, emails that match your store design and other methods.
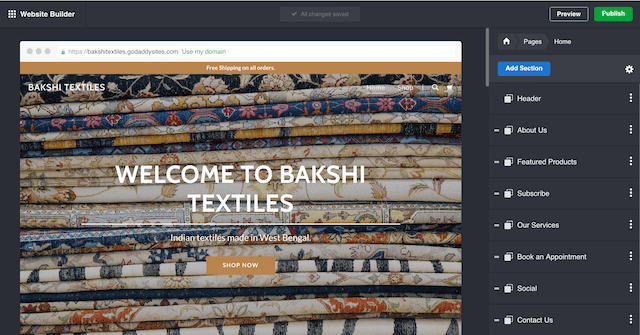
Add or delete sections to your new online store with a couple of clicks. Select any field in the right sidebar to make changes to the photos or text.
8. Preview and publish
Before you publish, you can click Preview in the top right to see what your online store will look like on a desktop computer or a mobile device.
If you need to make some changes in the look or feel of your store, click the Edit option given on the top right. Then adjust photos or text using the different editing tools that appear. All the changes you make appear immediately and are saved automatically.
When you feel that your store is ready for customers, just click the Publish option. Congratulations! You’re open for business.
To sum up
Your online store can increase your sales significantly — without renting any new space or hiring additional sales staff. GoDaddy’s eCommerce Online Store gives you a worry-free way to accept orders, manage inventory and ship products anywhere in the world. You can even create your own logo using GoDaddy's free logo creator.
By following the above simple steps, you can get your own eCommerce website up and running in no time. With a little planning and the right resources, you can extend your company’s reach beyond your own neighbourhood. Today, West Bengal — tomorrow, the world.

