WooCommerce is a great plugin for ecommerce websites, and it gives you all of the essentials. But, out of the box, WooCommerce can be basic.
To get the most out of WooCommerce and to have custom-designed emails, you need the help of plugins and extensions.
In this article, we’re covering all things WooCommerce and emails, from the benefits to them, how to set them up, and the must-have plugins to take your email automation from basic to elite.
WooCommerce email marketing tools to send automated emails
Email is the most direct way to communicate with your ecommerce customers. Whether you’re updating them on their order status or reaching out to inform them of a new product, WooCommerce email marketing is a great way to get your customer’s attention.
When you’re busy running your business and your customer list continues to expand, manually sending emails isn’t a viable option.
This is where email automation for WooCommerce comes into play. Email automation lets you send targeted and customized messages to your audience, based on a specific event or as part of a broader email marketing campaign.
In this post, we’ll look at how you can customize WooCommerce email templates, benefit from automating different types of ecommerce messages, and how to set up email automation for WooCommerce.
Does WooCommerce send automated emails to customers?
Yes, by default WooCommerce does send automated emails to customers. However, these emails are genterally tied to changes in order status.
This is solid functionality that your customers will surely appreciate. But these emails fall a bit short from a marketing standpoint, with limited customization options and triggers, as you can see below.
As you review the default automated emails below, consider which ones you need and which ones could be disabled. If you plan on marketing to customers via email, it's better not to bombard them with messages that aren't necessary.
Types of WooCommerce automated email series and notifications
The types of email you can send with WooCommerce will depend on your tech stack. If you use WooCommerce with an email extension, you’ll be able to send more sophisticated email automation campaigns.
Within the WooCommerce plugin, without any extensions or support from other email marketing software, you can send the following emails:
- Order on hold
- Processing order
- Completed order
- Refunded order
- Customer invoice / Order details
- Customer note
- Reset password
- New account
For your own administration, you can also have emails sent directly to you for:
- New order
- Canceled order
- Failed order
You can toggle on and off the standard emails so you have control over what’s being sent.
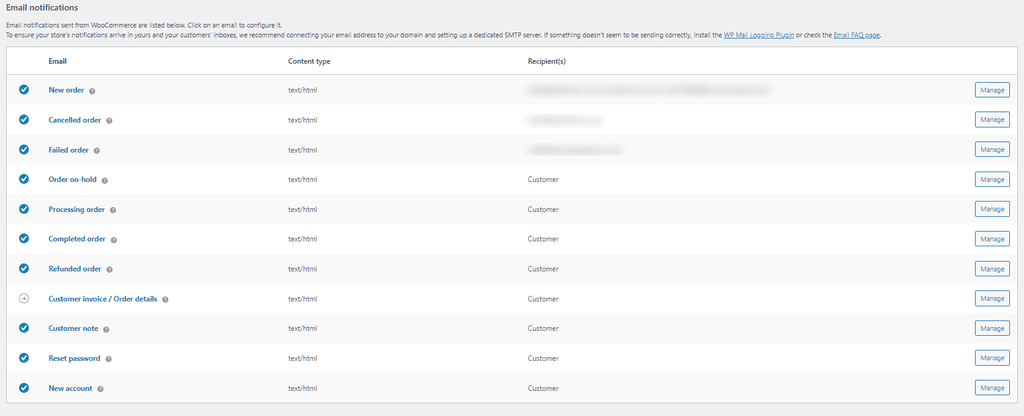
The screenshot above shows the email interface. On the dashboard, you can see the emails, the format (HTML), the recipients, and the manage button. Through the management button, you can customize emails and toggle them on and off; we’ll share the process for that in detail later.
Ideal email automation flows
If you choose to use another email extension or plugin with WooCommerce you can create more sophisticated email flows supporting other areas of marketing.
Here are some ideas and benefits:
- Welcome series to introduce your potential buyers to your brand. Send this flow to all new email signups.
- Cart abandonment emails to encourage a sale after a user has left something in the cart without buying. Try Incentivizing the sale with a discount.
- Follow-up emails based on user actions, such as viewing a product.
- Product recommendations based on previous user/buyer behavior. The personalization might help you convert.
- Priming for the next sale to encourage people to buy when they can get the best price.
- Purchase anniversaries to encourage a repeat sale.
- Coupons and deals for those who buy when there’s a sale.
- Life events such as birthdays.
Why are automated emails important, and how can they improve your WooCommerce store?

Email automation is really important for your brand. It is one of the best marketing tactics for keeping in touch with your customers. It builds relationships, nurtures buyers into brand advocates and gives potential customers the trust they need to buy.
Saves time
It goes without saying that manually sending each of these transactional emails would take a lot of time.
Email automation ensures that your buyers get all the information they need without you having to take the time to craft every single message.
Automating this process also ensures that customers promptly receive the information they need.
Aside from the obvious, with well-thought-out email automation, you can save your team time answering queries after the purchase. If you keep your buyer in the loop about their order, they won’t call you and ask if their order has been dispatched, for example.
Better customer experience
Your email automation is not just about the benefits that it brings to you but also about the benefits to the customer.
Simply, good communication results in a better experience for the customer. With this comes repeat sales or recommendations.
Several customer communications are all but compulsory in the ecommerce buying experience. For instance, customers need confirmation that their order was received and that it has been shipped for delivery.
Higher CTR
Your automated emails around transactions have some of the highest click-through rates (CTR) of any other email. According to Chamaileon, your order confirmation emails have a 65% open rate; that’s pretty impressive!
A 65% open rate tells you two things:
- You should definitely be sending these emails; users actively want to see and open them.
- With such a high CTR, use the email wisely; obviously, you need to confirm the order, but don’t miss the opportunity to do some brand-building or upselling.
Upsell opportunities
With a CTR of 65%, your transactional emails could be doing more for you than confirming an order.
Since your new customer is going to open this email, you could use this email as an opportunity to tell them more about you and what you offer.
For example, if someone bought an item that pairs well with another product, you could share related products in your email. Or, you can go for a more subtle sell and provide links to articles on your site that use that particular item in conjunction with something else on your site.
Many brands use an email with a friendly note about all the items the buyer could’ve put in their basket.
Increase brand awareness
If nothing else, your emails are an opportunity to increase brand awareness.
You could use an order confirmation to confirm the purchase, allow easy navigation to view the order, thank the buyer for ordering and remind the recipient of your brand slogan.
The short paragraph at the top does a lot for the brand; it’s friendly and warm, reinforcing those all-important brand values.
Efficient personalization
Consumers respond best to personalized messages. It presents them with the most relevant products and promotions and makes them feel like you are concerned about their needs.
Businesses that use their customer data to segment their audience and send targeted messages can enjoy better engagement and conversions.
However, like transactional messages, trying to send personalized emails manually isn’t a viable solution.
With email automation, you can create messages that go out to people that match certain characteristics or take specific actions.
For example, if someone browses a particular category in your shop, you can automatically send an email containing those types of products.
Remarket to old customers
Email can be one of the best ways to get old customers back to your site. When someone buys from your store, they are more likely to purchase from you again and will respond better to your email messages.
With email automation, you can include them in your newsletter and you can send them regular updates on your products and promotions.
You can also schedule automated campaigns to go out after important milestones. For example, you can reward a customer who has reached a certain total spent at your store.
How to customize WooCommerce automated emails
Email customization is so important for your brand and for your users. It helps you distinguish your brand from others and builds your relationship with the customer.
We’re going to walk through the steps to customize your emails using the standard WooCommerce emails and WooCommerce Email Customizer.
The WooCommerce plugin alone doesn’t give you a lot of customization, but it’s enough to get you started.
For more customization options you need the WooCommerce Email Customizer extension.
Default WooCommerce email automation
The native WooCommerce can automatically send transactional emails for specific events throughout the customer journey — for example, when someone completes an order and needs an order confirmation with the purchase details.
You can find these emails by going to WooCommerce > Settings > Emails. There you can choose to enable or disable any of the messages and specify the sender and reply-to addresses.
Start customizing your standard WooCommerce emails by logging into your WordPress website.
Step 1: Navigate to WooCommerce from the dash
Your WooCommerce dash is always within your WordPress navigation on the dashboard.
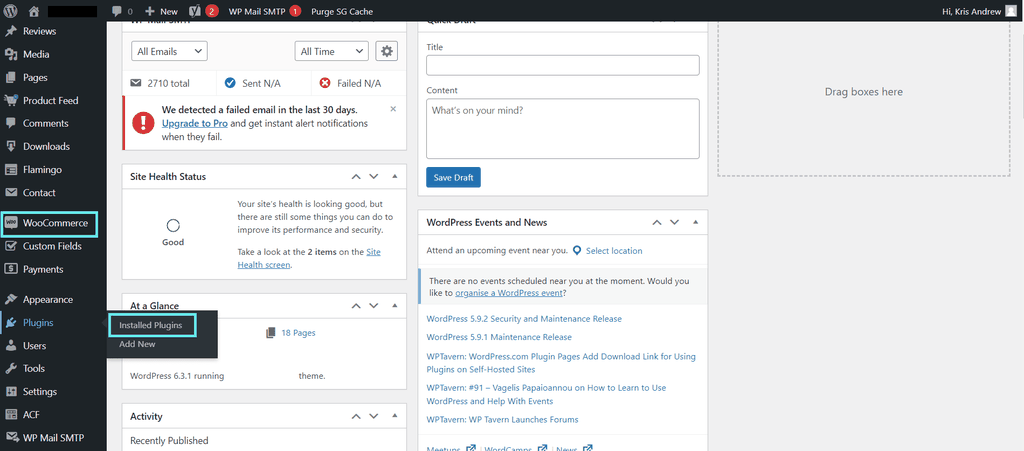
Step 2: Navigate to WooCommerce from the dash
You will open the WooCommerce dash with a new navigation, at the bottom of the menu, find settings.

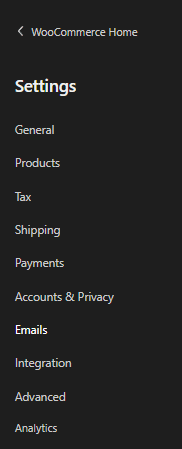
Step 3: Click emails
Within the settings, you can see the Emails menu item.
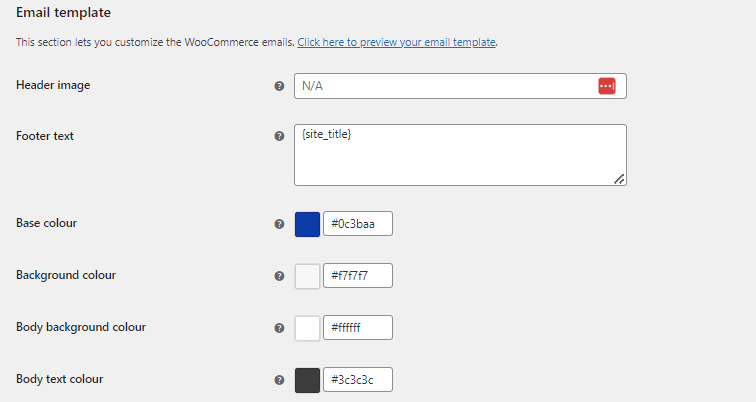
Step 4: Scroll down and edit settings
Within the email settings you will see the transaction emails you are already sending. Scroll down until you see Email Template.
Here you can edit text, brand colors, and sender information.
Customizing WooCommerce emails with GoDaddy
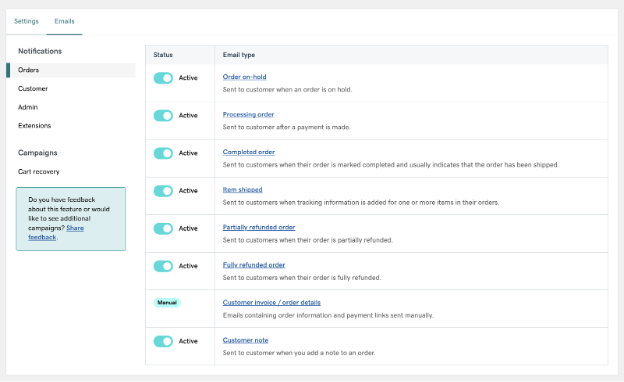
With a Managed Hosting for WooCommerce plan from GoDaddy, you can view your built-in WooCommerce emails by going to Marketing > Emails.
This interface is more user-friendly, and the emails are segmented into different categories, making it easier to find the messages you’re looking for.
Below is the list of order-related emails that you can automatically send to customers.
In addition to these transactional messages, WooCommerce also supports automated emails for many leading extensions and plugins.
For example, if you usep lugins or extensions to offer subscription products to your customers, you can set up automated messages to go out when their renewal is processed or if they change their plan.
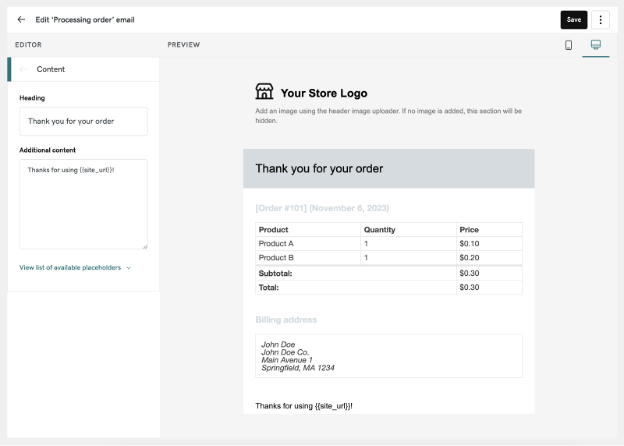
To edit the content for an email, you need to select the message from the list to open the settings and content editor. Click Content, and there, you can change the heading and the body of the message.
Best email marketing plugins and email automation tools for WooCommerce
Now that we’ve covered how to use the native WooCommerce setup to customize and automate transactional emails, let’s look at how to use extensions, plugins and other tools to set up email marketing and email automation in WordPress.
Constant Contact
Constant Contact is a renowned email marketing platform, and its WordPress plugin facilitates seamless integration with your website, streamlining the process of collecting leads and sending emails.
Quick links
Features
- Easy Integration: Directly embed Constant Contact forms into posts, pages, or widgets to gather subscribers.
- Automated Email Sequences: Send welcome emails, birthday greetings, or custom series based on user actions.
- Automated list building: Captured emails are automatically added to your email lists.
Pros
- User-Friendly
- Detailed Analytics
- Generous free trial
Cons
- Compared to other solutions, some users might find Constant Contact to be on the pricier side.
Best for
- Beginners
- Businesses with events
Pricing
Free trial with 100 emails within 30 days. After that, pricing starts at $12/month, depending on the number of contacts and features required (according to the most recent data available).
MailChimp
MailChimp is one of the most popular email marketing platforms. Like any good email marketing automation, MailChimp effortlessly integrates with WooCommerce with its WordPress plugin.
Quick links
Features
- Integrate sign-up forms into your site and auto-update email lists.
- Ecommerce integration: track sales, product views, and abandoned carts.
- Segmentation tools: Group subscribers based on location, behavior, or custom tags.
Pros
- Highly Customizable
- Automation Capabilities
Cons
- Compared to other solutions, some users might find MailChimp to be on the pricier side.
Best for
- Ecommerce
- Avanced marketers or those ready to learn.
Pricing
MailChimp offers a Free plan with basic features up to 500 contacts. Paid plans start at $10.01/month, increasing based on list size and feature requirements (according to the most recent data available).
Omnisend
Omnisend is here for those interested in omnichannel marketing, namely SMS marketing automation. This tool is designed specifically for ecommerce and works like a dream with WooCommerce.
Quick links
Features
- Multichannel Marketing: Combine emails, SMS, push notifications, and more in the same automation workflow.
- Segmentation: Use shopping behavior and other data to segment and target your subscribers.
- Forms & Pop-Ups: Collect subscribers with customizable sign-up forms, pop-ups, and landing pages.
Pros
- Advanced automation workflows
- Drag-and-drop email builder
- Pre-built templates.
Cons
- Pricing
- Complexity
Best for
- Ecommerce businesses: Strong focus on online retailers.
- Multi-channel marketing.
- Those looking to build workflows
Pricing
Omnisend offers a basic Free plan with 500 contacts. The next plan up is $16/month (according to the most recent data available) making it quite expensive.
Hubspot
HubSpot is a powerhouse in the world of inbound marketing and sales. The HubSpot WordPress plugin offers free newsletter sign-ups and other advanced features at a price.
Quick links
Features
- CRM Integration: Sync WordPress data with HubSpot's free CRM.
- Lead Capture Tools: Forms, pop-ups, and live chat to engage visitors and capture leads.
- Email Marketing: Send newsletters, automated follow-up emails, and more.
Pros
- Drag-and-drop email builder
- Seamless integrations
- Excellent support
Cons
- Advanced features require premium plans
Best for
- Scalability: HubSpot powers huge brands
Pricing
HubSpot offers free newsletters and a free WordPress plugin, but advanced features require plans (according to the most recent data available).
WP Mail SMTP
WP Mail SMTP provides resolution for guaranteeing consistent email sends from your website. The problem of email deliverability is an extensively encountered concern that can be effectively tackled.
Quick links
Features
- Connect with SMTP.com, which has been delivering emails for over 20 years.
- Send WordPress emails from a range of email accounts (eg. Gmail, Outlook etc)
- Reporting
Pros
- Reliable deliverability send from a range of email accounts
- User-friendly
- Versatility due to compatibility with SMTP providers.
Cons
- This is not a marketing tool
Best for
- WordPress Sites with email issues
- Those requiring simple email automaton as opposed to complex workflows
Pricing
Pricing starts from $49.00/ year (according to the most recent data available). There’s no free trial, but WP Mail SMTP will give you a 100% money-back guarantee.
AutomateWoo
AutomateWoo, developed by Woo, is guaranteed to seamlessly integrate with WooCommerce.
Quick links
Features
- Send emails based on triggers, rules and/or actions
- Analytics within the WooCommerce dashboard
- Pros
- One year of support
- Follow-ups: Automated personalized emails for abandoned carts, review requests, birthdays and more
- Workflow Builder: Visual editor to design and implement custom workflows
Cons
- Dependency: Relies heavily on WooCommerce, so if you were to change CMS you might need to migrate all your emails, too
- Scalability
Best for
- Those dedicated to the WordPress/WooCommerce platform.
Pricing
Only $9.92 per month and $119 if billed annually. Plus, Woo offers a 30-day of money back guarantee.
Closing thoughts on email automation for WooCommerce
Email marketing and automation for WooCommerce takes the hassle out of sending transactional messages and it helps you market to your customers much more efficiently.
Whether you set up an abandoned cart recovery sequence, or automatically reach out to old buyers that have been away from your site, there are many ways to benefit from automating and customizing your WooCommerce emails.
FAQs about WooCommerce Email Marketing and Automation
WooCommerce emails are easy enough to use but pretty limited in functionality, which raises a few questions, here are some answers to your most commonly asked questions.
Can you design emails in WordPress?
Yes, within the WooCommerce plugin, you do have some functionality to customize emails, but the plugin customizations are fairly restricted allowing you to change colors and text only.

Can I do email marketing with WooCommerce?
You can’t really run an email marketing campaign through the WooCommerce plugin, but you can send transactional emails.
You can think of your email functionality through WooCommerce as the basics, but if you wanted to run a sophisticated email marketing campaign, you’d probably want to integrate with something like MailChimp.
How do I see emails sent from WooCommerce?
You can’t see emails sent from WooCommerce without installing the WP Mail Logging plugin. If you install this plugin, you’ll have a log that you can view.
What is the email format for WordPress?
The emails sent to customers via WooCommerce, with no additional plugins, will be HTML emails.
How to test WooCommerce emails?
The easiest way to test your WooCommerce emails without extensions or plugins is by taking the action that triggers sending them (e.g. buying something).
The best way to test WooCommerce emails is installing a plugin that gives you previews, for example, preview emails for WooCommerce.
What to do if WooCommerce is not sending emails to customers?
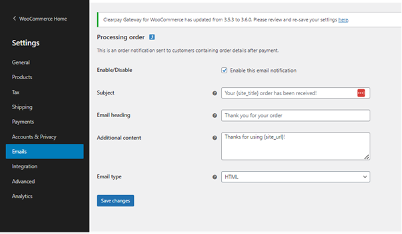
If WooCommerce is not sending emails to customers, the first port of call is your WooCommerce email settings. Head to WooCommerce > Settings > Email.
How do I get notified of a new order in WooCommerce?
WooCommerce will send you an email each time you receive a new order.
How do I change the sender of emails in WooCommerce?
Change your email sender options by navigating to WooCommerce > Settings > Email. Scroll down and you will see a section, ‘Email sender options.’ From there, you can edit the sender's name and email.
Disclaimer: All known trademarks contained herein are the property of their respective owners and their inclusion does not represent any affiliation, endorsement, or sponsorship.


