Hijacking happens. That’s where OpenSSH steps in to keep your virtual private server or dedicated server account safe. OpenSSH implements Secure Shell (SSH), a public key authentication system. It uses a pair of public and private keys to encrypt your communications. This encrypted connection enables you to work with little chance of someone peeking in at you, or worse, taking over your system.
True, you can do a lot with a cPanel Managed CentOS 6 account, but eventually you'll need more than Web Host Manager (WHM) and cPanel. In fact, if you're running a self-managed account with CentOS 7, Fedora, or Ubuntu, you must, as a requirement, use the shell command line for server administration. Convinced, yet? Then take a read below on how to configure an Open SSH client on a Linux server.
Configuring Open SSH
[requirements difficulty="3" time="10"]
To get started, you must first configure OpenSSH with a desktop client before you can log into your server with SSH. Even though most hosted Linux servers, including those from GoDaddy, come with OpenSSH already installed and ready to support your sessions, configuration is a necessary step. GoDaddy recommends either the OpenSSH client (Macs or Linux desktops) or PuTTy (Windows), a free Telnet/SSH client. Both operating systems support OpenSSH natively.
1. Set up your secure connection.
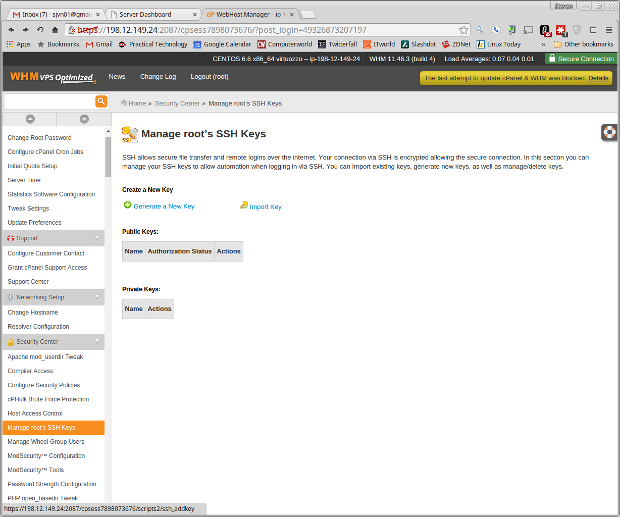
Once you have a client, you're ready to start setting up your secure connection. The easiest way to do this is with WHM. In this Web-based interface, begin by selecting Account Functions/Modify an Account in the left-hand menu. Next, select the domain to which you want to add SSH support, and click the Modify button.
This will take you to the Modify an Account box. Move down the screen and make sure that the Shell Access box is checked in the Privileges window. Hit save.
2. Set up your SSH keys.
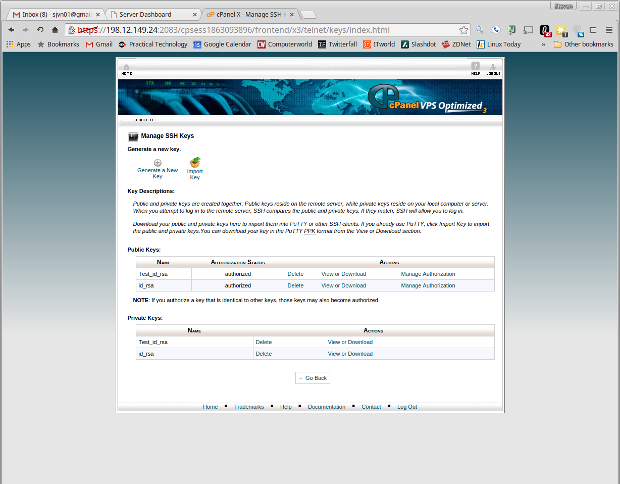
Use cPanel to set up your SSH keys. Go to Security/SSH Shell Access, and select Manage SSH Keys. In the next window, choose Generate a New Key.
At the next display, give your key a name; the default is id_rsa. Then, select a key password. This should be a complex one — no 123456 or PASSWORD here!
Select a key encryption type and the key size. The larger the key, the more difficult it will be for hackers to break, but the longer it will take to log in to your system. Once you've made the key, return to the Manage SSH Keys display, and authorize your new key.
By default, the cPanel SSH keys are associated with your primary ftp account. So, when you log in with SSH, you're logging in as the first ftp user.
3. Download the private key.
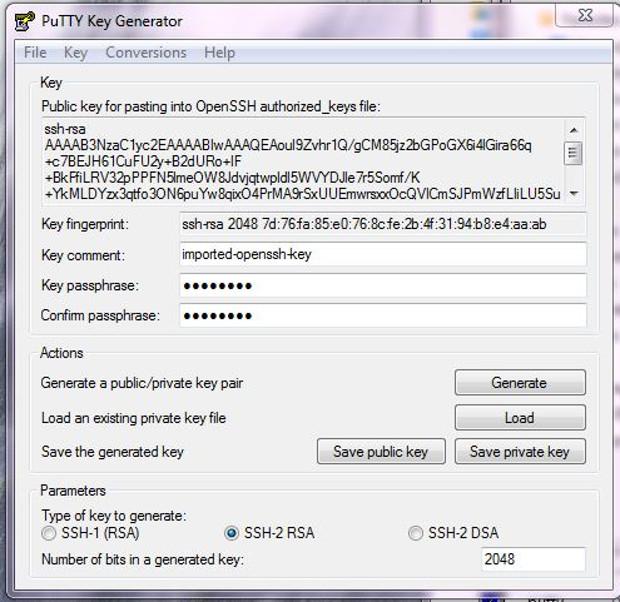
When it comes to downloading the private key to your PC, make sure your client can find and use it. With PuTTy, first give the private key the file extension .ppk. Then, download the program PuTTygen, which is PuTTy's key creator and manager. Use it to import your private key. The program will then ask you for the key's password. Once that's done, the program will tell you it needs to save it in PuTTy's own key format. Do this, and close PuTTygen.
4. Start PuTTy.
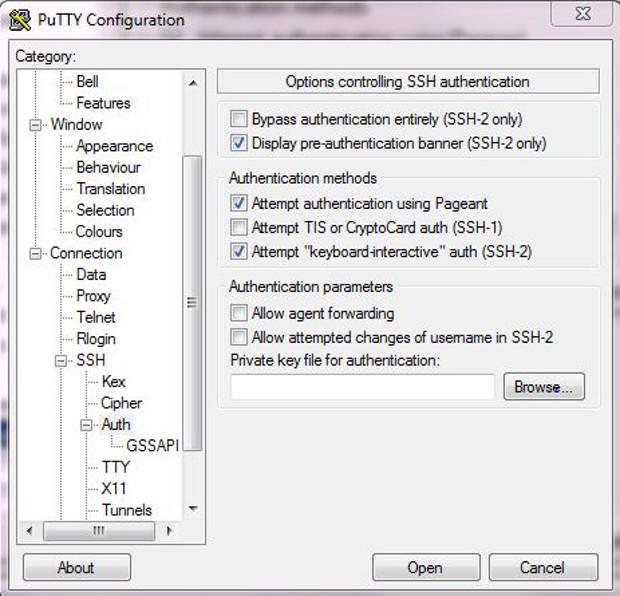
Open PuTTy, then give your account your domain or IP address and your SSH enabled username. Go down to the Connection/Data menu choice, and give the program your username. Follow this by clicking on PuTTy's menu to SSH/Auth. In this menu, select "Private key file for authentication," and browse your way to your private key. Once everything is loaded into PuTTy, and with your username and private key password, you're ready to log in to your server.
5. Place the private key file to the hidden SSH directory.
With Linux or Mac OS X, you must place your private key file to your hidden SSH directory. Typically, that goes:
/home/your_user_name/.sshYou must now set that file so only its owner, and no one else, can access it. To be specific, set the .ssh directory permissions to be 700 (drwx------) and the private key (id_rsa) should be 600 (-rw-------). To accomplish this, run the following commands from your local shell:
$ chmod 700 ~/.ssh$ chmod 600 ~/.ssh/id_rsaNow, invoke SSH by going to a terminal and running:
ssh your_domain_name_or_IP_address6. Set up the OpenSSH keys.
SSH will ask you for the private key passphrase, and then you should see the shell prompt for your server. If you don't have cPanel, here's how to go about setting up the OpenSSH keys on your CentOS 7, Fedora, or Ubuntu server:
On Ubuntu — Generate an SSH key pair with the ssh-keygen command. There are many variations on this command, but this is a good one to run:
$ sudo ssh-keygen -t rsa -b 4096 -f ~/.ssh/id_rsa -C "Enter an optional comment about your key"On Fedora or CentOS 7 — Run as root:
# ssh-keygen -t rsa -b 4096 -f ~/.ssh/id_rsa -C "Enter an optional comment about your key"What I've done here is create a strong 4,096 bit RSA password and made certain that it’s in its default location. If you want to give the key a different name, enter something else instead of id_rsa.
The program will now ask you for a password. Once again, give it a good one. Then after you've confirmed the password, the command will create two keys. The public one will have a name such as id_rsa.pub, and the private one will bear the name id_rsa.
7. Hit the ground securely running.
Download the server's private key to your local system. Once it's in place, just load it into the client using the aforementioned steps, and you're ready to securely run and manage your server.
Got questions? Let ‘em fly in the comments section below.


