Your menu is your restaurant’s most important marketing tool. It represents the very essence of your brand and the heart of who you are. What’s more, prospective diners are reading it. According to Toast's Restaurant Technology in 2016 Industry Report, 83 percent of American adults use their smartphones or tablets to look up restaurants. Three-quarters of this large group read the restaurant’s menu. When you create a menu, it’s important to get it right.
Some basics about menu design
Many restaurant operators make mistakes with their menu design that actually hurt sales and profitability. Menus that are poorly laid out, or have too many items, can be confusing. Those that are worn, tattered or dirty can be a turnoff for customers. For independent operators, keeping things simple, fresh, uncluttered and easy to read is generally best. Menus that change often are most attractive and intriguing to both new and existing customers.
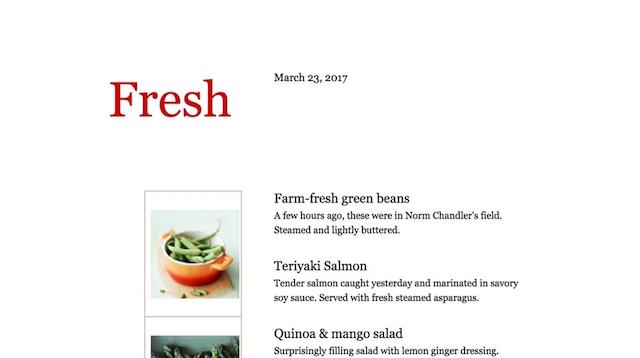
Instead of paying a designer to create a menu, why not do it yourself with Microsoft 365 templates?
But there’s no need to hire an expensive designer to create a menu for you. Consider using Microsoft 365 templates to do it yourself. These templates offer clean, simple designs and the ability to easily update offerings and menu design frequently. Moreover, they’re intuitive and simple to use.
Finding the right template
While many restaurateurs hire graphic designers for their menu design, Microsoft 365 templates bring quite a bit to the table. Aside from being budget-friendly and easy to use, these templates encourage simplicity. This is important for menu success as complicated menus can negatively impact sales. Templates that are easy to edit and update encourage operators to change and add new items frequently — which diners love. The ability to print fresh menus right in your restaurant office is a big advantage.

Microsoft 365 offers a variety of templates — some of which are already loaded on your computer. For a larger variety, visit the template section online. While there are many choices — some with extensive graphics — it’s better to steer clear of any that are too busy or too cluttered.
Using a simpler template when you create a menu will allow your menu items to stand out.
Once you’ve chosen a template, simply click in the boxes to create a menu, adding your appetizers, entrees, salads, desserts and drinks. Naming your menu items properly and adding informative, appetizing descriptions is important, but remember to keep it straightforward and simple. Feature your most popular and most profitable menu items in prominent places, or at the top of their category.
The finishing touches
After you’ve entered all your items, do a thorough proofread — don’t just rely on spell check to catch your mistakes. It’s common for descriptions of food items to contain errors that spell check won't catch. Having misspelled words or grammatical errors on your menu is a careless error, and gives the impression to your guests that your restaurant is not paying attention to the details. Customers will be left to wonder if this lack of attention extends to your kitchen.
Once you’ve proofread all menu items and descriptions and made sure they’re free of errors, be sure to save your document. Nothing’s worse than working all night on a menu, then forgetting to save.
Now, you can begin to edit the design if you’d like. Most Microsoft 365 templates will let you move things around a bit so get creative and see what you can come up with. Be careful with your font and make sure that it’s easy to read. Try to stick with one or at most two fonts throughout the menu because using too many can give your menu an unappealing, busy look. You can change the colors and usually some of the elements, but remember that less is more.
Few menus are more impactful or classy than a freshly printed, block print, black and white menu.
While you might think that your menu needs to be flashy and colorful to look professional, that’s not necessarily the case. There’s something intriguing about a restaurant that prints their menu often, and is consistently offering new items for their customers to try and enjoy.

Upload it to your website
With more and more diners using their smartphones to read restaurant menus before picking a place to eat, you’ll want to make sure your website displays features your latest menu. The format you’ll likely use to save your Microsoft menu is a PDF and they aren’t easy to read on smartphones or tablets. So it’s a good idea to do a couple of things to it before putting it online. One you’ve done it a few times, it’ll be second nature.
Create a menu to put today’s catch at your fingertips
Microsoft 365 menu templates give restaurant owners and operators the ability to create a menu that can be changed frequently — even daily. While some might insist that restaurant menus should always be professionally designed, there’s a lot to be said for the savings and flexibility of do-it-yourself menus.
Do-it-yourself menus save money and can be changed daily.
With a relatively small investment in a quality laser printer, ink and high-quality paper, you can shift on a dime. Add seasonal specials, delete poor-performing items and evolve your menu to keep things fresh for your guests — all without running to the print shop.


