
Fresh, unique images are essential for engaging users online, especially when attention is spread across endless pages of content. Images help communicate ideas quickly and make information easier to process at a glance.
Written content plays an important role in explaining details, but images often leave a stronger impression. And when images are optimized for the web, they support brand recognition, improve the browsing experience, and help guide users toward the next step in their journey.
Guide to image optimization
You’ll find everything you need to know about optimizing images for the web — including how to optimize images for SEO — in this guide.
Let’s get started!
Why images matter
Image optimization starts with photo selection and quickly moves on to providing smart naming systems, creating alt text, and ensuring the files are the right size and type.
But first, it's crucial to fully understand why you want images on your website.
Images reinforce content
Fundamentally, images are important because they are content — the kind of content that creates a huge impact on people.
Think about how long it takes to read a short, punchy paragraph. Not long, right? However, images can be processed in 13 milliseconds — 60,000 times faster than text alone.
More often than not, you'll use images along with text to help drive home a point. This is extremely effective. Along these same lines, textual information can become even more powerful when worked directly into an image by creating infographics.
Images improve content retention
Although infographics can create virality for your brand, a simple photo, in the right context, can significantly improve audience comprehension.
Web content containing visuals, such as images and videos, can receive up to 94% more views than text-only websites.
In the same vein, email newsletters with visuals get more clicks and engagement. Images also increase dwell time on a page.
Images communicate your brand identity
The specific images you use can help to communicate the nature of your brand’s identity.
Each picture you post can help enhance, refine, and solidify that identity. Such visuals provide you with the opportunity to create consistent messaging, which leads to brand familiarity and, eventually, customer loyalty.
This ability to associate with a brand without the use of text is incredibly powerful.
Images drive traffic to your site
Image searches represent 10.1% of all queries generated on Google. Along these lines, an increase in website visits from image searches has significantly increased since Google updated its "View Image" button from Image Search to "Visit [Page]."
Images make your website more visually appealing
A well-designed website will integrate strong images and logos with text. When posting additional content throughout your website, you should take the same approach — don't try to take a shortcut around publishing sharp images.
What is image optimization?
SEO image optimization is the process of creating and delivering high-quality images in the ideal size, format, and resolution to increase user engagement. It also involves labelling images correctly so that search engine crawlers can find them and understand what they are.
7 steps to optimize images for the web

Given how important images are to a company's brand and online presence, it's a surprise that more people aren’t fluent in incorporating image optimization into their SEO strategy.
So let’s change that with these seven steps:
- Choose the right images.
- Carefully consider the text associated with your images.
- Adjust image size and format.
- Consider lazy loading.
- Enable browser caching.
- Don’t forget image metadata.
- Create an image sitemap.
1. Choose the right images
Search engines focus on delivering the most relevant content to users, which includes images. Because of this, you want to select images that are relevant to what you're talking about.
If you're focused on social media content marketing, for example, don't start throwing around pictures of famous pop stars simply to get attention — unless your business is legitimately connected to that person (and you have their permission).
Don't add images to a post for the sake of having images.
Ultimately, you should include images in your posts to complement the content, break up long blocks of text, and help your audience better understand the concept at hand.
Use your own images
When possible, you want to use your own images. The online world is dominated by stock photos, so creating your own content is notable.
Your original image is unique and better represents the point you’re trying to get across.
You’re not just limited to photos here, though. The images you create might include graphs, charts, and infographics, as well as other visual aids.
For example, if you own a restaurant, the photos you take of your dishes are going to better represent what you serve than a generic picture. Such images will also help you avoid accidentally misrepresenting your product or services.
Knowing and applying best practices when photographing your products can make all the difference in the long run.
Stock photos are an option
In cases where you don't have an image of your own that matches what you're writing about, and you're using the image more as an illustration (instead of an example of the product you're selling), it's perfectly fine to use stock photos — if you have the proper licenses.
Understanding image licensing is incredibly important, as the photos are considered intellectual property.
A license establishes the legal scope within which the image can be used. Some images can be used for many purposes, even commercial purposes, as long as they are appropriately credited.
For other images, commercial use might be strictly prohibited. Basically, an image license is a contract in which the photographer grants specific rights to a client/person using their image.
You can obtain licenses by either hiring a photographer and commissioning new work or by drawing from work that already exists. Sometimes, work that is already published online can be free, but often you will need to pay for usage rights.
Facing the facts
As a species, humans are deeply programmed to pay attention to faces. Because of this, images with human faces are usually more effective in encouraging conversions than other types of graphics or animations.
To be sure, there are plenty of situations where using images of people's faces simply won't work. But when there is an opportunity to do so, do so.
2. Carefully consider the text associated with your images
If you're used to uploading a photo on WordPress, for example, you might recall being prompted to add Attachment Details. Because most people don't know how these additional details impact SEO image optimization, they often don't have the patience to fill in this information.
Resist the temptation to skip filling out those text details.
The information WordPress is prompting you to add is essential to improving your SEO image optimization. Feeling lost on what should be included when adding text to your images? Never fear, we’ll cover each option below.
Keep in mind, though, while WordPress is one popular content management system for websites, the options we’ll be discussing here will generally apply to many different website creation tools.
With that in mind, let’s break it all down.
Image title
With any image that you add, it’s critical that you use an accurate and relevant title. Often, the default title for an image will reflect the file name of whatever you uploaded. If this amounts to random letters and numbers, this mix won’t be very helpful to a search engine.
So, before you upload a photo, give it a file name that accurately describes the picture.
The file name should also incorporate keywords that the image could rank for in a Google search, omitting stop words. You'll want to separate the keywords with hyphens — not underscores — as search engines do not recognize these.
Using the right keywords can improve your SEO, as they help search engines better understand what the images are.
Image alt text
Search engines gather information by having "spiders" crawl through websites, logging information as they go. Unfortunately, these spiders aren't capable of seeing an image and understanding it — they only read code, relying on associated information to guide them.
Alt text was designed to provide a description of the image in cases where the browser can't display the image.
The alt text also helps search engines understand what the image is. Additionally, alt text helps with accessibility. Such information is useful for users accessing a webpage with screen readers or using browsers that can't process images.
By including keywords in your alt text, you can give your SEO a little boost too — just make sure you refrain from keyword stuffing.
Accessibility considerations
Accessibility should be part of every image decision. For inline SVGs, adding a <title> element and linking it with aria-labelledby helps screen readers interpret the image. For standard image files, descriptive alt text is essential. Your alt text should explain what the image shows, not act as a place to cram in keywords. Clear, accurate descriptions help both users and search engines understand your content.
Image caption
Captions are the descriptive text below an image that is visible to all users.
A caption can provide additional information about an image that might not be obvious to users, such as the date the picture was taken, where it was taken, and who is in it. You can also use the caption to reinforce the purpose of the image. In other words, the caption provides additional context.
If you're using the same image for several posts, changing the caption you use with the image can be helpful for SEO, as well as user engagement.
Image description
Image descriptions are often said to be one of the best-kept secrets of the attachment post. This is because once you enter a description, it is stored as content for the attachment post. So, if someone clicks on the attachment post, they will be sent to a separate page showing the image, image title, caption, and image description as post content.
3. Adjust image size and format
When optimizing images for SEO, image size, file format, and compression all affect how users experience your site. These factors influence load times, visual quality, and overall performance. If images are not handled carefully, slow pages can lead users to leave and look elsewhere.
Resize your images
High-resolution images can slow down page load times, especially on mobile devices, where more than half of searches now occur. Reducing image dimensions is an effective way to improve load speed while maintaining acceptable visual quality.
It is important to distinguish between image size and file size. Image size refers to an image’s dimensions, such as 1024 x 680 pixels, while file size refers to how much storage space the image requires, such as 350 KB. Larger dimensions often result in larger file sizes, but compression and format selection can reduce file size significantly.
Lowering image quality slightly usually does not affect how an image appears on screen. It simply limits how well the image can be printed or enlarged, which rarely impacts the online viewing experience.
Choose the right image file types
Choosing the right file type can help with image optimization, as certain file types are best suited for specific applications.
The most common web image file types are JPEG, GIF, and PNG.
Usage scenarios
Each image format has strengths depending on how and where it is used. Here’s a quick guide to help you decide:
- SVG: Best for logos, icons, and simple illustrations that need to scale cleanly across screen sizes without losing quality
- BMP: Use only when compatibility is required, as file sizes are typically large
- GIF: Suitable for simple animations and small graphics with limited colors
- JPEG: Best for photographs, offering a balance between image quality and file size
- PNG: Ideal for images requiring transparency or sharp edges, such as logos and graphics
- WebP: Designed for efficient compression and faster load times where browser support exists
- AVIF: Offers strong compression and image quality when browser support is available
JPEG
Joint Photographic Experts Group — better known as JPG/JPEG — is one of the oldest file types.
It's best used for photographs because it allows the user to balance file size and image quality. One of the significant advantages of JPEGs is that they are easily compressible, which makes them even smaller. However, over time, image colors can degrade.
GIF
Graphics Interchange Format, GIF, which was made famous due to animated raster graphics files, has an importance beyond a gnome crocheting heart balloons and other silliness.
Users are advised to use the GIF format when there are large areas of uniform color and the total number of colors is fewer than 256. If you used a JPEG for a similar image, it would be a huge file. On that note, GIF formatting should also be your go-to for animated images and small icons.
PNG
Portable Network Graphics, PNG, is supported by most browsers, has a smaller file size and more colors than GIF, and its colors do not degrade as easily as JPEG. However, transparent PNG images run into a bug when used on Internet Explorer, so it’s best to use PNG format when you aren't dealing with transparent images.
SVG
SVG, which is short for Scalable Vector Graphics, is the perfect format for images that need to look sharp everywhere. An example of this would be logos. SVG files are a smart choice because they scale cleanly at any size and can be styled with CSS without losing quality. Google supports SVGs when they are used correctly, making them both a design-friendly and search-friendly option.
There are two common ways to use SVGs on your site, and each serves a slightly different purpose.
- Inline SVGs: When SVG code is embedded directly into your HTML, you gain more control over styling and accessibility. This approach allows you to add a <title> element and connect it with aria-labelledby, which helps screen readers understand the image content.
- File-based SVGs: You can also reference SVGs as image files using an <img> tag or within a <picture> element. This approach works well when you want to offer multiple image formats for responsive design, such as pairing SVGs with WebP or PNG fallbacks.
Images can also be inlined using data URIs, which embed image data directly into the HTML. While this reduces HTTP requests, it can increase page size, so it should be used carefully. An inlined image would appear as:
<img src="data:image/svg+xml;base64,[data]">Tip: When adding images inline, the following formats are supported by Google for the “img src” attribute: BMP, GIF, JPEG, PNG, WebP, SVG, AVIF
Choose the right compression rate
If you've chosen the image file type you think is best for your needs, but it’s still too big, you might want to consider compressing the image. When doing this, choosing the right compression rate is essential.
If you compress an image too much, you'll reduce not only the file size but also the quality.
A 60% to 75% compression will keep your image quality decent. However, it's best to use that range as a starting point and then experiment with different file sizes and ratios to see which one works best for your site.
Some recommendations for image compression tools are:
- Shortpixel or Smush are your best bets when compressing images in WordPress directly.
- Pixlr (JPEG) or GIMP are great for optimizing outside of WordPress.
- WP Rocket and Imagify are helpful for websites that have a lot of images, as they include functionality for GZIP compression, caching, and image optimization. They can help make your files smaller without sacrificing quality.
Now, if you don’t want to mess around with plugins, you can always use Photoshop to modify your images. To do this, use the "save for web" option, which minimizes file size while optimizing quality.
Other tips for dealing with large image file sizes
There are a few other things you can do to help keep your image file sizes small and increase the speed of your website. If you're relying on stock images, try downloading smaller files. If it looks fine to you in the size-specific preview before you download it, it's going to look similar on your website.
Another tip is to create responsive images. Such images will grow or shrink depending on the browser size and device used. This helps with both site speed and SEO.
SVG in responsive design
For responsive design, SVGs can be used with the <picture> element or with srcset on an img element to offer multiple versions. Because some browsers or crawlers may not fully support these attributes, a standard src fallback should always be included. The <picture> element allows different formats and device characteristics to be grouped together, ensuring compatibility when newer formats are not supported.
4. Consider lazy loading
Lazy loading is when the browser defers loading images until they need to be shown on screen. This means that images further down on the website (below the fold) won't be loaded until a user gets to that part of the website.
Lazy loading can significantly increase your website's speed, especially on long pages that include many images below the fold.
Although there is an ongoing debate on the impacts of lazy loading for SEO, Google's PageSpeed Insights tool recommends doing it — and Google is in charge of the whole game.
There are several ways to implement lazy loading. However, most of them involve manual coding. That said, if you’re using WordPress, the A3 Lazy Load plugin comes highly recommended.
5. Enable browser caching
Browser caching is when your files, including images, get stored in visitors' browsers so that these files load faster when they revisit the site in the future. You can enable browser caching through the use of plugins like W3 Total Cache.
You can also enable browser caching manually by adding this code to your .htaccess file:
<IfModule mod_expires.c>

ExpiresActive On

# Images

ExpiresByType image/jpg "access 1 year"

ExpiresByType image/jpeg "access 1 year"

ExpiresByType image/gif "access 1 year"

ExpiresByType image/png "access 1 year"

</IfModule>
Modify the "1 year" in the code for any time frame that seems suitable to your needs (ask yourself how often you’re updating content), such as "1 month" or "1 week."
6. Don't forget image metadata
Metadata is any auxiliary information stored within a file, including when the file was created or last edited.
Other image metadata can include thumbnails, copyright information, and color profiles. This type of information is considered structured data, as it resides in a fixed field within a record or file.
By adding structured data to your images, you can help search engines display your image as rich results.
Google Images supports structured data for product images, videos, and recipes. For example, if you have recipes on your site and you add structured data to your images, Google can add a badge to your image showing that it belongs to a recipe.
To create such structured data, you're best off following Google's structured data guidelines.
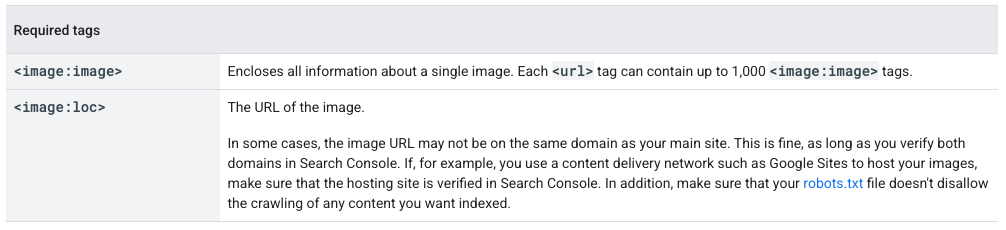
7. Create an image sitemap
A sitemap is important because it tells search engines about all the pages on your site.
Google allows image sitemaps to contain URLs from other domains, unlike regular sitemaps, which enforce cross-domain restrictions. This means you can use content delivery networks to host images, which can improve your website's performance.
Here’s the good news: Building an image sitemap isn't something you'll have to do manually.
If you’re using WordPress, you can use the Yoast SEO plugin to automatically add your content — including photos, videos, thumbnails, and posts — to a sitemap. Unfortunately, Yoast does not include any captions you have with your pictures in the sitemap. You may add these to your site manually using these codes:
Conclusion and next steps
Images are essential to your website, as they reinforce your brand and significantly increase the impact your site has on users. However, image files can also slow your website down to the point that you’re limiting your exposure to users and losing clients. To combat this drag in speed, as well as increase your SEO, it’s crucial to optimize your images for the web.
Image optimization can feel like a lot of work. Even when you understand how to choose the right images, the right associated data and the right image size for your website — it’s easy to feel overwhelmed.
If you are feeling bogged down with optimizing images for SEO, GoDaddy SEO Services has your back. Contact the GoDaddy SEO experts today to learn exactly how they can help!