In 2011, Justin Dube, a motorcycle enthusiast, lost his job as a convenience store manager and was struggling to make ends meet. so he started a side business dismantling motorcycles and selling online the parts on eBay. He made his first sale on the same day he posted his first listing, and by 2012, he was shipping more than $5,300 worth of parts to people worldwide each month.
“That’s how our business on eBay came to be,” he told eBay in 2013. “Every month, we increase our inventory and make more money than the last.”
Selling on eBay, Dube was able to not only do what he loved, but also make a living off it, and his success illustrates just how user-friendly eBay’s system can be — even for first-time sellers. If you’re not familiar with the marketplace, you just need a bit of foundational knowledge to start selling items to eBay’s 182 million active buyers.

Go from idea to online in minutes with GoDaddy Airo™
Get started now.
How to successfully sell on eBay
Selling on eBay doesn’t need to be hard, but you do need to ensure you follow some key steps. Below, we'll breakdown everything you need to know for successful selling in three parts:
Editor's note: Sell your products from one place on the web’s popular marketplaces such as Instagram, Amazon, Google, eBay, Etsy, and Walmart with our integrated multi channel listing software. If you’d like to diversify your sales channels, you can also buy a domain then create your own store with our online store builder, which allows you to start selling quickly using GoDaddy Payments, an online payment processing service. For physical sales we also provide a Point of sale device.
Related: What is a POS
Let’s dive in.
Part 1: Set up an eBay account
You can set up your eBay account in just a few steps.
Step 1: Register for a personal or business account

Visit ebay.com and click “register” in the top left of the menu to create an account.
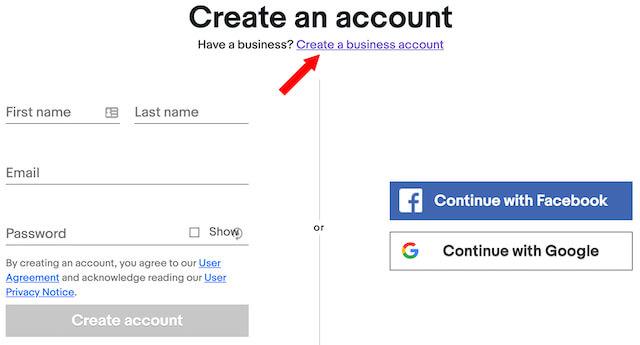
The page defaults to registration for a personal account, which is ideal if you plan to sell small amounts of items occasionally. However, if you plan to sell large quantities regularly, opt for a business account, as illustrated below.
Step 2: Create a user ID
Next, you’ll be asked to choose a user ID. Your ID will be displayed to every user who views your listings or interacts with you, so choose a professional user ID name that reflects your business. For example, two of eBay’s top sellers, thrift.books and musicMagpie, sell books and compact discs, respectively.
Step 3: Set an automatic payment method
After creating a user ID, you’ll be prompted to provide an automatic payment method: PayPal, a checking account, or a credit or debit card.
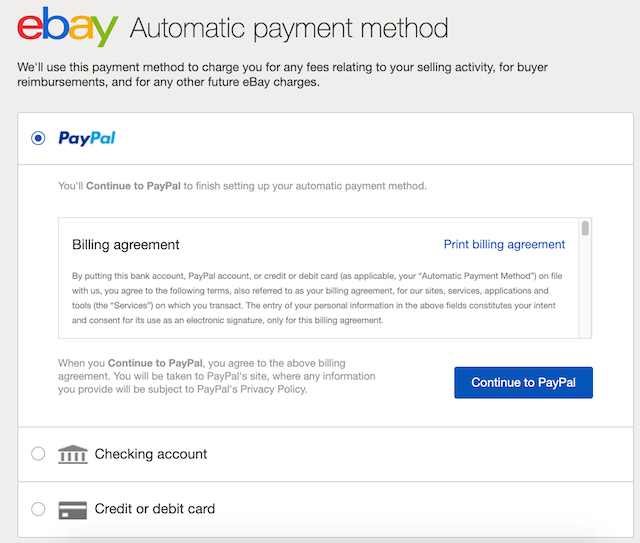
eBay will use this payment method to charge you for any fees relating to your seller activity, such as buyer reimbursements.
Part 2: Selling on eBay and creating a listing
Now that you’ve created a seller account on eBay, it’s time to list your first item.
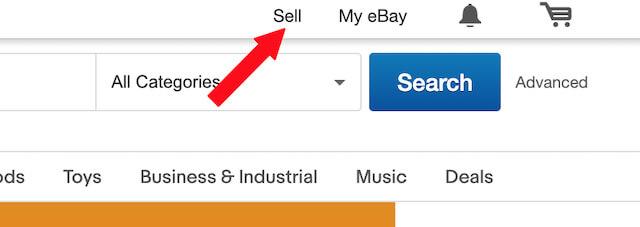
Log in to your account and click “Sell” in the top right-hand corner to get started.
Step 1: Identify your product
There are two different ways you can list an item for sale: eBay’s quick listing tool or the advanced listing form. The quick listing tool can be a good choice for your first listing because it’ll provide guidance on how to price and ship your item based on previous sales of the same or similar items. However, if you have a lot of inventory or are going to be selling on eBay often, you may want to use the advanced listing form because of its additional features.
How to identify your product with the quick listing tool.
Simply enter words that describe your item or its UPC or ISBN code in the search bar. eBay will automatically provide listing suggestions based on similar items that have sold. For example, if you’re listing a pair of Nike men’s shoes for sale, the quick listing tool will start populating information for you, as illustrated below.
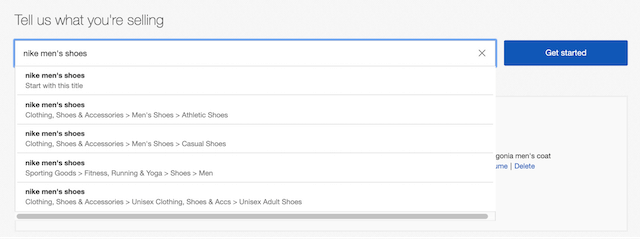
If you see a listing that matches the product you’re selling, click “select” as illustrated below.
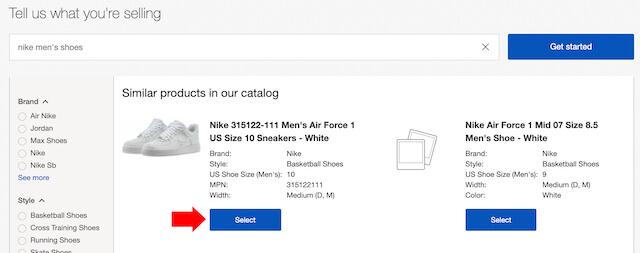
This will populate your listing with information from the selected listing, and you’ll then have an opportunity to edit any fields to customize your particular product.
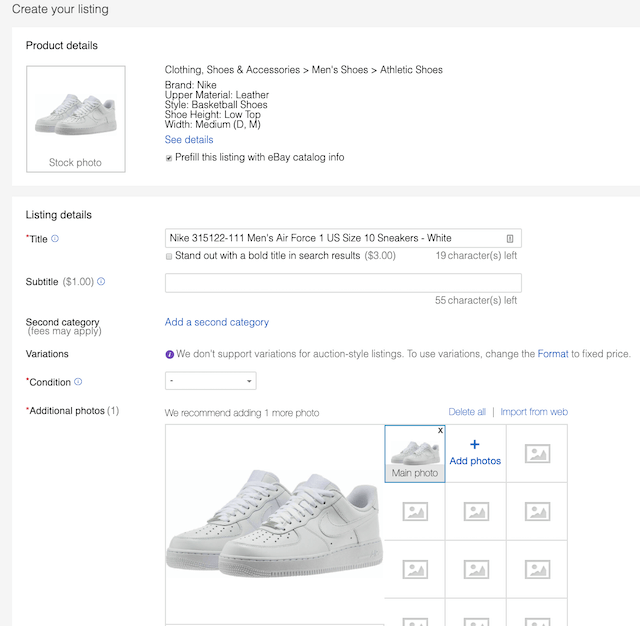
How to identify a product through the advanced tool.
Type the keywords for your product into the search bar and click “Get started.” If you’re unsure which keywords to enter, identify your product by clicking “Browse categories” and selecting the category and subcategories that best match your item. For example, if you’re selling a book, you can then select the book’s genre.
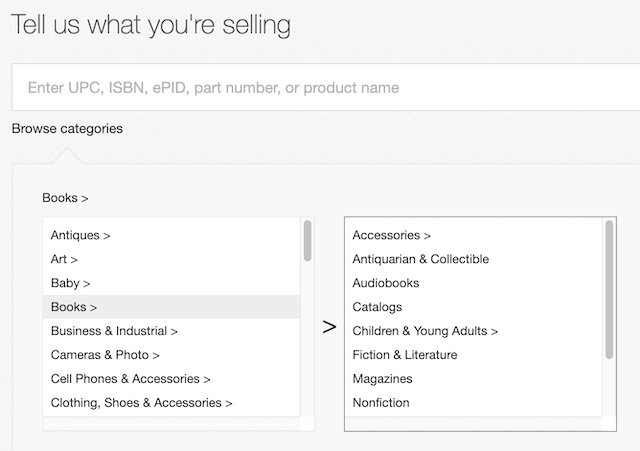
Once you’ve made your selections, a form will be generated with a variety of fields to fill in about your item.
- The title is the first line of text people will see about your product. Include the most important, compelling information about the item in the title — this will make the listing easy to find and entice buyers to click on it.
- eBay also requires that you fill in product identifiers, such as UPCs and ISBNs.
- Fill in item specifics or the brand and physical details of what you’re selling, such as size, make, model, and color. This information will make it easy for buyers to find your product through search.
- Include up to 12 high-resolution photos of the item you’re selling. The minimum and maximum image dimensions are 500×500 pixels and 9000×9000 pixels, but 1600×1600 pixels is recommended. Photograph your product in front of a white background in a well-lit area to make the listing look professional and uncluttered. Including quality images isn’t only visually appealing to buyers, but there’s also a science to it, as detailed in this FollowUp article.
- Write an item description that’s clear and concise. The copy should answer any questions a buyer may have about the item (size, dimensions, specifications, etc.). Keep the formatting simple, and consider using bullet points to make the description quick, easy-to-read, and mobile-friendly.
Now that your product information is complete, you can move on to the next step.
Related: Etsy VS eBay
Step 2: Choose between Auction-style and fixed-price selling
Next, you’ll have to select which type of selling you would like to use on eBay: auction or fixed price.

In auction-style listings, buyers bid on items until the end date you set. You can also include an “accept Best Offers” option, which allows buyers to make an offer on an item that you can then choose whether to accept. While you can set a fixed price on auction-style listings, remember that it must be 30 percent higher than the starting price.
It’s best to use auction-style listings in circumstances when you’re unsure of the item’s value, when you want to sell an item quickly, or when your item is rare or unique.
In fixed-price listings, also known as Buy It Now listings, you set the price for the item. This selling method is best to use when you know the price you want to get for an item, when you have a lot of inventory, or when you want your listing to appear in search results for more than 10 days.
Now that you’ve selected your selling format, you can decide how long your listing will last.
Step 3: Set your listing duration
Next, you’ll be asked to set a start date and duration time for your listing.

Consider the following factors when deciding what the start date and duration of your listing should be:
- Your type of selling:
- Auction-style listings can last for one, three, five, seven, or ten days.
- Fixed-price listings are considered “Good ‘Til Canceled,” meaning they’ll be re-listed every month until the item is sold or you cancel the listing.
- When buyers will be online: Think about when users are most likely to place bids on your item, and keep in mind that the more people who are online when your auction is closing, the more bids you’re likely to receive. For example, if you list an item for sale at 3 a.m. on Saturday and select a three-day listing duration, it’ll end at 3 a.m. on Tuesday when your listing won’t be in front of as many potential buyers, so in this scenario, it would be best to schedule your listing for a later time.
Now you can move on to actually putting a price on your product.
Step 4: Price your item
The fields for pricing your item appear just below the listing duration.

The importance of pricing can’t be overstated on eBay. Setting a competitive rate not only impacts buyers’ willingness to pay, but it also affects how visible the item is in eBay’s search results.
Pricing isn’t a guessing game, so do a bit of market research to find a competitive rate for your product by searching eBay’s completed listings to see how many similar items have sold and at what rates. To see this search filter, scroll down the left-hand panel on a search results page until you reach the Preferences section. Under “Show only,” check off the box for “Completed Items.”

Listings with a green price are those that sold, while listings with a red price are items that ended without a sale.
Take a look at the prices for both sold and unsold items, and consider how the items’ pricing might have played a role. Were the unsuccessful listings priced exceptionally higher, or could another factor, such as high shipping costs or poor seller feedback, have prevented an item from selling? You can also use this information to determine how much an item sells for on average and to see if other sellers had more success selling the item with a fixed-price or auction format.
Keep in mind that if you’re selling a high-priced item, an antique, or a collectible, it can be helpful to include a professional valuation or authentication paperwork to justify the item’s high price and appeal to bidders. You can include an image of any such paperwork in the listing photos.
Now that you’ve determined the perfect price to get buyers’ attention, you can select shipping options for your item.
Step 5: Set up shipping options
Once you’ve set your price, you’ll need to set up shipping options for your product. Aim to make your shipping policy as attractive as possible, whether that’s offering two-day shipping or free returns.
In the world of Amazon Prime, convenient shipping is an expectation of online buyers that you must deliver on to stay profitable.
Beyond meeting buyers’ expectations, offering a strong shipping policy increases the visibility of your products on eBay. With the marketplace’s search engine, buyers are able to sort products with short shipping times that meet eBay’s Guaranteed Delivery (EGD) guidelines. To qualify for EGD, a listing must have a same-day or one-day handling time.
To set your shipping policy, fill out the following information in the listing tool:
- Type of rate: Select a flat rate for all buyers, a calculated rate based on the buyer’s location, freight shipping for large items that weigh more than 150 pounds, or “No shipping: Local pickup only.”
- Carrier services: You can choose from a variety of carriers and their services, including USPS, FedEx, and UPS.

If you are offering international shipping, you’ll also have to choose a type of rate, but you’ll have only two options: flat rate or a calculated rate based on the buyer’s location.
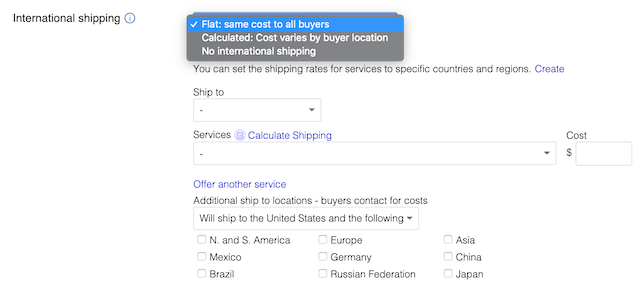
If you need assistance with sending orders on time, consider signing up for eBay’s Global Shipping Program (GSP). With this program, sellers ship sold items to eBay’s global shipping center in Kentucky. From there, eBay handles any customs paperwork and ships the products to buyers across the globe.
Because eBay is taking care of the shipping, eBay will be accountable for any delivery mishaps that may occur.
There’s no fee to join GSP. However, standard eBay selling and PayPal fees apply, including PayPal’s transaction fees for cross-border payments. The final fee is calculated based on the total amount of the item sale, including any domestic shipping fees. Here are a few tips that can help you lower your eBay fees. At the same time, if you start your own online business, you will be more independent in terms of cost, without relying on a third party platform like eBay.
Part 3: Manage your eBay listing
As soon as your listing is live, you’ll receive an email informing you that it’s posted, but your role as the seller is far from over. You’ll still need to engage with buyers who have questions, possibly promote your listing, and complete the transaction if your item sells
While eBay will email you if a buyer asks a question, you can also keep an eye on your listing by logging in to eBay and clicking on “My eBay” in the top right-hand corner of the menu. From here, you can view your active listings, see how many people are watching your listing or have placed bids, and answer any buyer questions.
Step 1: Build a positive seller reputation
It’s important to maintain a positive seller reputation. This increases your credibility as a seller, encourages buyers to shop with you, and even boosts your search ranking.
How to develop a positive seller reputation:
- Offer competitive pricing and shipping
- Answer buyer questions promptly
- Provide excellent customer service
- Keep track of inventory to avoid canceling sales
- Track shipped items and provide customers with delivery dates
- Promptly report any issues you have with a buyer
- Leave positive feedback for buyers and ask them to leave you feedback as well
As you can see, building a positive seller reputation involves taking action at every step along the way, from creating your listing to shipping a purchased item.
Step 2: Complete a transaction
When an item sells, eBay notifies the seller immediately. Once you get that message, complete the transaction quickly and accurately to maintain a positive seller reputation.
Here are a couple of tips for completing transactions in a way that’s both secure and considerate of the buyer:
Ship the product as soon as the payment is verified.
eBay will inform you as soon as payment is received. Sometimes payments can take longer to arrive based on the type of payment a buyer uses, but you can always check payment status through “My eBay account.” If you see that a payment is pending or on hold, PayPal or eBay may have placed a temporary hold on it. This is common if you’re a new seller who hasn’t established a selling record yet. You’ll become an established seller after it’s been more than 90 days since your first successful eBay sale or if you’ve had more than 25 transactions and made $250 in sales.
Take action if you don’t receive payment within a couple of days.
Start by contacting the buyer to confirm when they plan to send the payment. If the buyer doesn’t respond to your message or invoice, report the unpaid item to eBay. You must report your case within 32 days of your listing ending. Once a case has been opened, the buyer has four days to respond or pay for the item. After four days have passed, visit eBay’s Resolution Centerto close the case by selecting “receive fee credit” and then “close case” on the following page. The unpaid item will then be recorded on the buyer’s account, the fee will be credited back to you, and you can re-list your item.
If you find that your listing isn’t generating much interest though, you can get it in front of more potential buyers by doing a simple promotion. Check out our dedicated article on tips for selling on ebay, you can get some more ideas to improve.
Step 3: Promote your listings
Selling on eBay can be a challenge simply because of the billions of listings that exist on the marketplace.
By promoting your listing through eBay advertising, your product has a better chance of standing out and attracting buyers. In fact, according to eBay, the exposure of promoted listings is 36% greater than non-promoted ones.
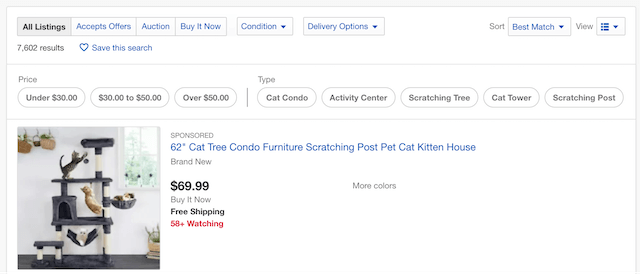
Promoted listings appear at the top of search results when a buyer searches for your particular item. The listing will be identified as “Sponsored,” as in the screenshot below.
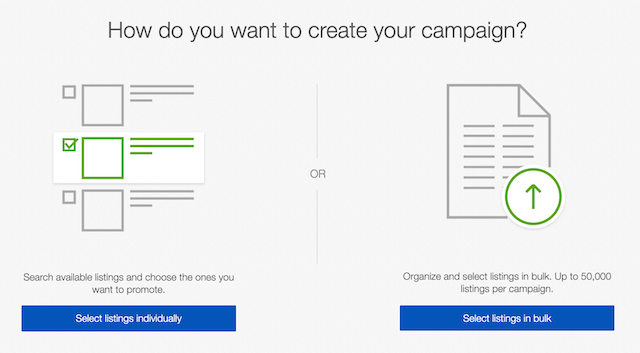
To create a promoted listing, you must be an eBay store subscriber. To set up your promotion, go to pls.ebay.com and choose how you want to set up your campaign: by selecting individual listings or selecting them in bulk.
Once you’ve chosen the listing you want to promote, an ad will be automatically generated. Now you simply have to decide how much you’re willing to pay for promotion. This is called the ad rate.
The ad rate is a percentage of the item price, and sellers can set their rate to as low as 1%. This percentage is what you’ll pay to eBay if a buyer clicks on your promoted listing and purchases your item.
The ad rate you choose essentially helps eBay decide if it wants to promote your listing when a buyer searches for your item or something similar. The higher your ad rate, the more likely it is that eBay will promote your listing. You can view eBay’s ad rate trends by country and category.
Now that you’ve created a promoted listing, you’re well on your way to becoming an expert seller.
Editor’s Note: Use your social media bio to promote your business. Create a link in bio website to list your top-rated products, showcase your social media channels and even list your contact details.
Experiment to constantly improve as an eBay seller
Selling on eBay is constantly evolving, and this guide provides only foundational knowledge. Once you’re comfortable with the basics of selling on eBay, it’s time to experiment to learn how to make your listings more competitive and discover new ways to reach customers and help your business thrive.
Start by analyzing your account data with this guide to tracking and applying metrics for better growth; it will help you identify areas where you can experiment with new ideas.
For example, if you always create fixed-price listings, try auction listings to see if your profits increase. Or, if your listing isn’t generating much interest, tweak your item description or test out a promoted listing to see if it increases sales.
You can also experiment with shipping options like Justin Dube did. As he completed more and more eBay sales, he found that using eBay Labels and offering free shipping on all orders transformed his business and, ultimately, made it sustainable.
Don’t be afraid to try your own tests to determine what makes your own listings most effective when selling on eBay.
If you’re interested in multiple marketplaces learn how you can sell on Walmart as well.
*AI-assisted full website including all of the premium features like online store, appointment scheduling, and marketplace selling to name a few, requires paid subscription.
Social media marketing calendar available with GoDaddy Airo, some features will require paid subscription.
Professional Email through Microsoft Office 365 30-day free trial with an option to renew into a paid subscription beyond the promotional period.
While the LLC starter plan is free, there are likely some state and/or local filing fees associated with your filing which will be determined during the filing process.


