You’ve gotten a domain name from GoDaddy and bought hosting at an amazing deal as well. Your domain is even connected to your new hosting. But now what? You wanted to set up a WordPress website, but you’re confused. Where do you begin?
While you can get GoDaddy’s managed WordPress Hosting for pre-installed and configured WordPress, it doesn’t come pre-packaged and pre-installed for other types of hosting services, especially the unmanaged hosting services. However, there’s lots of tools within cPanel (a popular web hosting control panel used on GoDaddy’s servers) that make it fast and simple to install and manage WordPress. We’ll learn more about how easy it is to use and manage WordPress on cPanel.
Launch your business in minutes with GoDaddy Airo™
How to use WordPress with cPanel
We’ll cover the following in this guide:
- What is cPanel?
- How to access cPanel.
- Auto-installing WordPress with cPanel.
- Manually installing WordPress with cPanel.
- Choosing a WordPress installation method.
- Troubleshooting WordPress issues in cPanel.
- Using cPanel to enable debugging in WordPress.
- White Screen of Death.
- Internal Server Error.
- The bottom line.
Let’s start with the basics.
What is cPanel?
cPanel is a user-friendly, graphical interface made for managing web servers and helps eliminate the need for command-line expertise or access to and know-how of Linux utilities. It is widely used by many web hosts to allow their customers to manage hosting, and while its appearance has changed over time, this is what it looks like now:
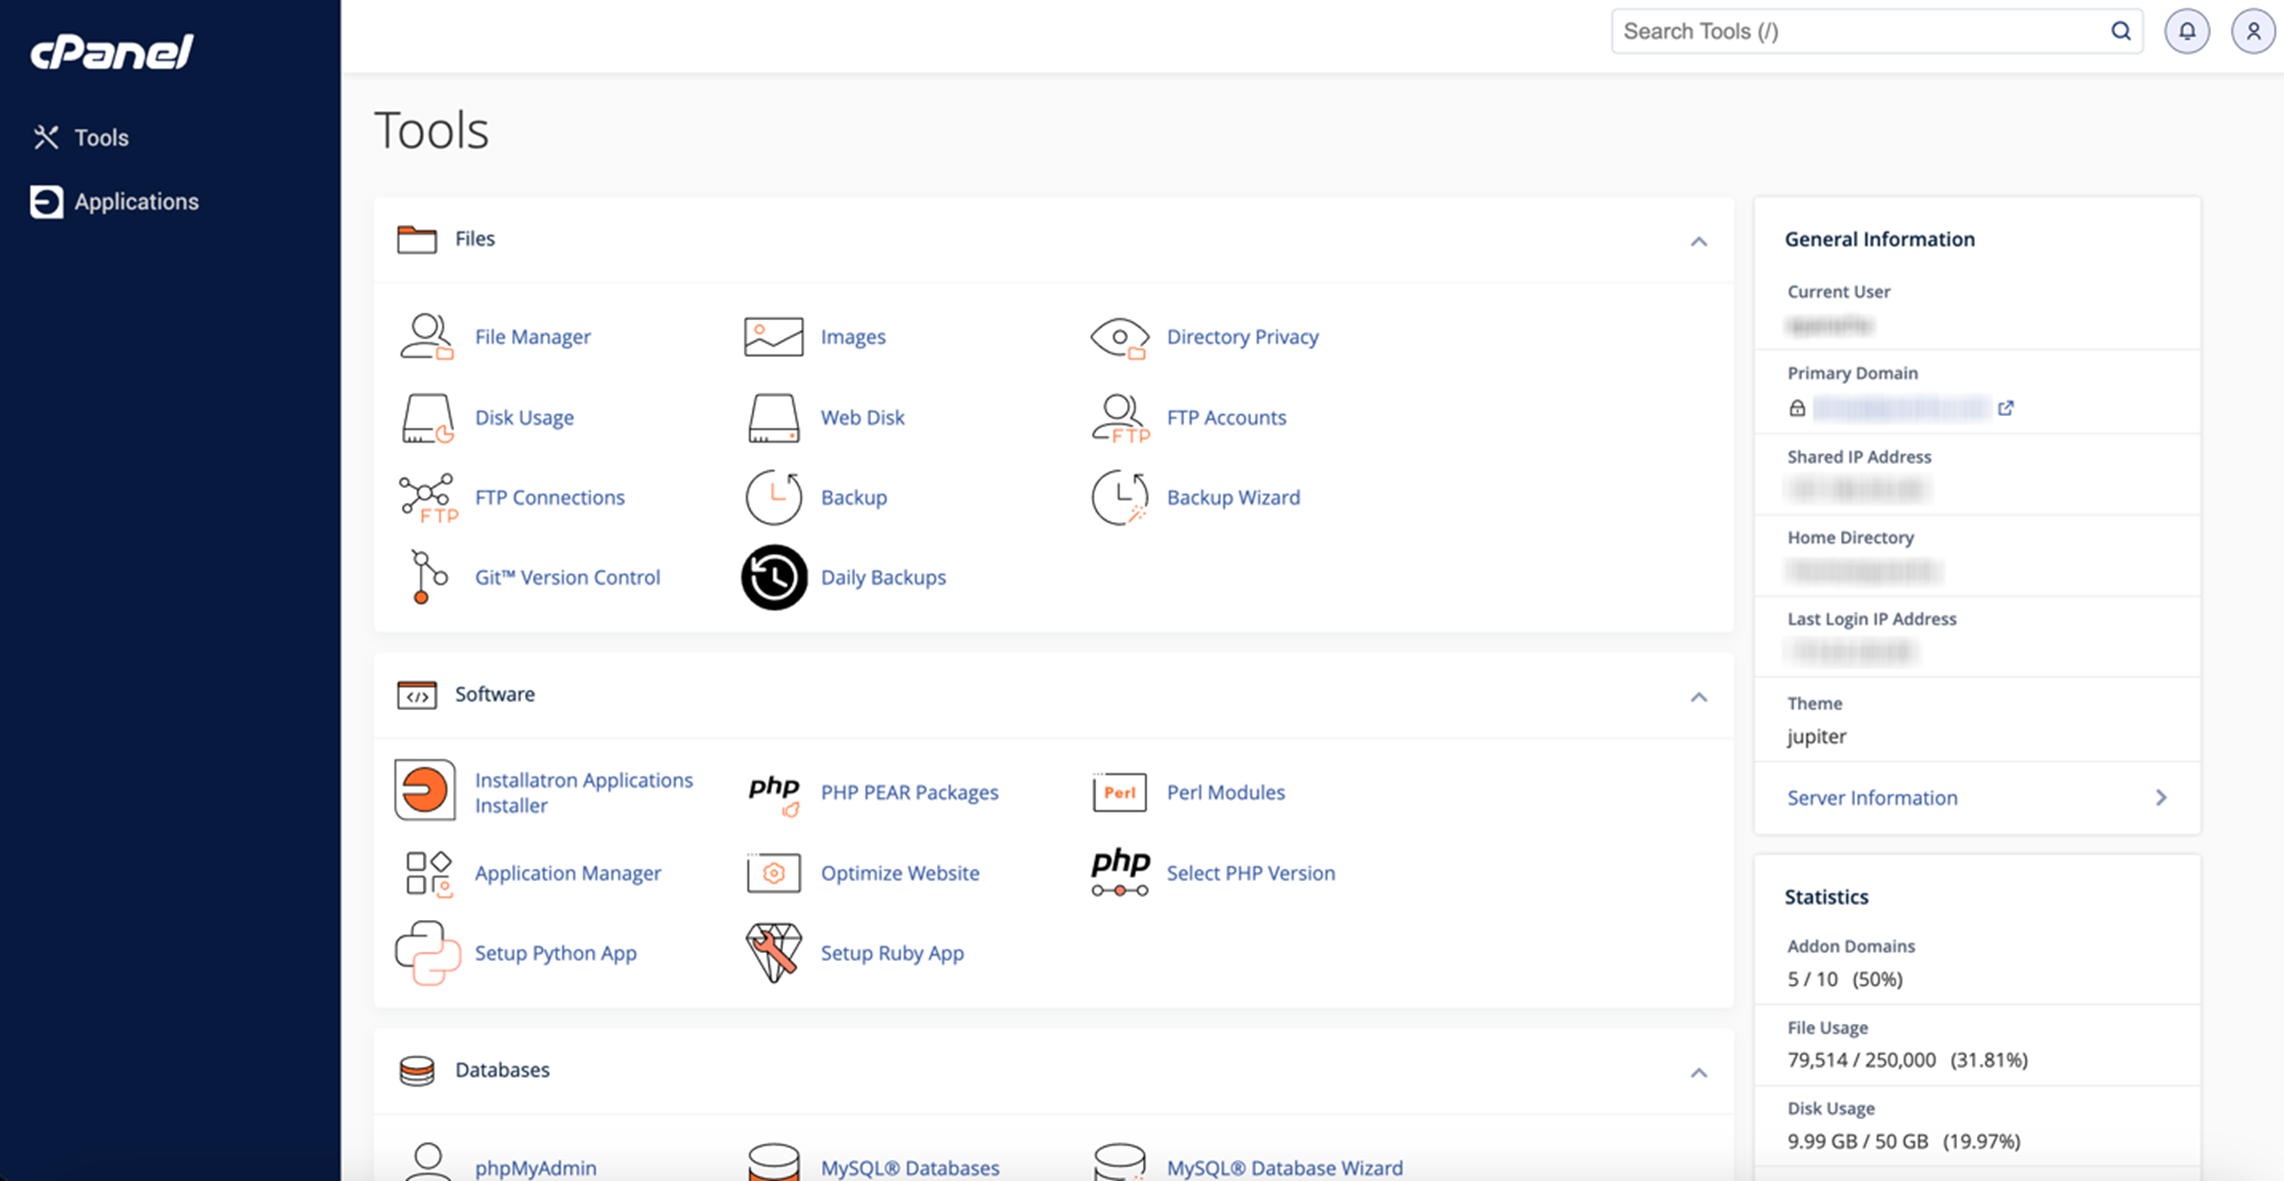
cPanel helps automate several tasks, from automated installers of applications like WordPress and SSL certificates and more, to viewing website files in a nice GUI and even editing them within. However, it is particularly useful for managing WordPress websites, and we’ll dive into that deeper.
How to access cPanel
Before you use WordPress with cPanel, you need to know how to get to cPanel first. There are three main ways to do it:
1. You’ll probably find a link to it in your email from your web hosting provider.
2. You can go there directly by going to the browser and appending the right port to your website’s domain:
a. For HTTP sites, append :2082 to the end of your domain. For example: http://mydomain.com:2082
b. For HTTPS sites, append :2083 to the end of your domain. For example: https://mydomain.com:2083
3. Some hosting providers also set up an alias, so it is easy to access. For example: https://mydomain.com/cpanel
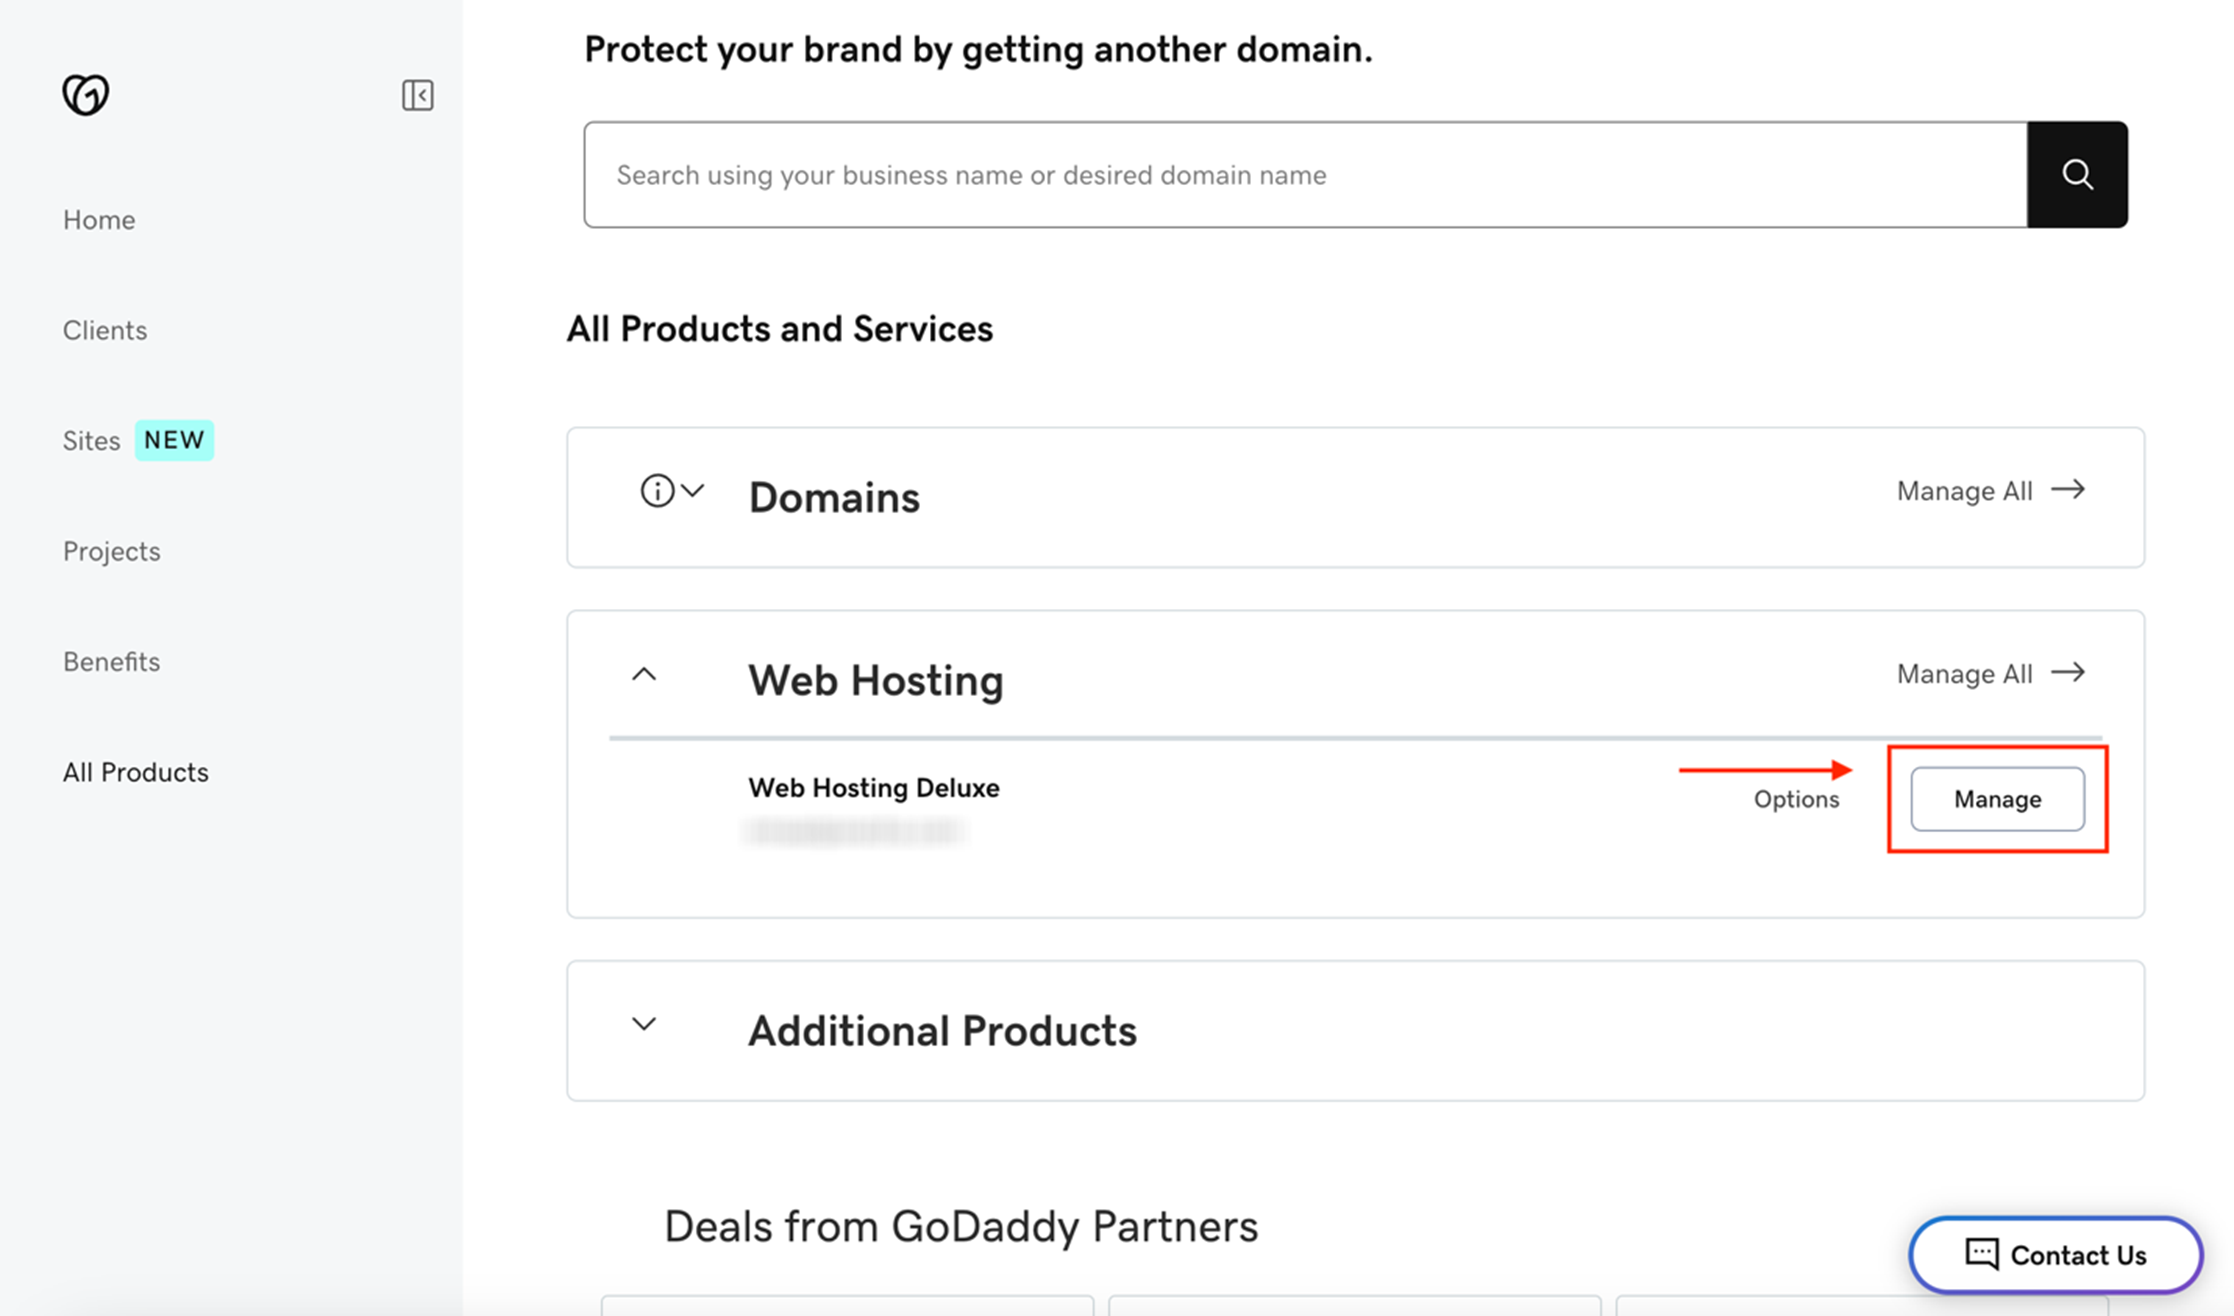
If you are a GoDaddy client, you can also access cPanel directly from your GoDaddy account. To find it, log in to your GoDaddy account and go to My Products. Scroll down to Web Hosting and click Manage for the hosting that you want to access.
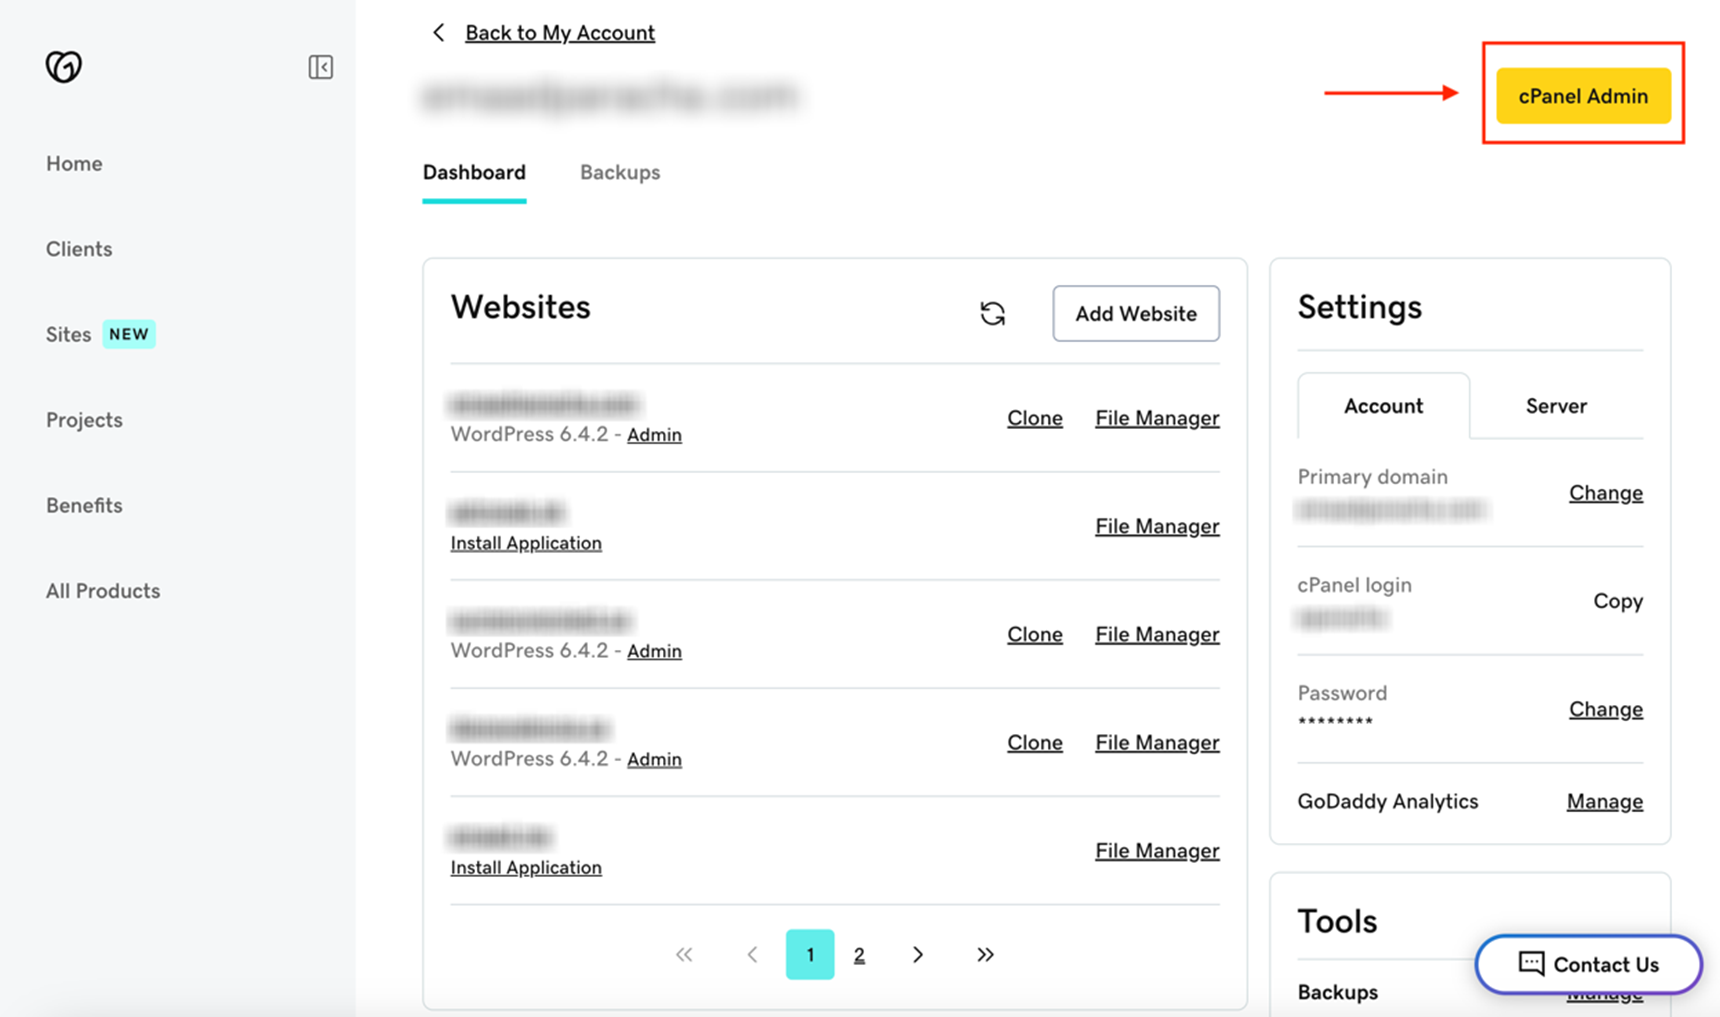
Once there, you can edit your cPanel username and password, and to get to cPanel, you can click on the Yellow “cPanel Admin” button on the top right, and that should take you directly to cPanel.
If you use the three methods above, make sure you know your cPanel username and password, and always keep them secure.
Auto-installing WordPress with cPanel
Most web hosting services, including GoDaddy, make it easy to install WordPress using an application like Installatron from your cPanel dashboard. Here are the steps for an easy install with an application installer like Installatron:
- Log in to cPanel.
- Launch the installer.
- Select WordPress.
- Confirm the install options.
- Adjust the default settings for installation.
- Complete the installation.
Let’s go through them one by one:
1. Log in to cPanel
Refer to the above to log in to cPanel with your method of choice.
2. Launch the installer
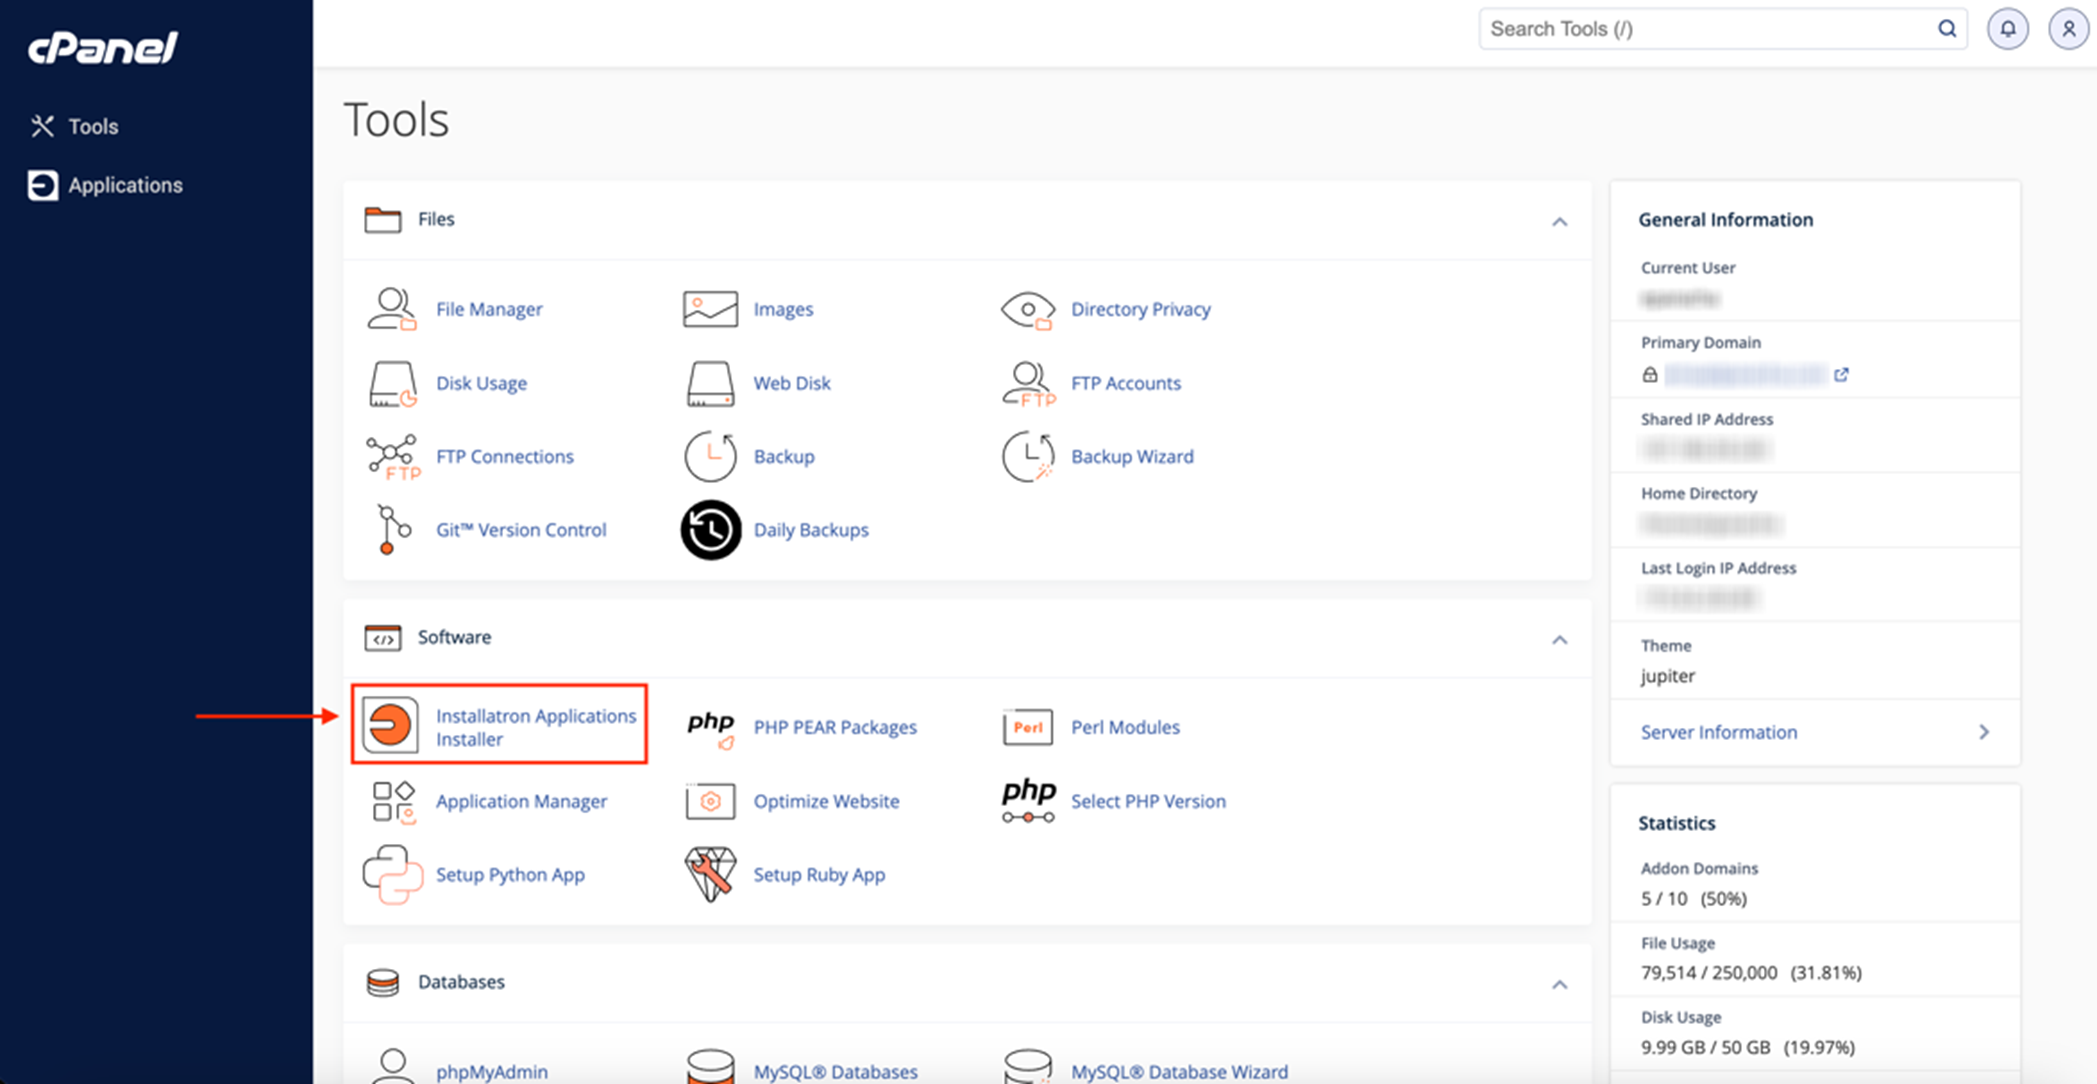
Search for “Installer” or scroll down to the Software section in the cPanel dashboard. You should be able to see an “Application Installer” app. Currently on GoDaddy servers, this is the Installatron Applications Installer. Click on that.
3. Select WordPress
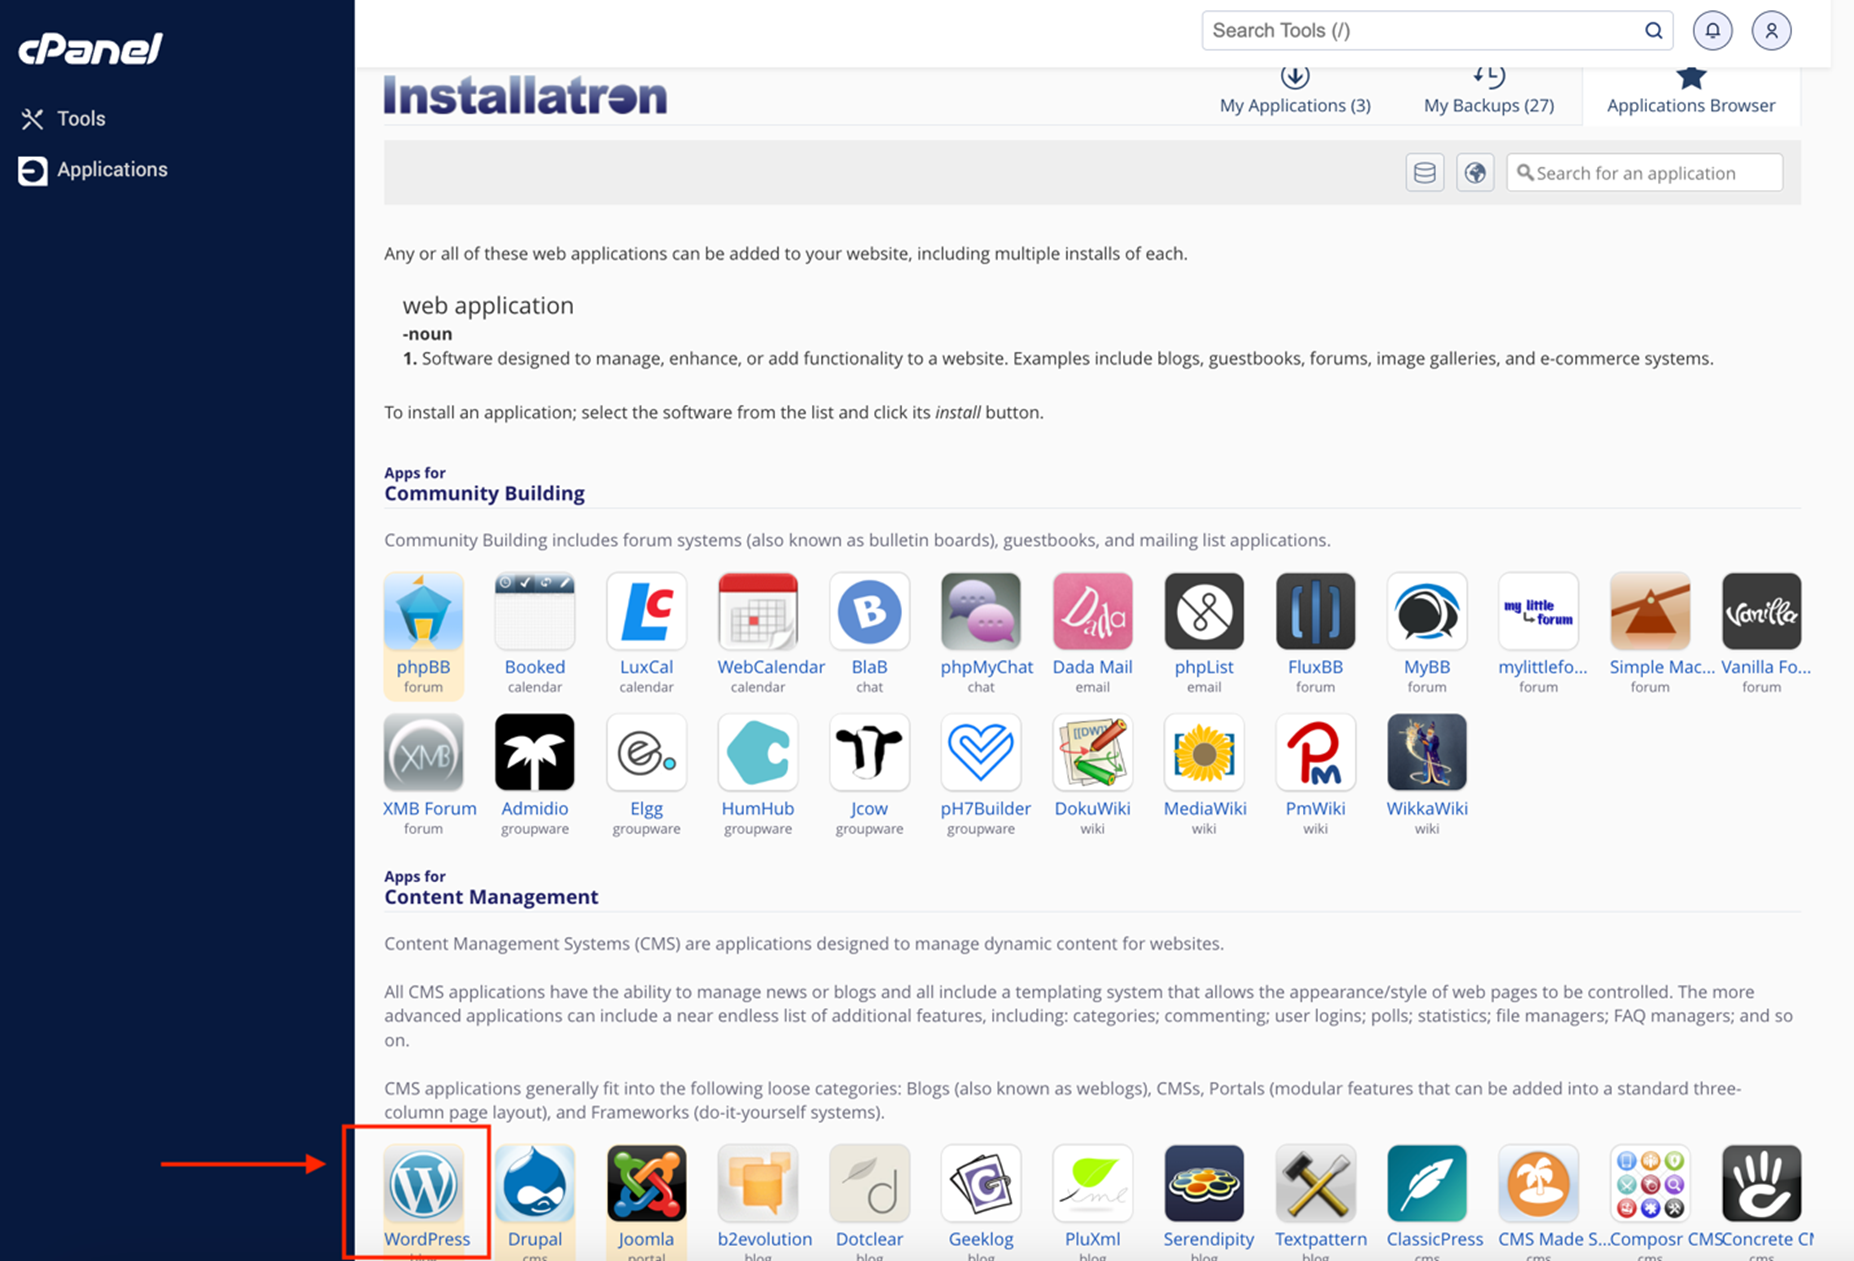
Once Installatron loads, either click the Applications Browser tab at the top right or search for WordPress and you’ll find the WordPress icon. Click on that.
4. Confirm the install options
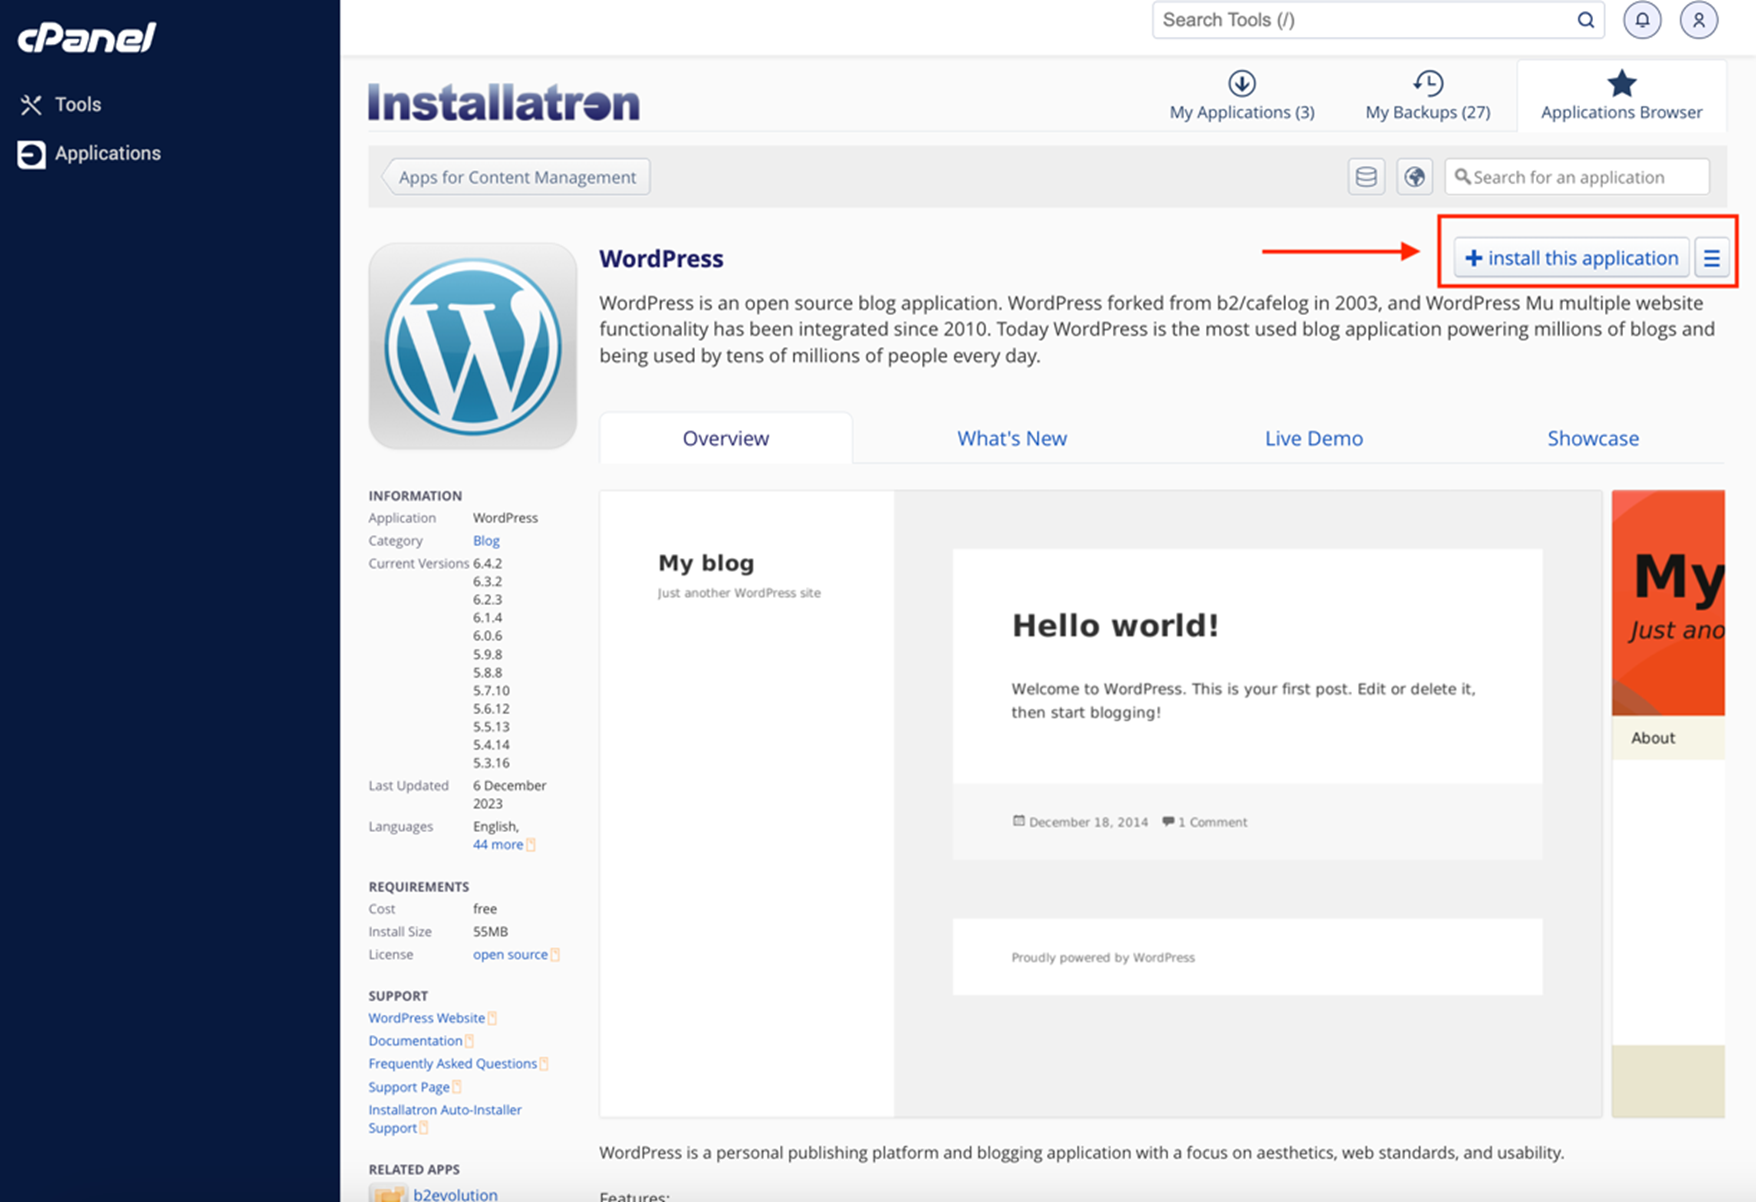
When the WordPress application page shows up, it will tell you information on the version, size, and more. Confirm that is the version you’d like to install (usually the latest), and click install this application.
5. Adjust the default settings for installation
This is where you set the following configurations for WordPress to be installed on your server:
1. Location: Choose the domain you want WordPress to be installed under and the directory. Leave it blank if you want it to be in the root directory.

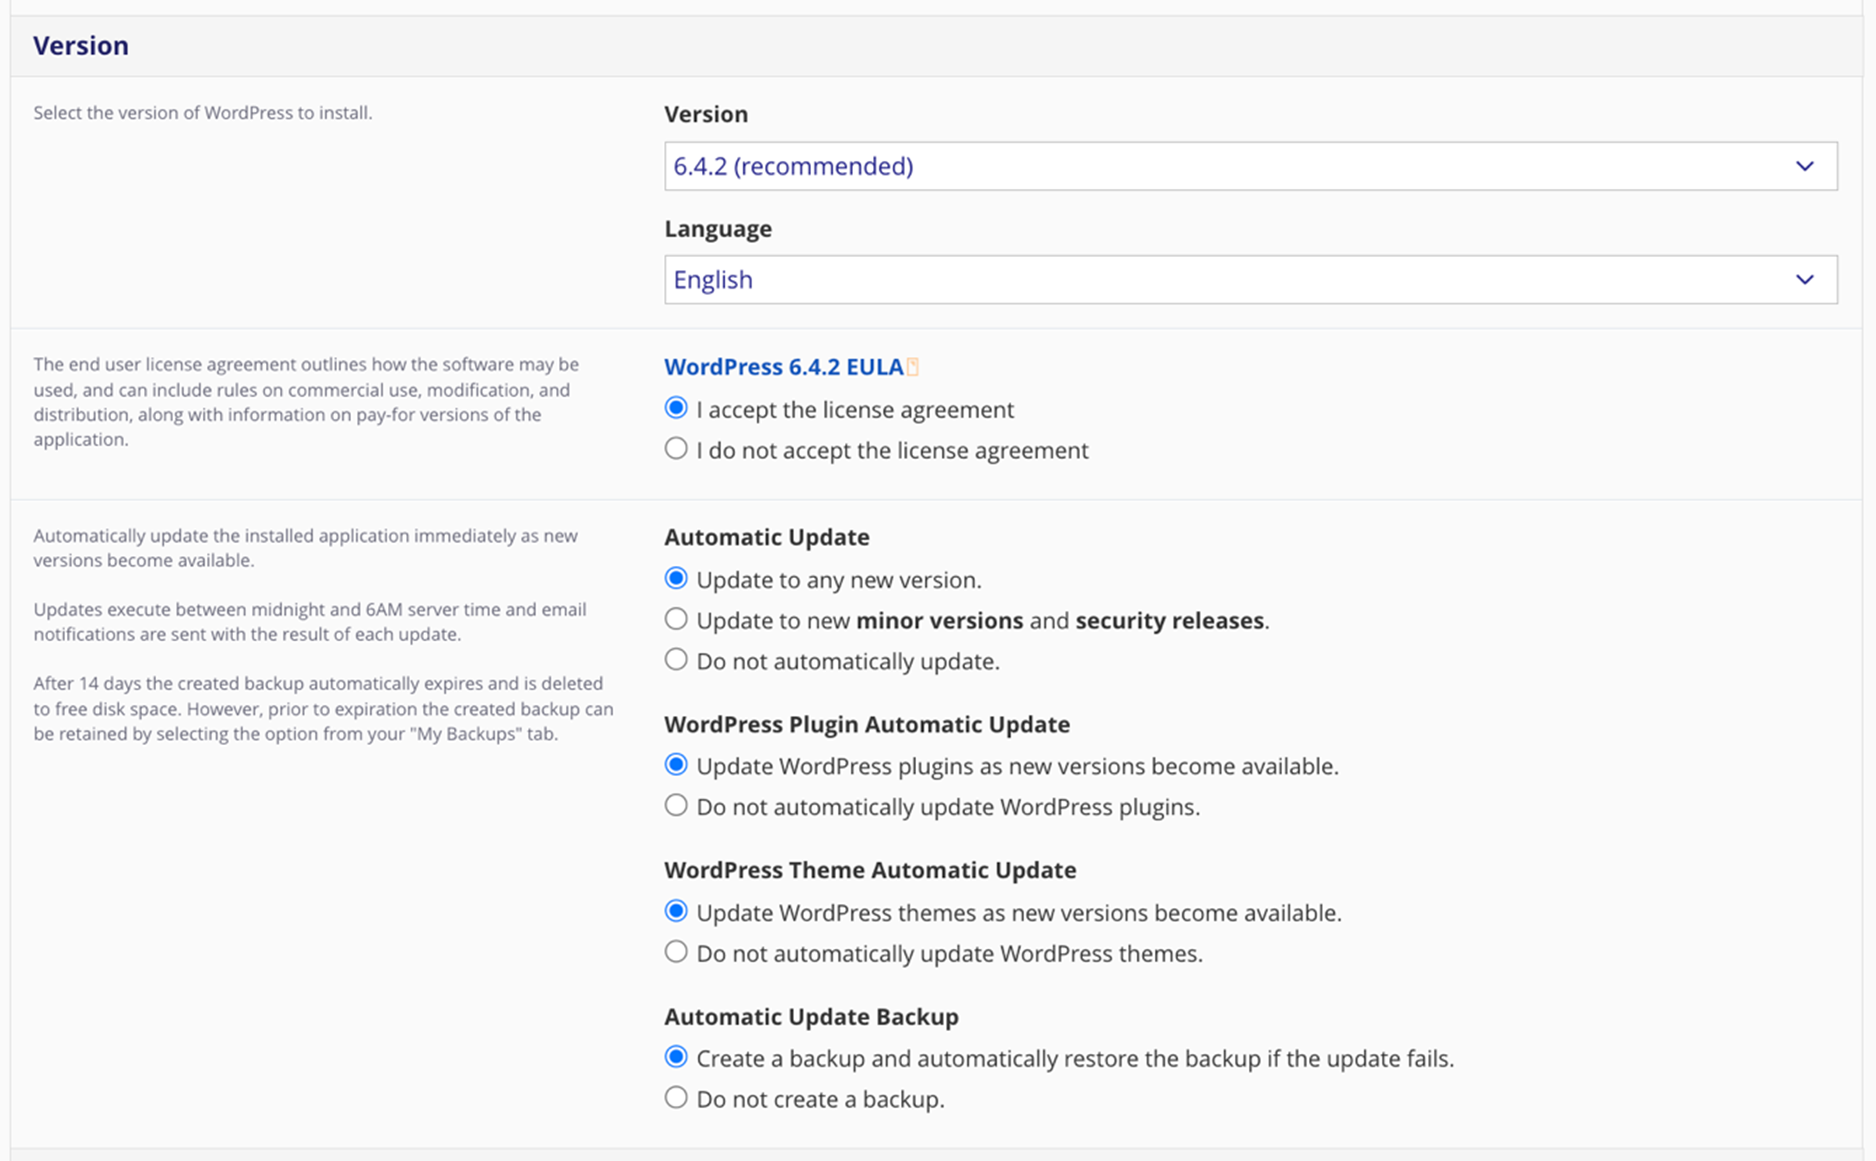
2. Version: Choose the version you’d like to install. It is recommended you install the latest / recommended version for the most up-to-date security. You can also choose options for automatic updates of WordPress and WordPress plugins.
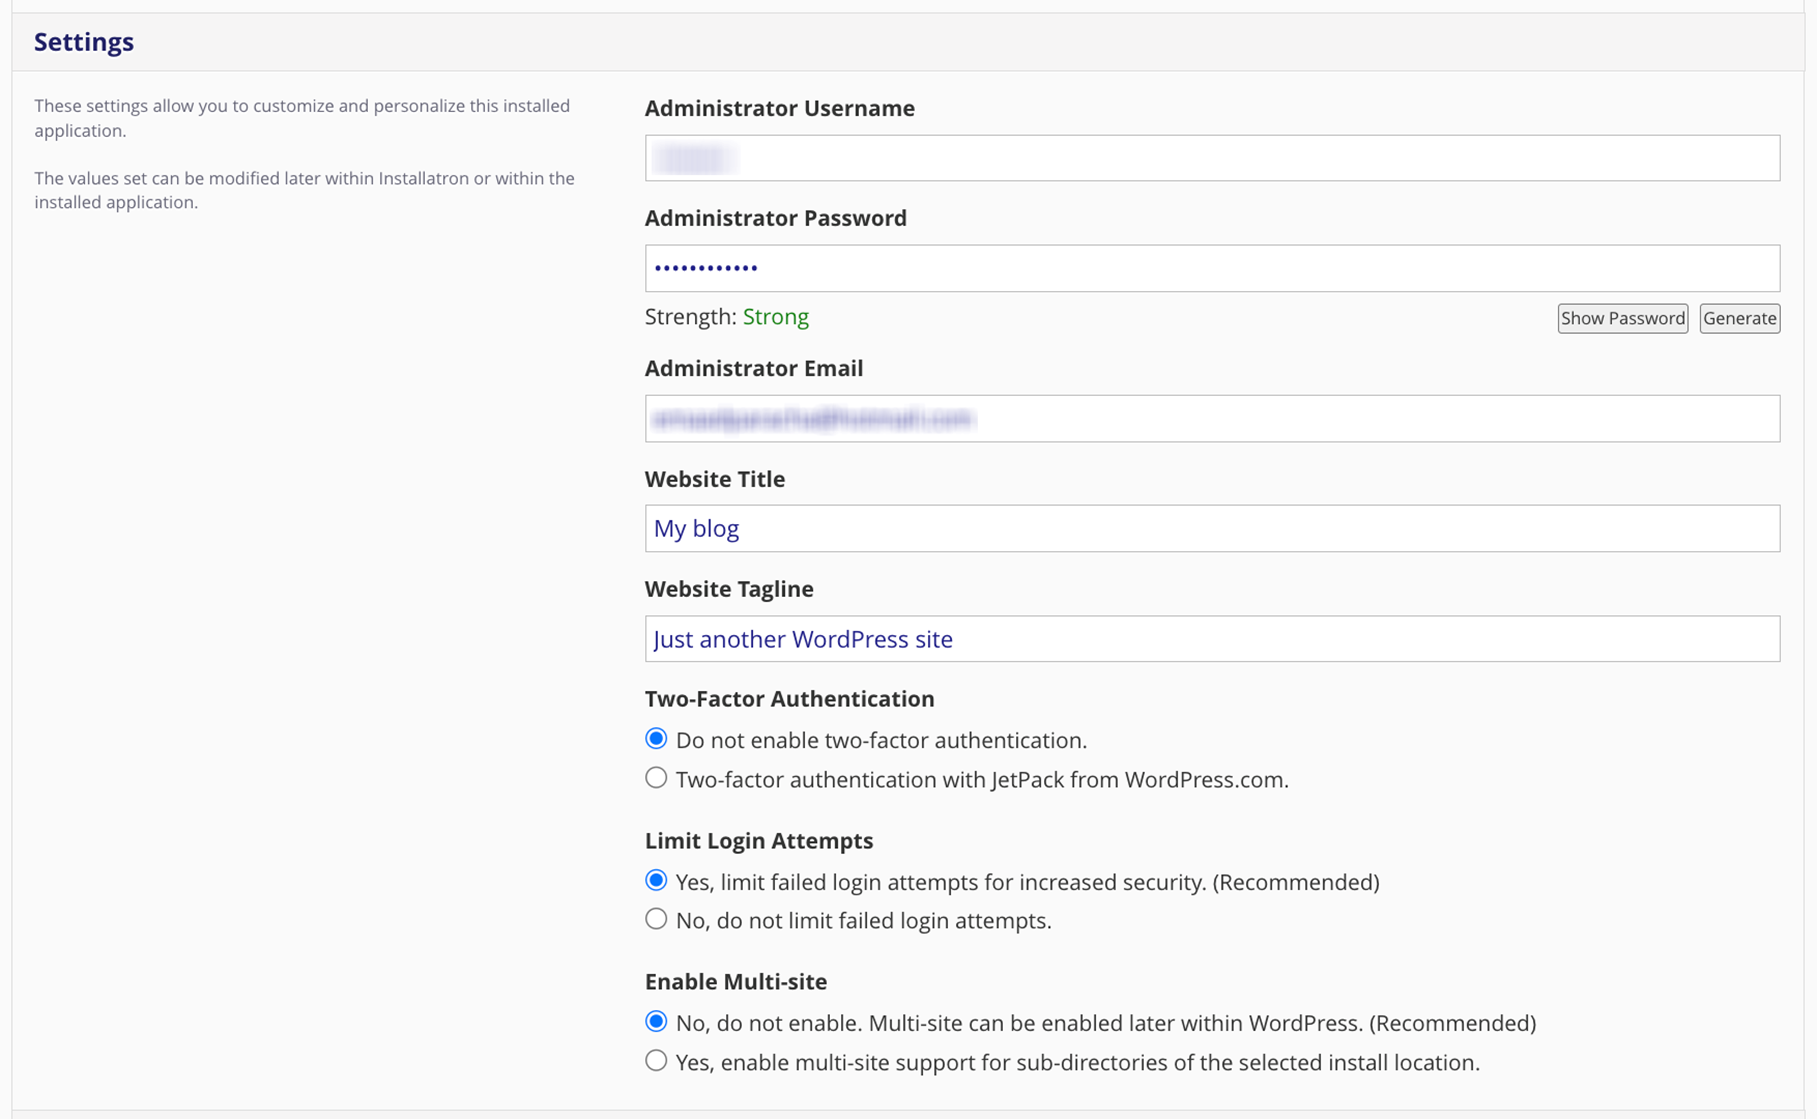
3. Settings: Choose the Administrator username, password, email, website title and the website tagline here. You can also choose security options and if you’d like to enable multi-site.
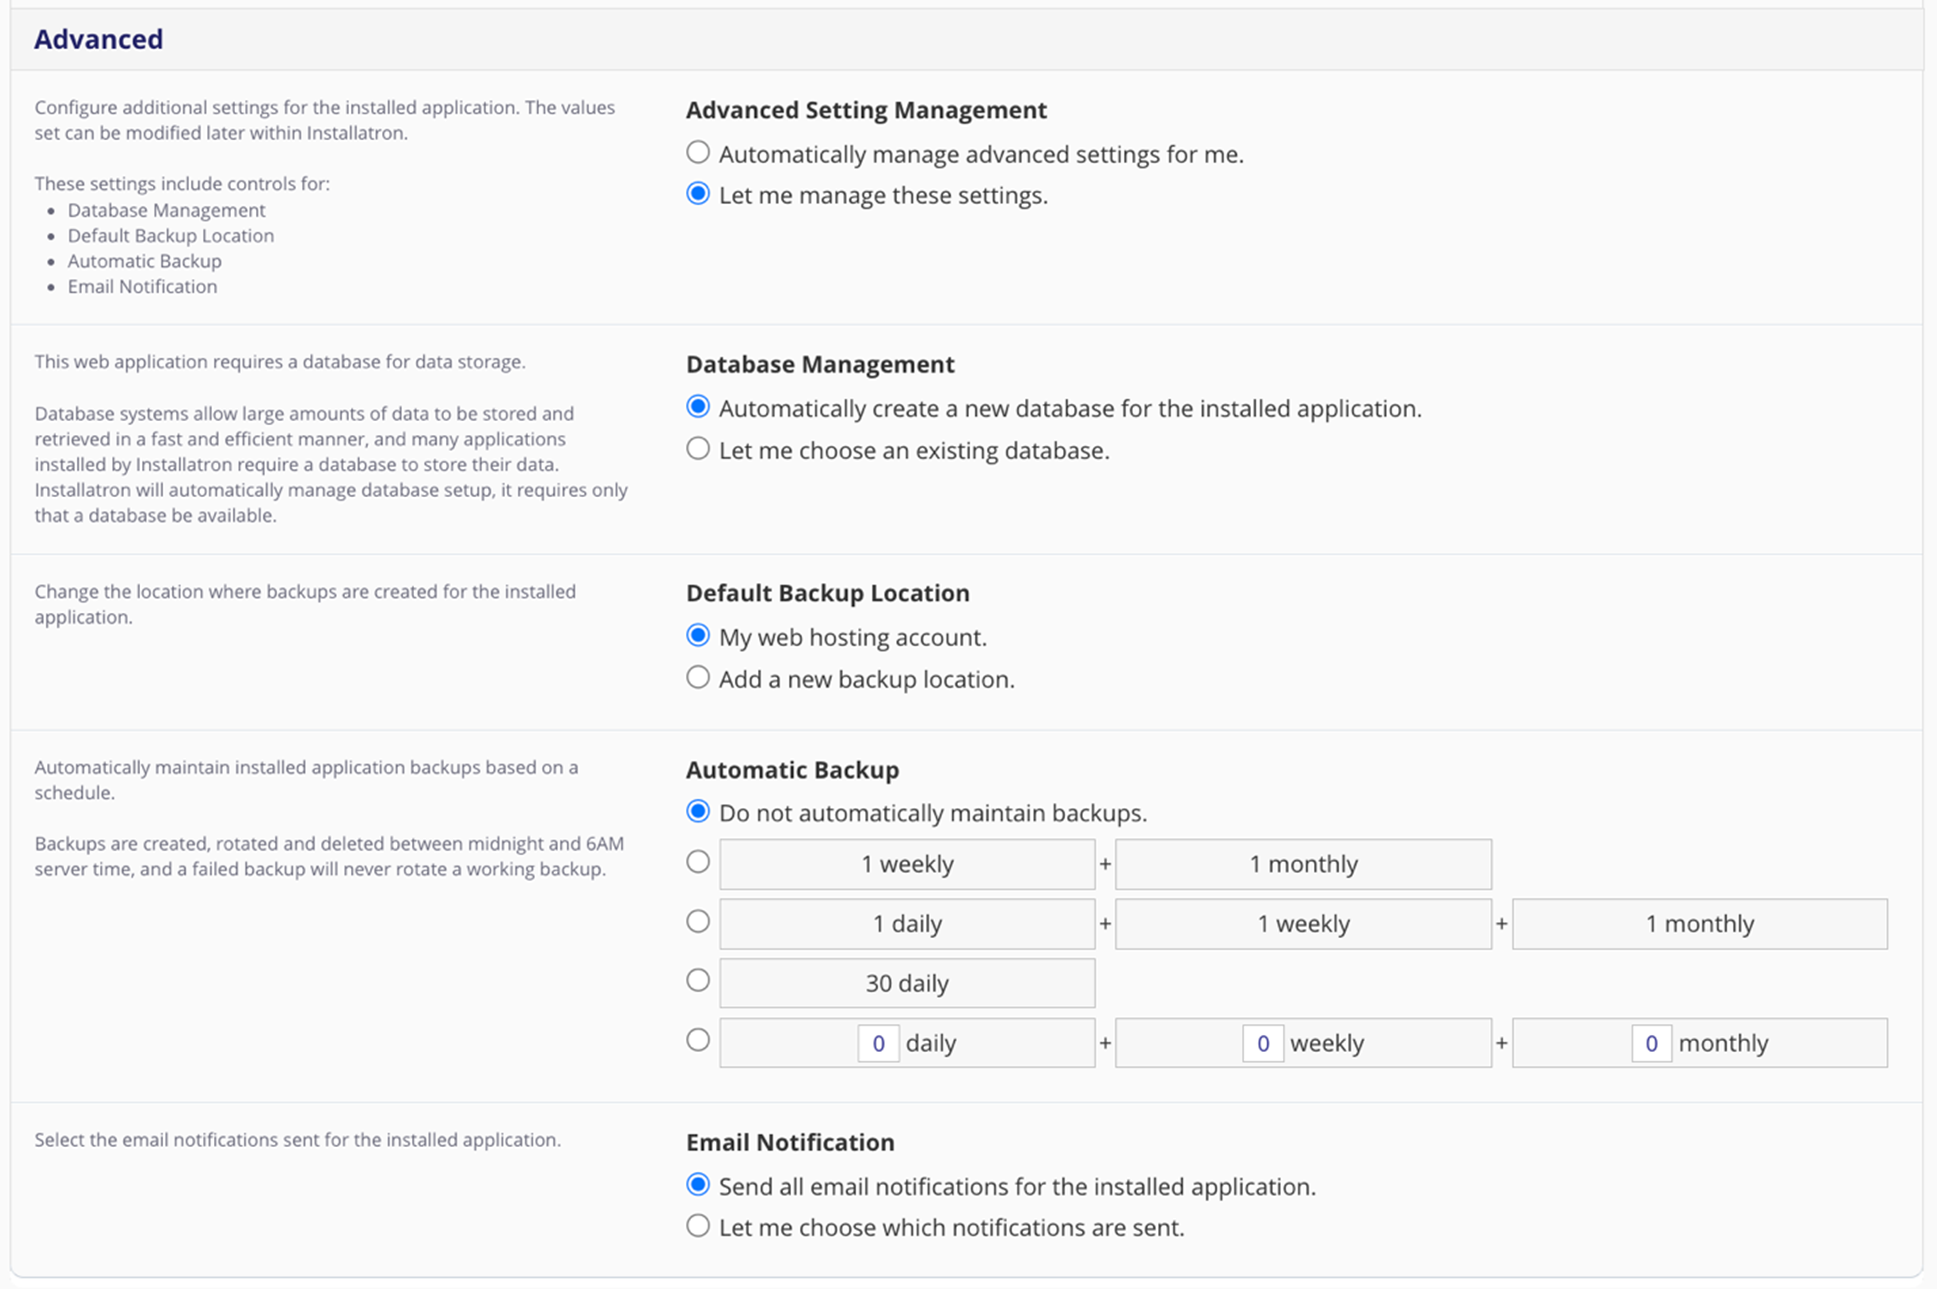
4. Advanced: You can choose to either keep the defaults or manage your own database, backups, and email notification settings.
Once you have reviewed everything, click “Install” and wait for WordPress to install. While installing, it will look something like this:

And in a few minutes, after it has been installed, it will update to this (you might have to refresh the page):

You can then click the link that ends with /wp-admin to get to the WordPress site and login with the credentials that you set earlier.
It’s as simple as that!
But what if you want to manually install WordPress?
Manually installing WordPress with cPanel
In case your web host does not have an installer capable of installing WordPress, or you’d like to install a specific version of WordPress not available in the installer, you can do it manually. To do this, you do need to be a bit more technical, but it is doable!
You’ll have to:
- Get WordPress files.
- Upload the files.
- Create a MySQL database and user.
- Go to your domain and complete the install.
Let’s dig in.
1. Get WordPress files
Find the latest copy of WordPress (or any specific WordPress version you wish to install) and download it to your computer.
2 . Upload the files
You can either upload files directly using the cPanel File Manager or an FTP program such as FileZilla.
Uploading via cPanel File Manager:
Go back to your cPanel dashboard, click on or search for File Manager and enter the file manager:
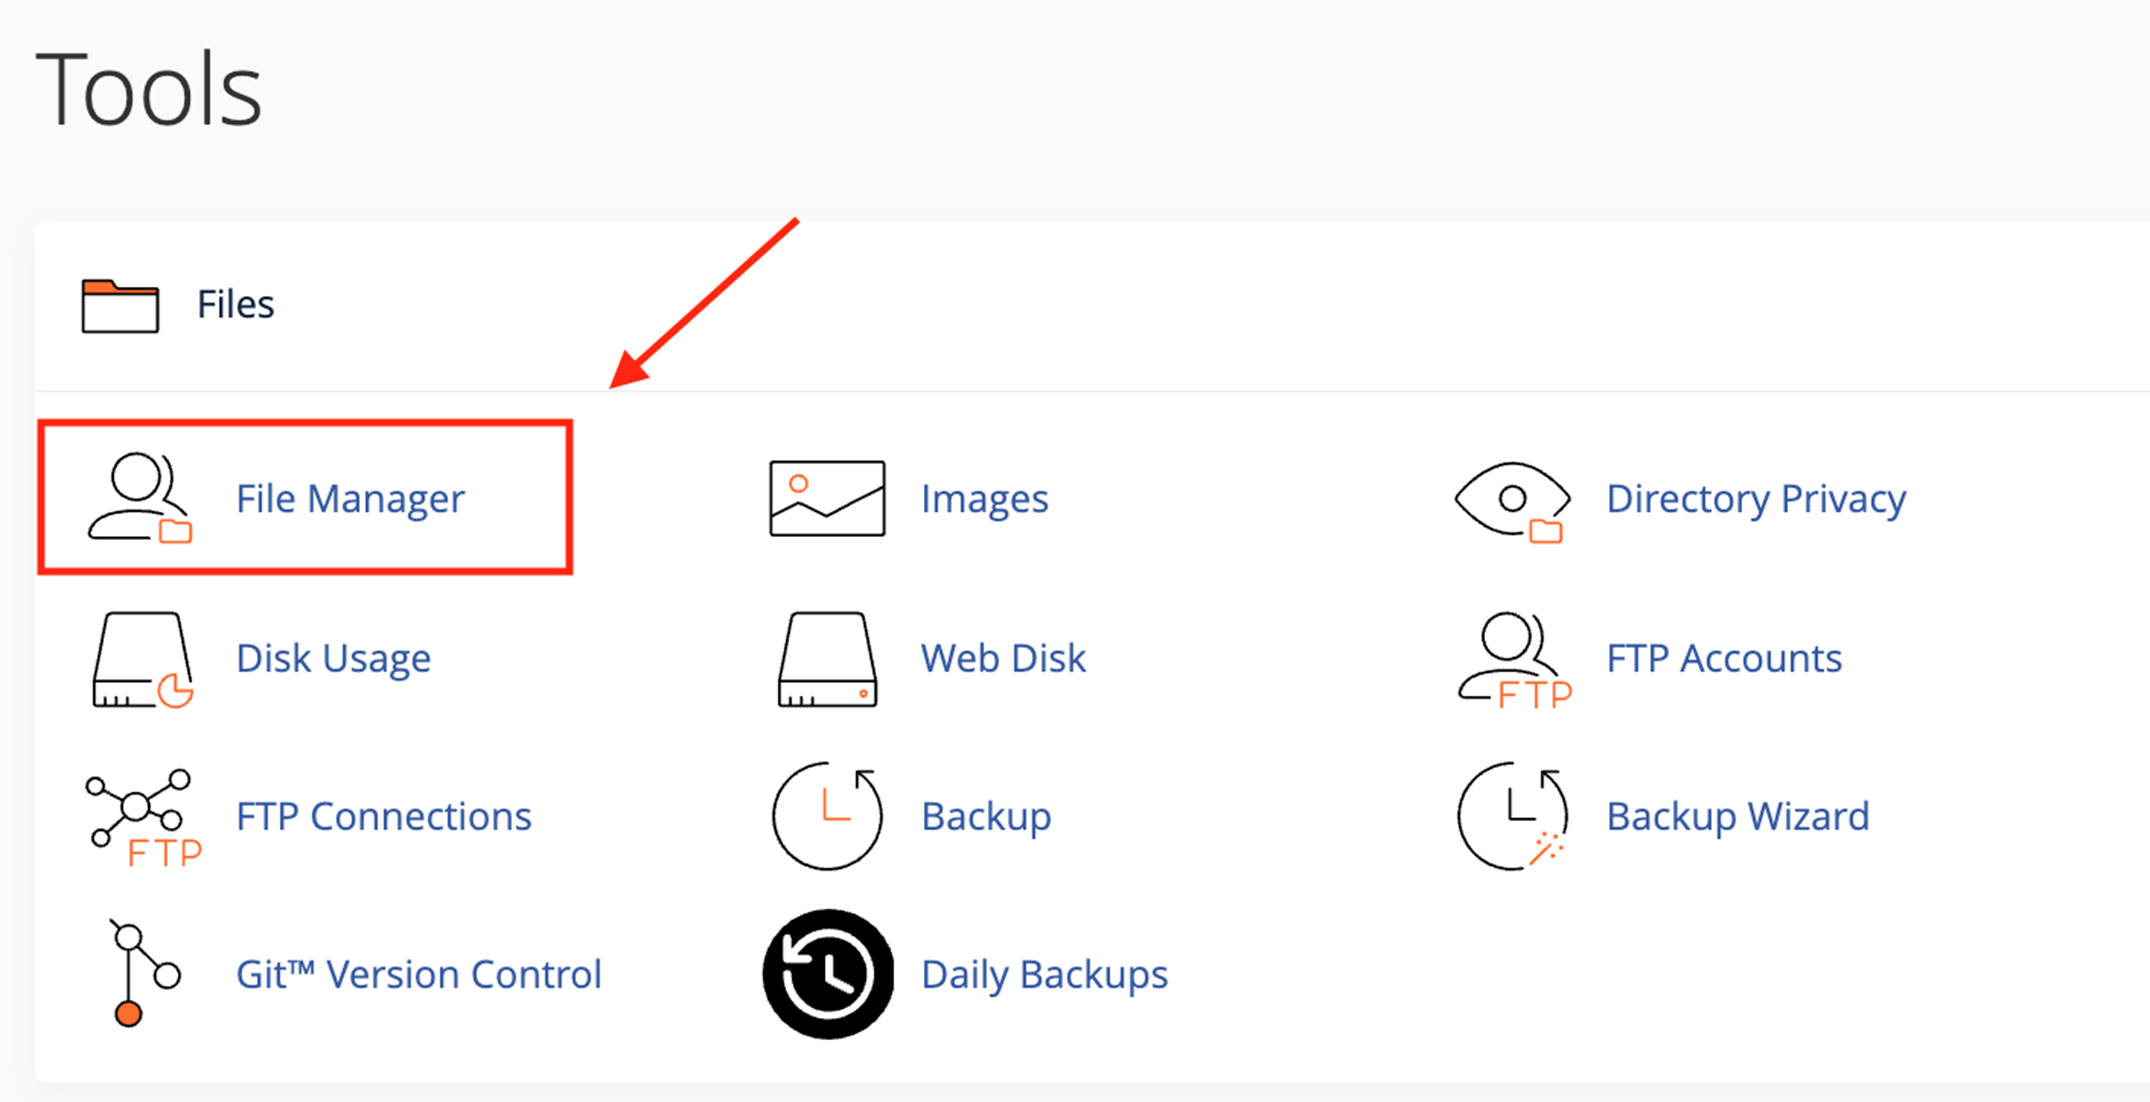
Once inside, you have the choice to either install WordPress in your root directory (so http://mydomain.com) or within a subdirectory (http://mydomain.com/subdirectory).
Navigate to the public_html folder from the menu on the left. If you want to install WordPress in the root directory, this will be the primary folder you’ll work out of. If you want it to be in a subdirectory, create a new folder with the appropriate name.
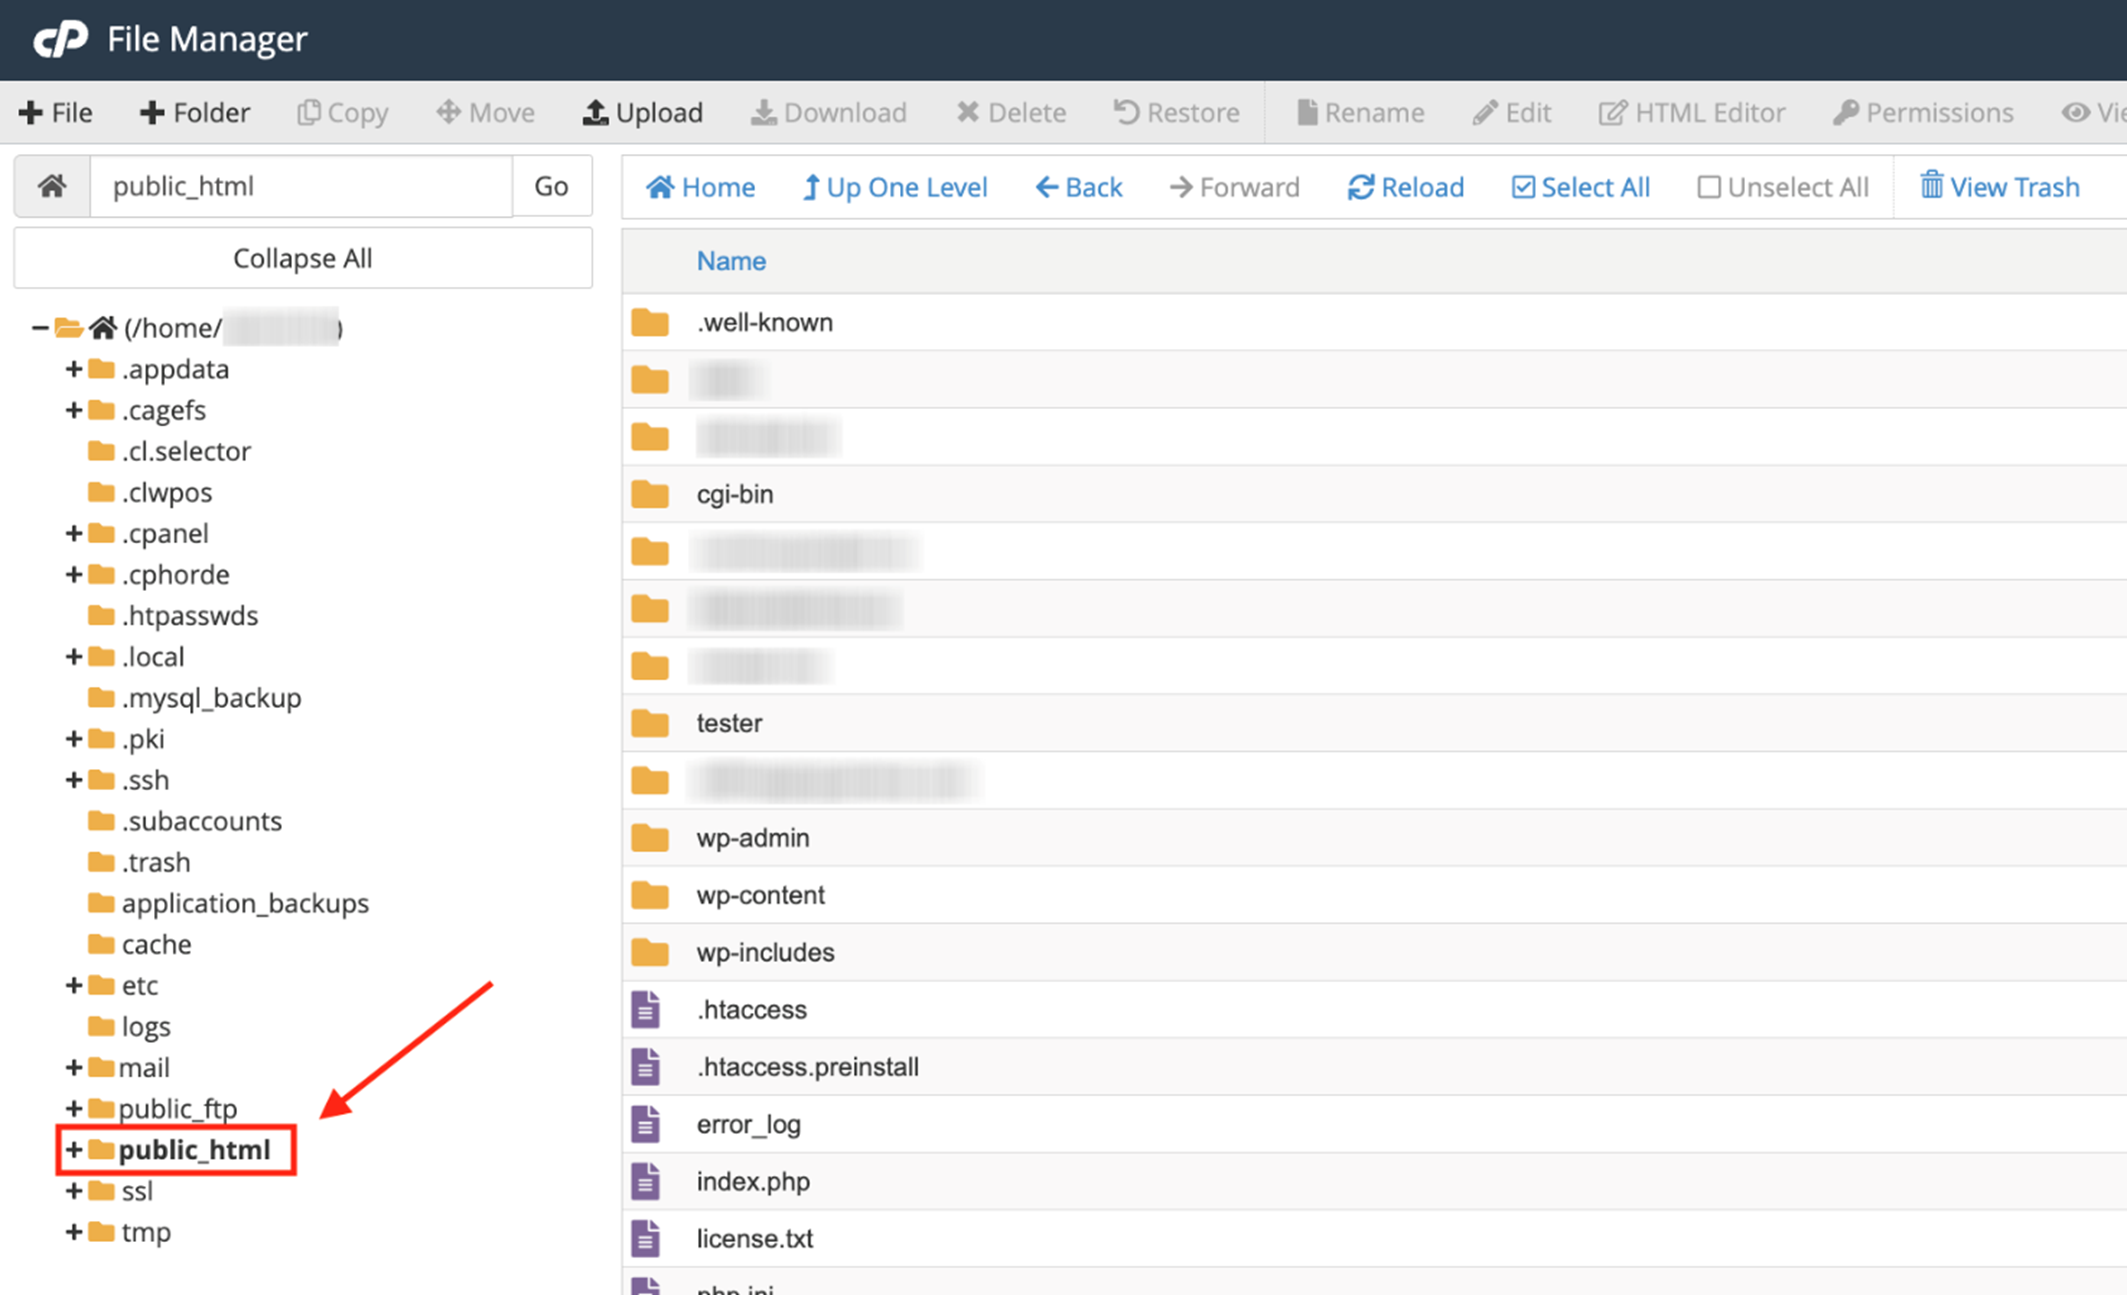
Once in the right directory, click the Upload button at the top menu to upload the WordPress file you downloaded earlier.
Once it is downloaded, you can select it, left click, and select Extract to unzip the file. It will then be placed within a folder inside of your intended directory. You’ll then need to select everything within that new folder and Move it by selecting all the contents of the folder, left clicking and selecting Move. You can just choose the move location to be the directory you want the install to be. To make things easy, delete the empty folder that you just moved the items out of as well as the zip file you uploaded earlier.
Uploading via FTP:
You can also upload files via FTP similarly, and here is a guide on FTP and how to upload items to a server.
3. Create a MySQL database and user
The next step is to create a database for your WordPress environment. Go back to the cPanel console and click on the MySQL Database Wizard icon in the Databases section. That will bring you to a page where you can create a new database.
Follow the wizard to create a new database and user, that you can then feed into the WordPress installation:
- For Step 1: Create a Database - Enter a name for your database. Preferably something random but also easy enough for you to know.
- For Step 2: Create Database Users - Enter a database username and password.
- For Step 3: Add user to the database, select All Privileges.
Be sure to write down the database name, username, and password as you will need them in the next step.
4. Go to your domain to complete the install
Open your domain (or subdomain) in your browser. If everything was properly uploaded, you’ll see a language menu:
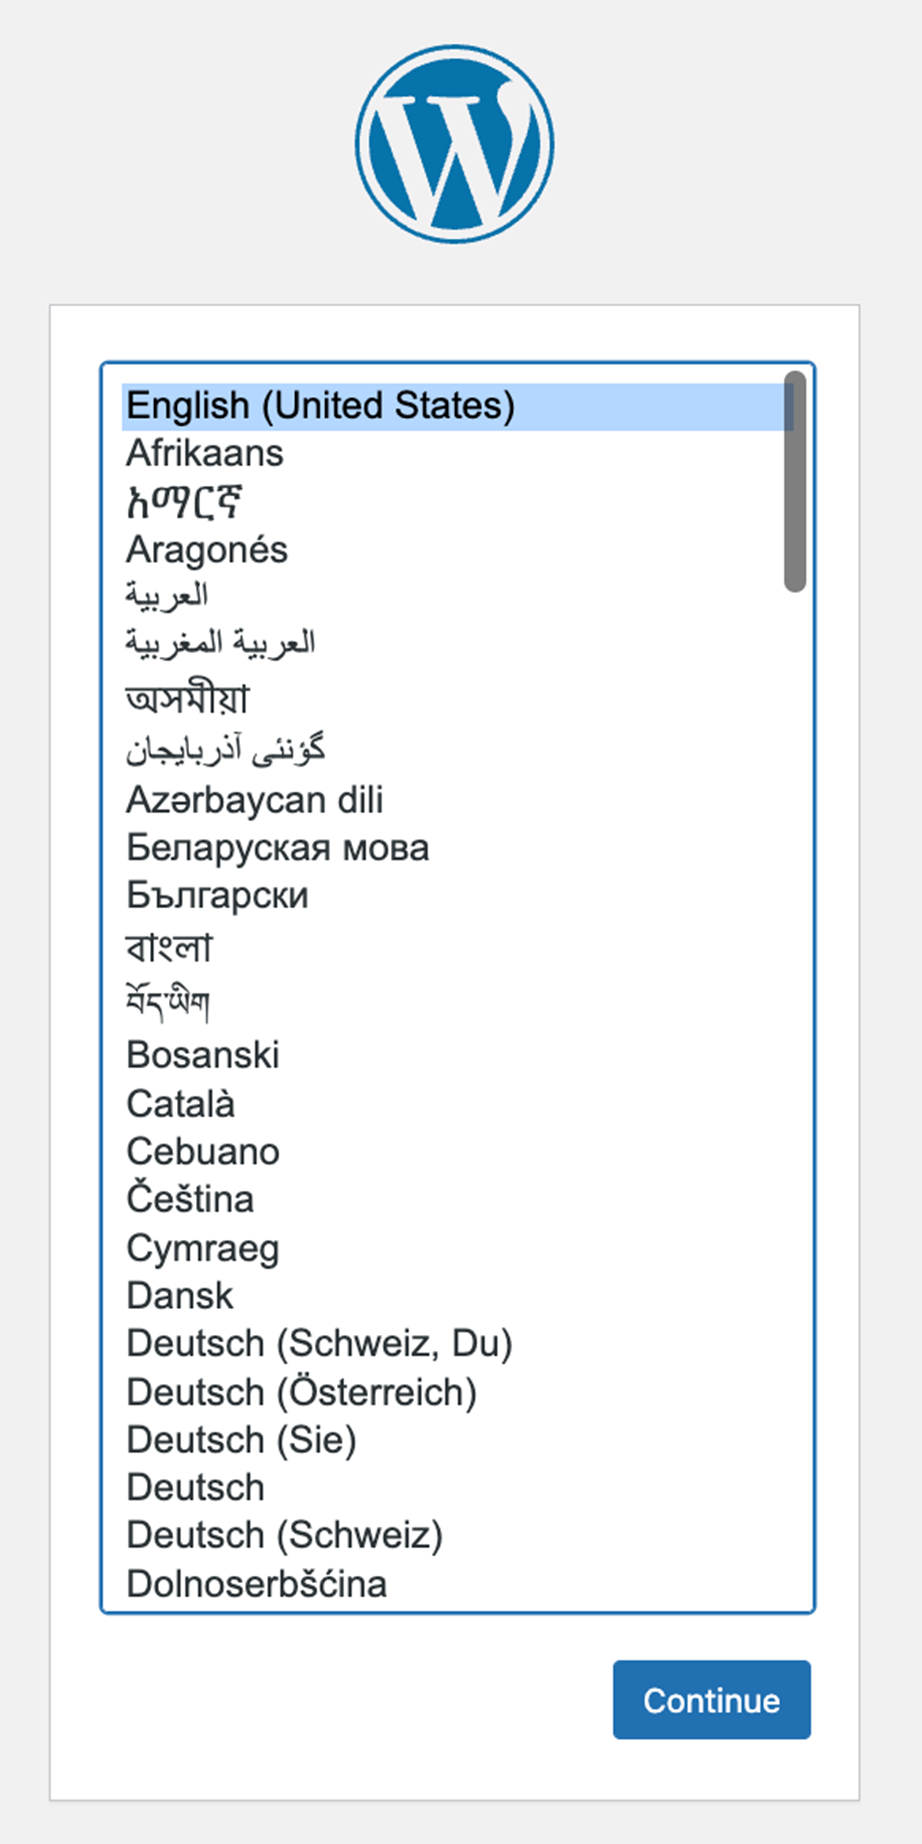
Select the language you desire and click Continue. The next screen simply advises you that you’re going to need the details of the database you created. Good thing you saved those earlier.
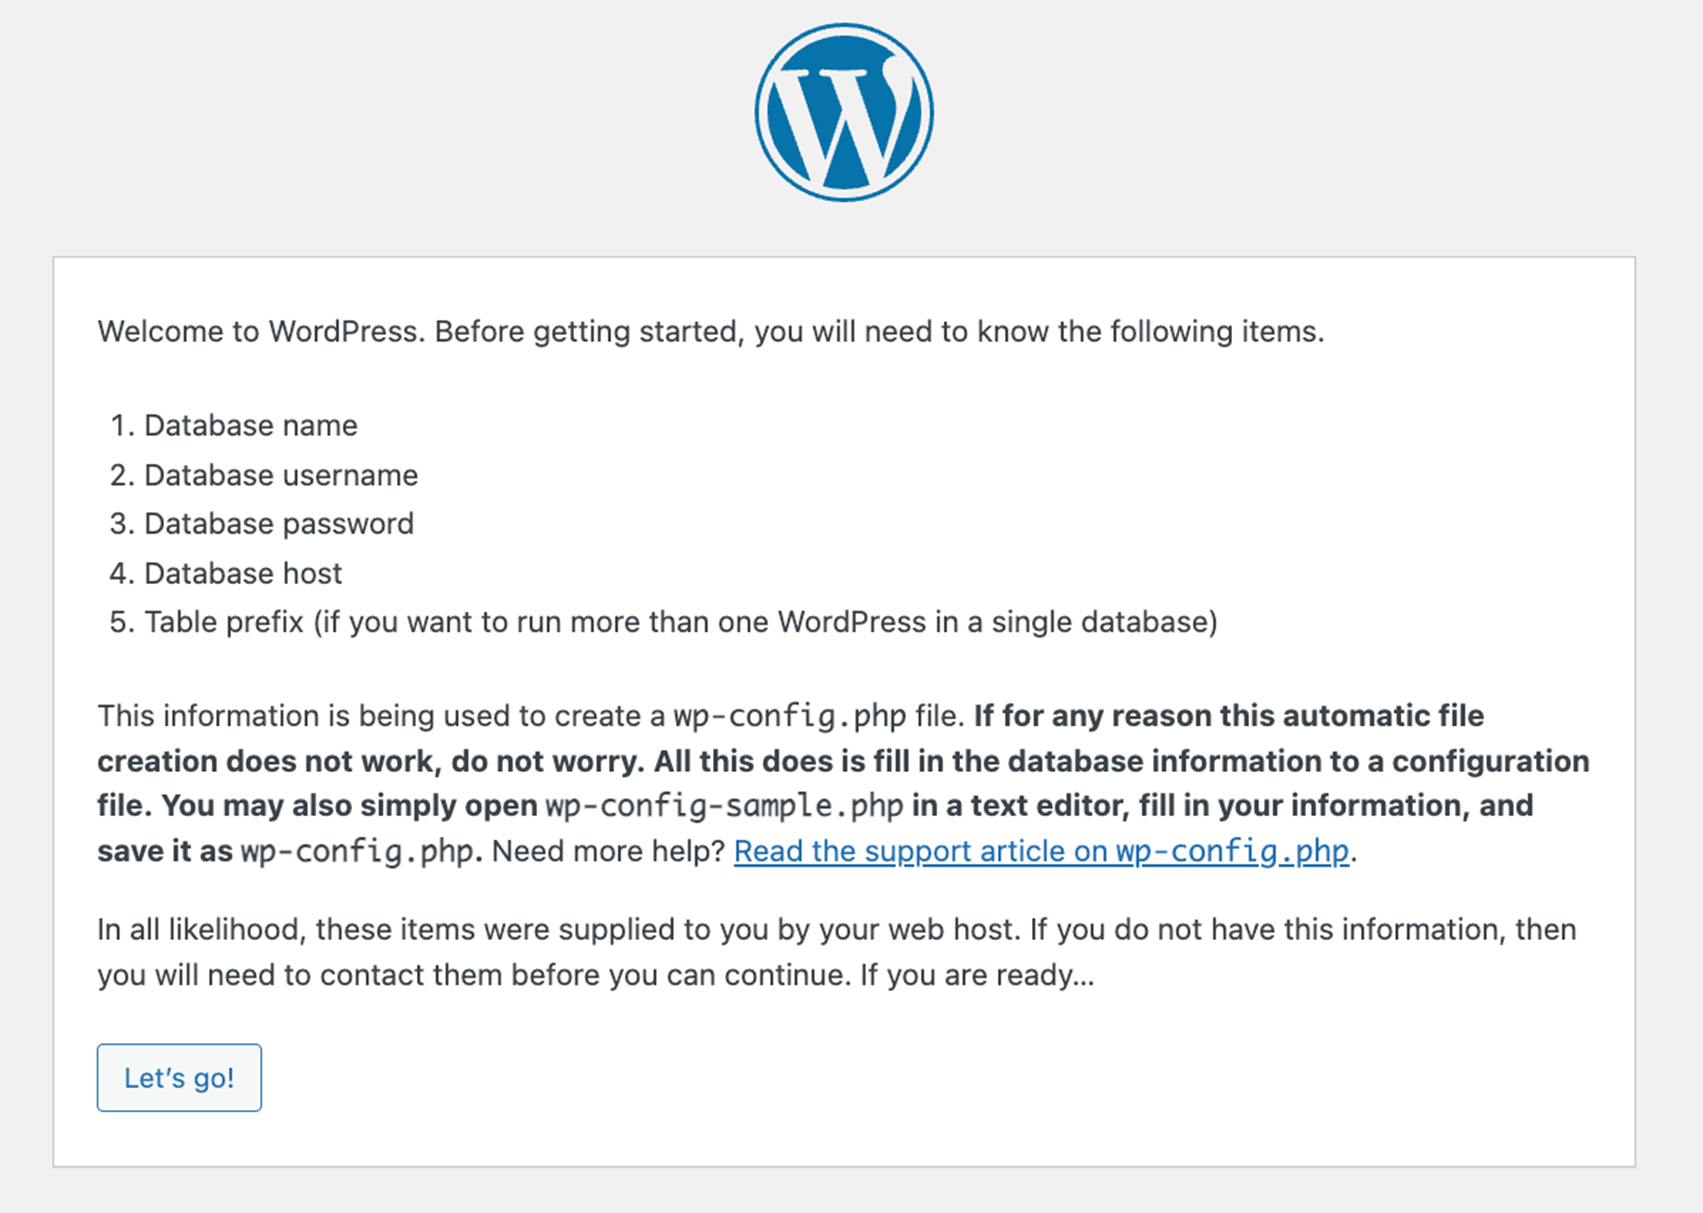
Click Let’s go! to continue to the next form, where you will enter your database connection details:
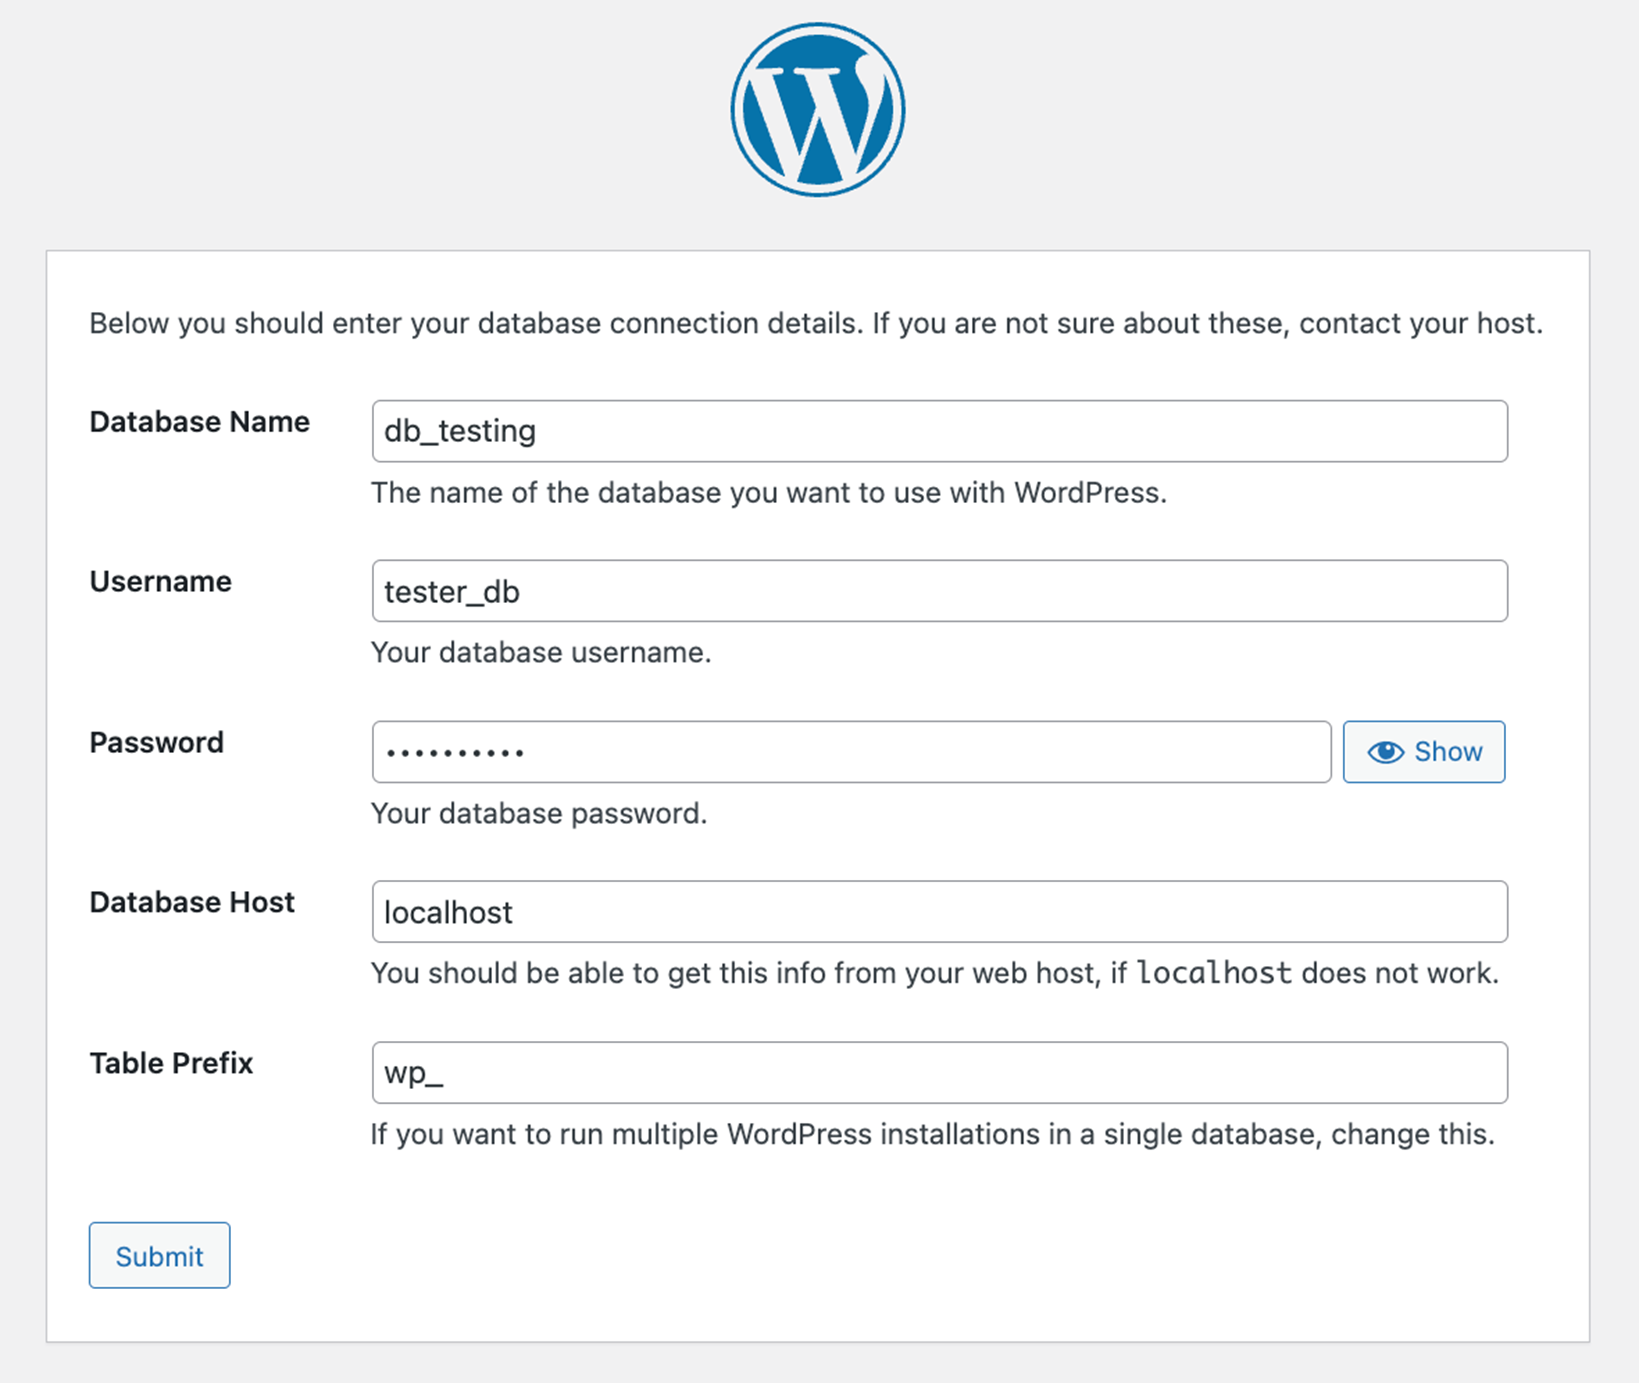
Enter the database name, username and password you created. The database host is most commonly localhost, so you can leave that as is, along with the table prefix. When you click Submit, WordPress will test the connection and report success:
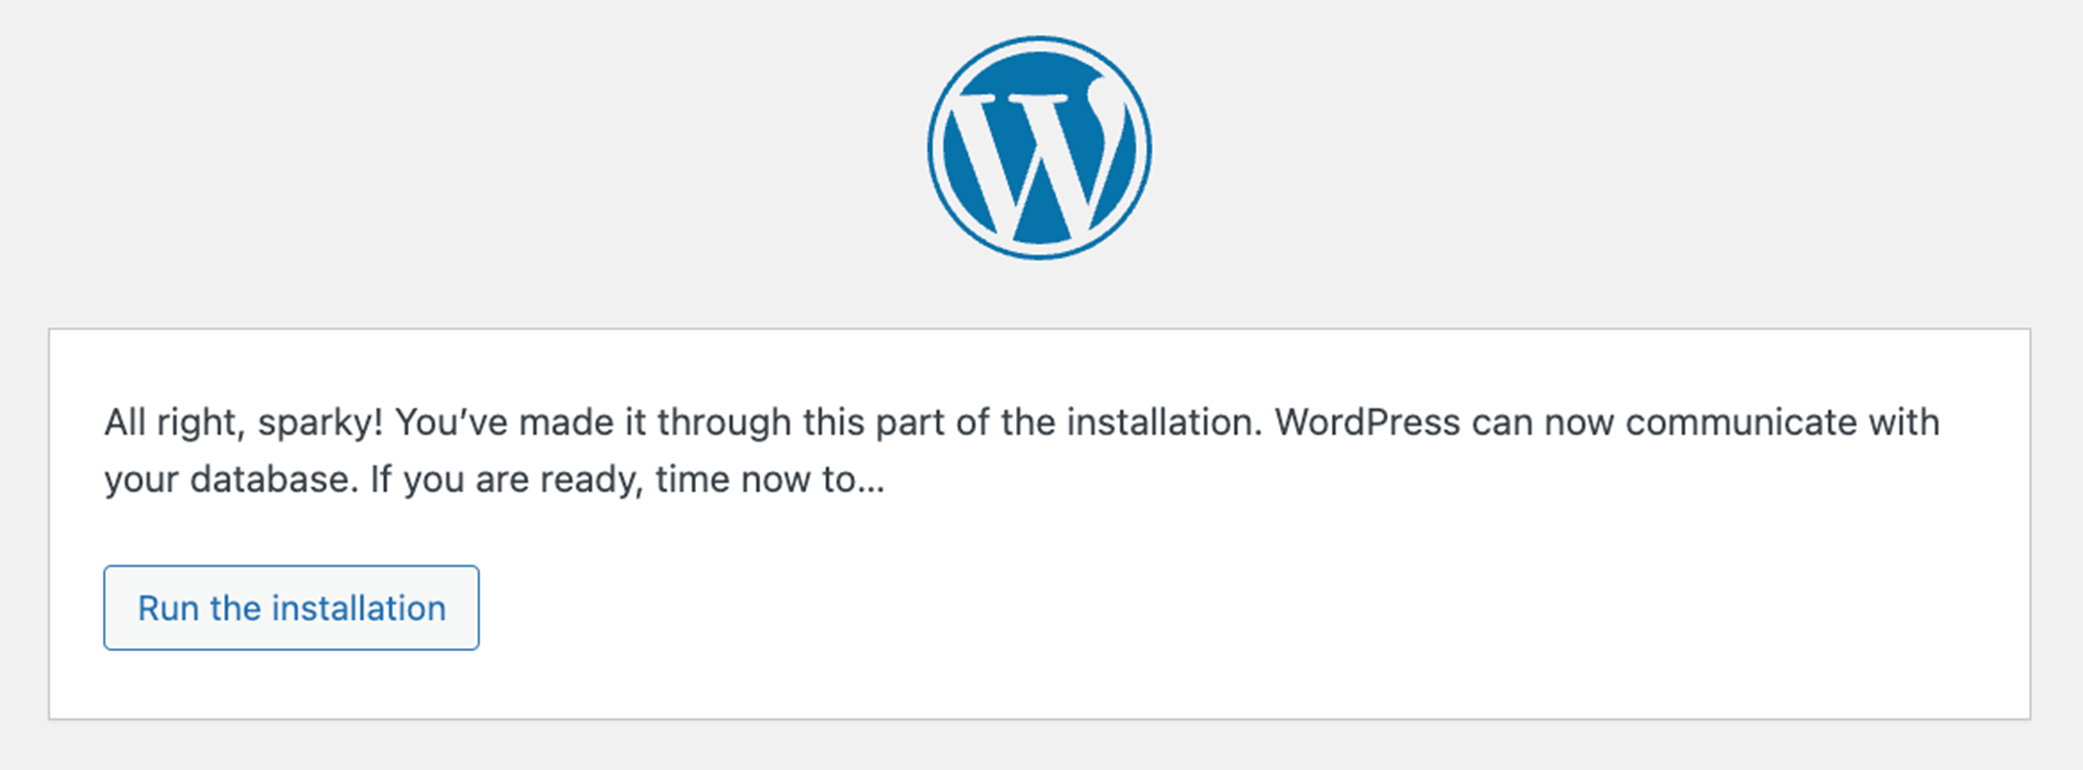
Click Run the installation to complete the final step. WordPress will ask you for a few details about your site, including a username and password for the Admin user and the site title and email:
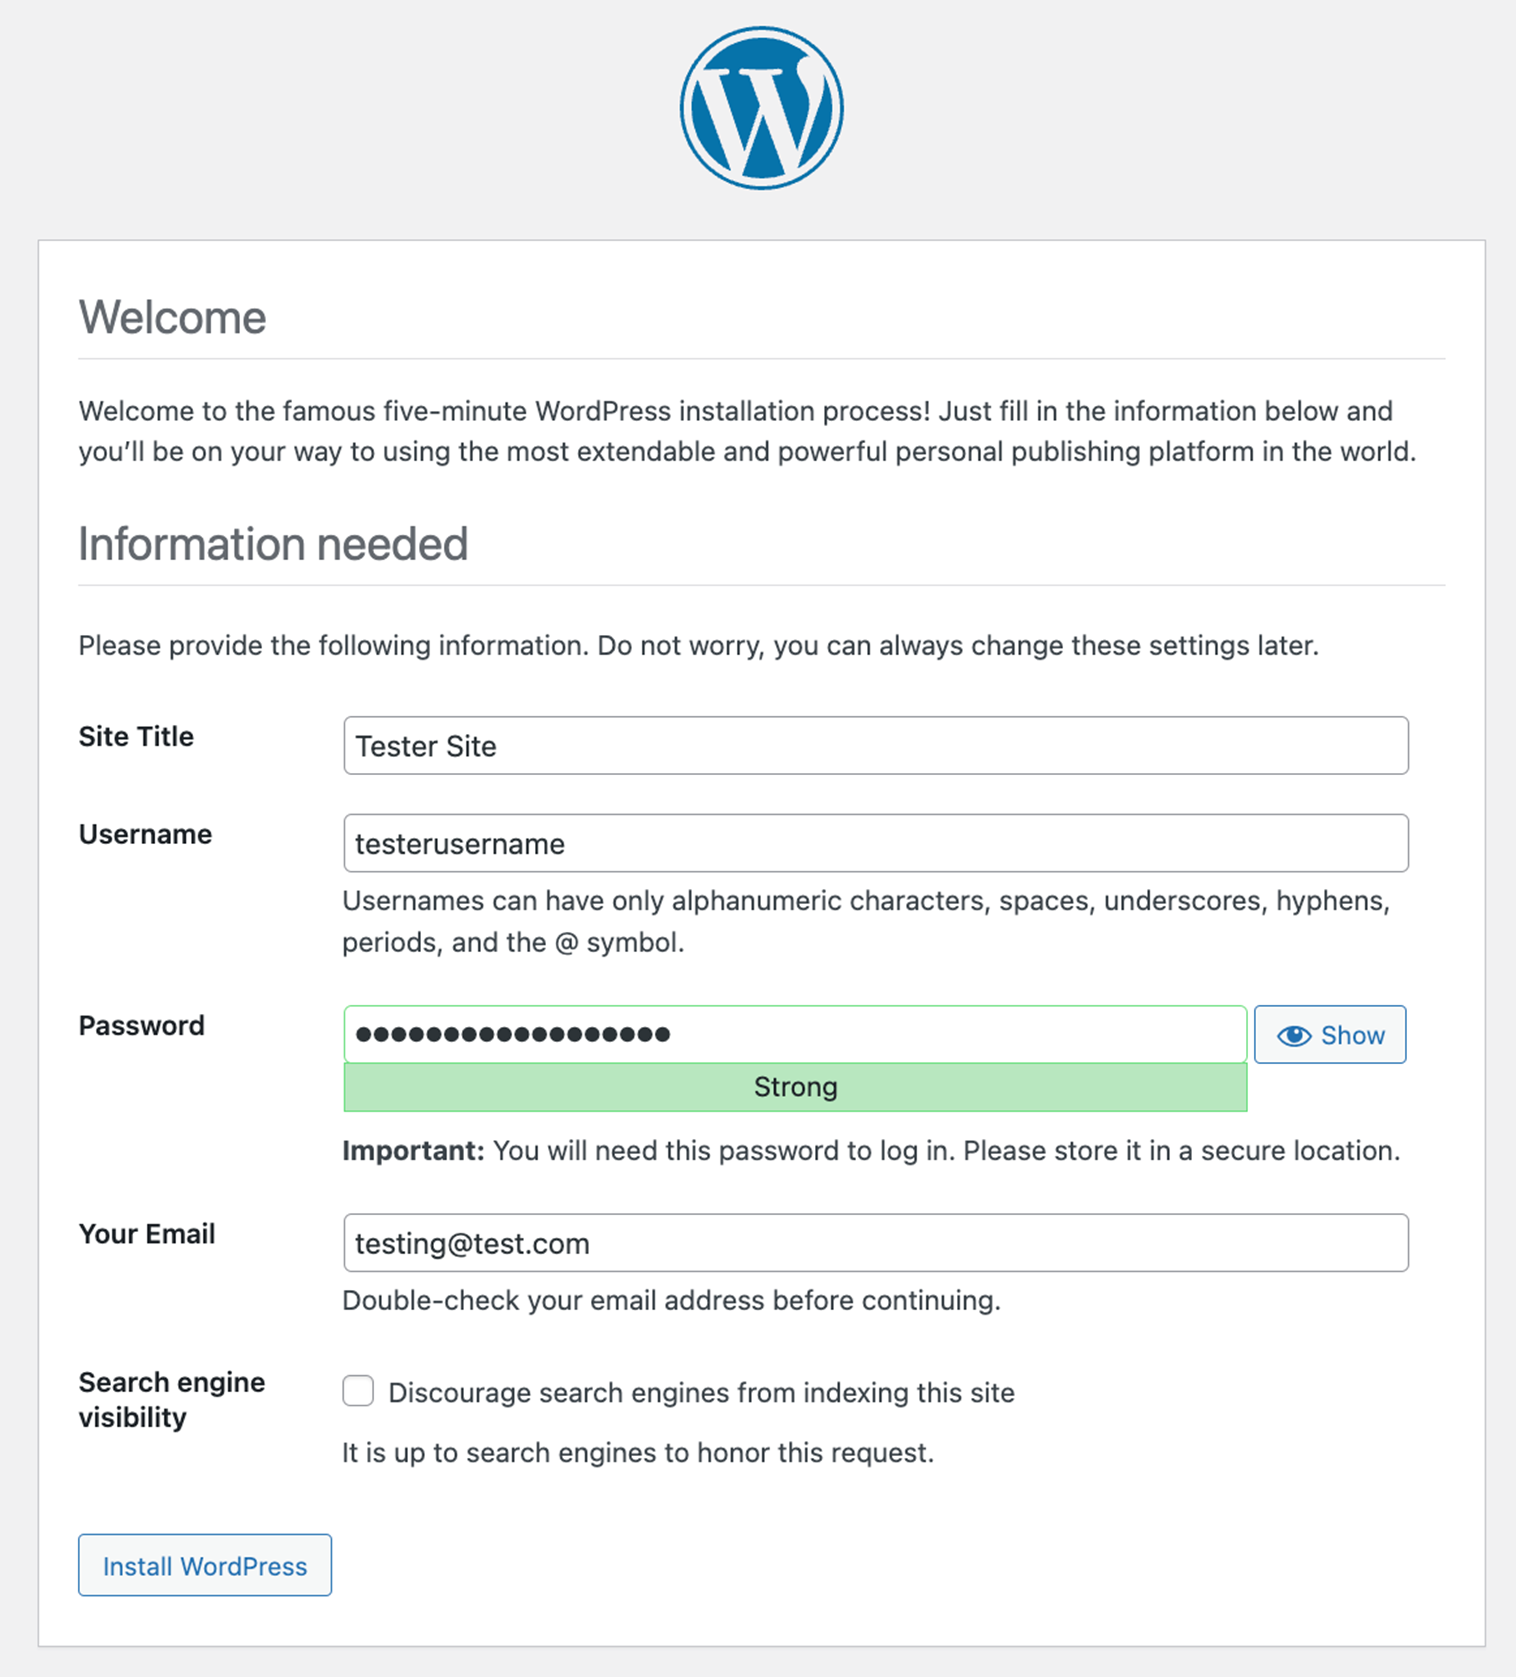
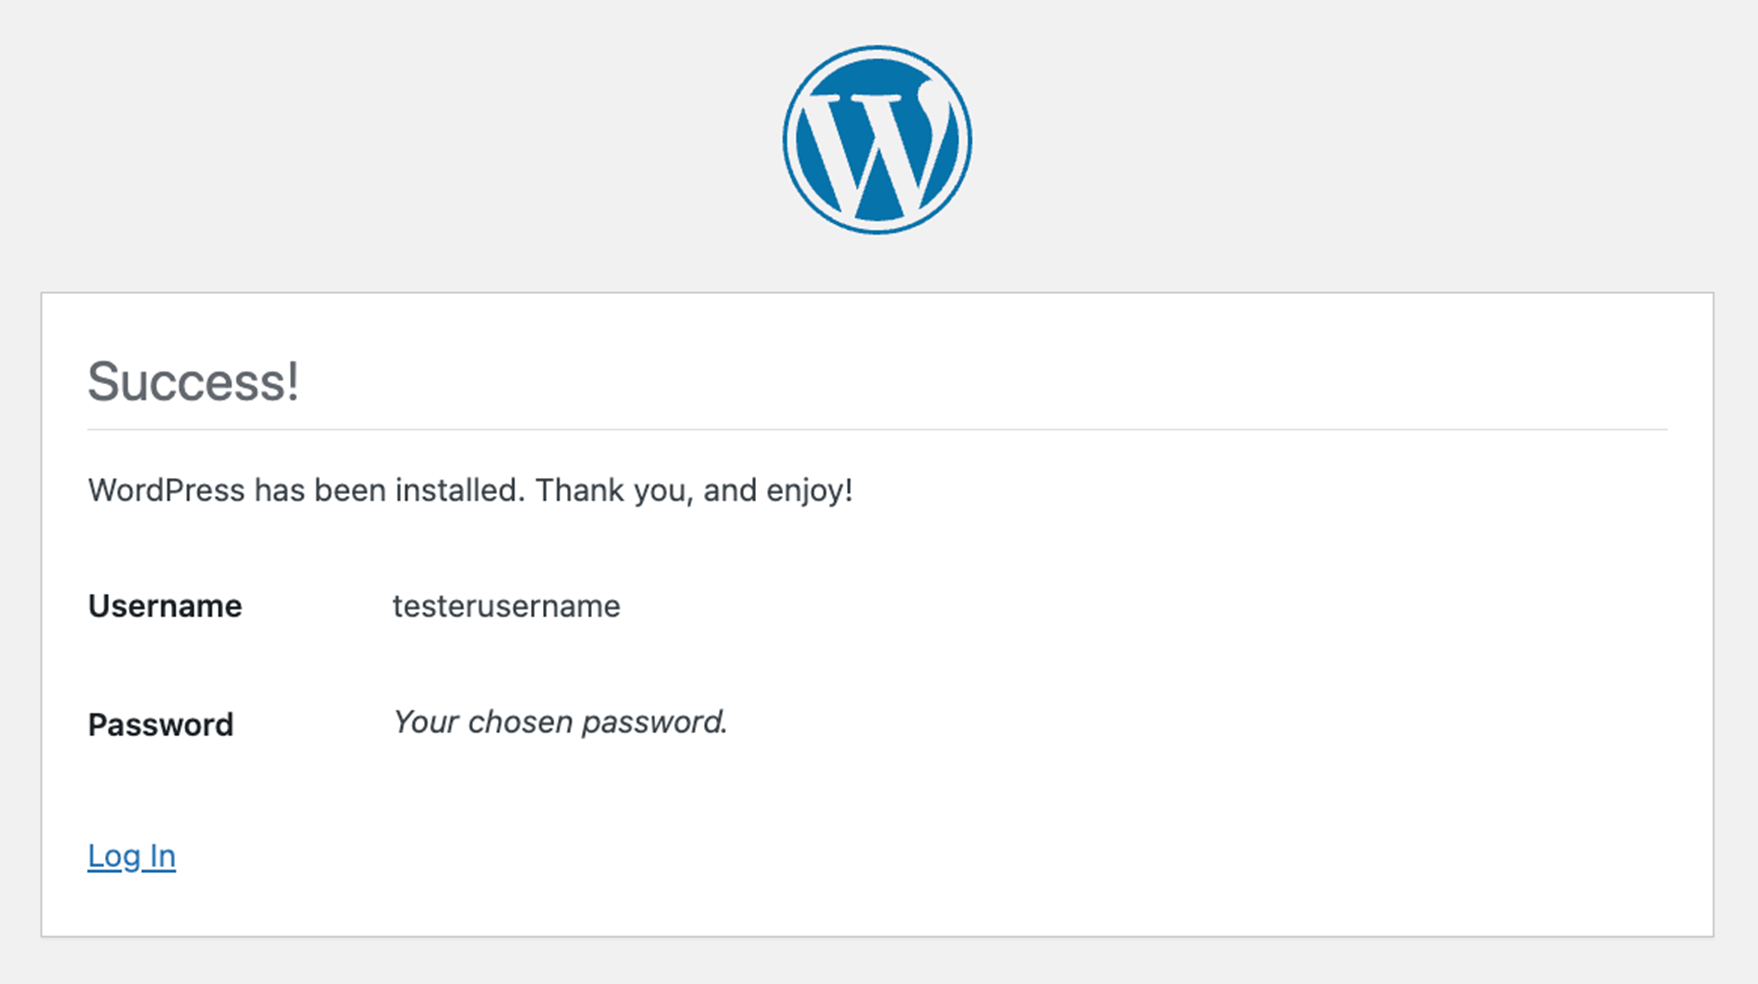
Fill in the requested information and click Install WordPress. Give it a few moments to install, and soon you’ll have a brand-new WordPress site! You can now login with the same credentials at http://mydomain.com/wp-admin. Mission accomplished!
Choosing a WordPress installation method
Automated installers like those in cPanel provide a quick and user-friendly setup, ideal for beginners seeking simplicity and efficiency. They are time-saving and minimize the risk of errors.
On the other hand, manual installations offer advanced users and developers greater customization and control, accommodating specific configurations, security settings, and handling special or beta versions. While it is more involved, manual installations cater to users with specific project needs.
The choice between the two depends on the use case, but in most cases, the automated installer can do the job.
Troubleshooting WordPress issues in cPanel
It happens to all of us: You create a brand-new website, make a few changes and add a new plugin, refresh the site to see the changes, and boom, your site is down and you’re scouring Google for answers. You could see the White Screen of Death (WSOD), or an Internal Server Error.
Whatever it is, don’t panic – chances are it is something you can fix easily. And with some WordPress troubleshooting knowledge, you’ll be on your way.
Here are some of the most common WordPress errors and how to fix them using cPanel.
Using cPanel to enable debugging in WordPress
Enabling debugging in WordPress helps create logs with detailed debugging messages to appear on your site, which can help with troubleshooting and pinpointing errors.
To enable debugging via cPanel, follow these steps:
- Log into cPanel.
- Click on the File Manager.
- Navigate to your website’s home folder.
- Select the wp-config.php file and click Edit.
- Look for the line define( ‘WP_DEBUG’, false );
- Change it to define( ‘WP_DEBUG’, true );
- Save your changes.
- Use your browser to reload your website.
Debugging messages should now be visible on your site.
Keep in mind that not all debugging messages are equal. There’s a difference between an error message and a warning message, for example. You can learn more about debugging in WordPress in the official WordPress Codex article.
White Screen of Death (WSOD)
If you reload your website and instead a blank white screen takes its place, you’re seeing the White Screen of Death. Despite the terrifying name, all it really means is that there’s a PHP or database error interfering with WordPress displaying your site. It also might be due to a new theme or plugin, or an update gone wrong.
Solutions to some of these are listed below. Think about changes you’ve recently made to the site, as that will point you toward the most likely culprit.
WordPress plugin problems:
The White Screen of Death can result from plugin conflicts. If you can log into the WordPress Admin portal, try deactivating all plugins. If your site reappears, turn them back on one at a time to pinpoint the bad one.
If you can’t access the admin portal, you can disable plugins via cPanel using the following steps:
- Log into cPanel.
- Click on the File Manager.
- Navigate to your website’s home folder and then to /wp-content/
- Rename the subfolder /plugins/ to /plugins-disabled/
- Clear your browser cache and go back to your website.
Refresh the admin portal, if you can view it, then the WSOD was likely caused by a plugin.
To figure out which plugin is causing the issue:
- In cPanel File Manager, in the /wp-content/ folder, create a new /plugins/ folder.
- Move individual plugins from the /plugins-disabled/ folder to /plugins/
- Use your browser to reload the admin portal.
The only active plugins will be whichever ones remain in the /plugins/ folder. If the WSOD reappears, you’ll be able to pinpoint the culprit.
Alternatively, you can disable each plugin individually:
- Log into cPanel.
- Click on the File Manager.
- Navigate to your website’s home folder, then to /wp-content/plugins/
- Append “-disabled” to the folder of any plugin you’d like to disable.
- Use your browser to reload the admin portal. The plugin is now disabled.
For example, if you wanted to disable Jetpack, you can take the original folder name:
/wp-content/plugins/jetpack/
And rename it to:
/wp-content/plugins/jetpack-disabled/
WordPress theme problems:
If you’ve tested the plugin directory without success or made a recent theme update, the WSOD might be due to a theme problem.
The process for fixing this is similar to the process for finding a bad plugin:
- Log into cPanel.
- Click on the File Manager.
- Navigate to your website’s home folder and then to /wp-content/
- Rename the subfolder /themes/ to /themes-disabled/
- Clear your browser cache and go back to your website. If you can view your admin portal, then the WSOD was likely caused by installation of a new theme or a theme update. Use a different theme until you’re able to resolve the problem.
Bad .htaccess file:
If the WSOD persists after taking the above steps for plugins and theme problems, you might have issues with the .htaccess file related to your site. To check this, take the following steps:
- Log into cPanel.
- Click on the File Manager.
- Navigate to your website’s home folder.
- Rename the file .htaccess to .htaccess-old
Note that in some versions of File Manager, you’ll need to click on the File Manager Settings button and enable the “Show hidden files” option or you won’t be able to see this file.
Clear your browser cache and go back to your website. If the WSOD is gone, then you’re dealing with an issue related to a change in your .htaccess file. If you have a backup, restore it. Otherwise, you can use the standard WP .htaccess file as described here.
Alternatively, now that your admin portal is back, you can also navigate to Settings > Permalinks and click Save Changes. WordPress will create a new .htaccess file in your site’s root directory.
Internal Server Error
The dreaded “500 Internal Error” message is about as helpful as an umbrella in a hurricane. It basically means that there’s something wrong, but the server is unable to determine what it is.
The most common causes of this error on a WordPress site are a corrupted .htaccess file or problems with the PHP memory limit.
The first WordPress on cPanel troubleshooting step is to rename the .htaccess file as described above. If that doesn’t fix the problem, then you might have a problem with the PHP memory limit. Follow the instructions in the next section, Increase PHP Memory Limit.
If neither of these resolves the issue, then the problem may be due to a plugin or theme malfunction. Follow the steps for WordPress Plugin Problems and WordPress Theme Problems.
Last resort, and good basic practice, should be to have regular backups (which you can configure in Installatron) so you can back up to a time when the site was working properly and try to recreate the steps to understand exactly what went wrong.
Internal PHP memory limit:
It’s not uncommon for a WordPress installation to run into memory problems. You might receive a vague “internal server error” message or, if you’re lucky, the more descriptive: “Fatal error: Allowed memory size exhausted.”
Fortunately, you can increase the PHP memory limit to make this error go away. To do this via cPanel:
- Log into cPanel.
- Click on the File Manager.
- Navigate to your website’s home folder.
- Select the wp-config.php file and click Edit.
- Look for the line that says: /* That’s all, stop editing! Happy blogging. */ and paste this just before it: define( ‘WP_MEMORY_LIMIT’, ‘256M’ );
- Save your changes. When you revisit your website, the error should be gone.
It’s important to note that, even if you’ve made this error go away by increasing the memory limit, you might still have a problem. Something is gobbling up memory, perhaps a recently installed plugin or a theme function. Learn more about how to check your server logs so you can identify the culprit by reading through them.
Increase WordPress file upload size:
If you’re trying to upload a large file, you might run into the “Exceeds maximum upload size for this site” message.
The default file size is often set low to keep people from uploading huge videos and massive files to your server.
If the limit is getting in your way, it’s possible to change it by configuring some server settings. If you’re using cPanel, making the changes is easy:
- Log into cPanel.
- Scroll down to the Software section and click (or search for) Select PHP version.
- Click the link to Switch to PHP Options.
- On the Options screen, you’ll need to modify three settings:
- post_max_size
- upload_max_filesize
- memory_limit
These three settings are all related. To upload large files, post_max_size must be larger than upload_max_filesize. It is also recommended that memory_limit be set larger than post_max_size.
- Save your changes and you should now be able to upload your large file.
You could also implement these settings via creating or editing a php.ini / .user.ini file; however, doing it through cPanel is easier.
WordPress is simple when everything goes smoothly, but if something goes wrong, things can come crashing down and seem very confusing. Following the above WordPress troubleshooting steps will help you resolve the most common problems yourself. However, if you’re still stuck, contact your hosting provider’s technical support department. For GoDaddy customers, help is available 24/7.
The bottom line
cPanel is a robust hosting control panel. It has way too many features to cover in a single post – you can watch more on cPanel on their official YouTube channel or the cPanel docs.
Alternatively, you can also go to GoDaddy Hosting Help for further assistance.
cPanel and WordPress go together like salt and pepper — use them separately or together, and either way your experience will improve.
And remember, if you’ve got a mission-critical site on your hands or multiple websites to manage, try GoDaddy Web Hosting Plus. It’s the best of both worlds — the amped-up power of a Virtual Private Server, but with the easy-to-use cPanel dashboard.


