When you start a business or begin to work as a freelancer, you might think you’re going to spend most of your time on your craft. But being the boss (of a business or yourself) means you’re going to need to master another art — overseeing proper project management steps.
Freelancers and entrepreneurs usually work on many multi-phase projects and collaborate with a variety of clients, contractors and vendors.
Strong project management skills are a must to keep everything running and properly completed on time and within budget.
The rest of this guide will look at why project management skills are so important to entrepreneurs, and it will outline five project management steps you can master to improve operations within your business — whether it’s a business of one or 100.
Project management guide for entrepreneurs
Here’s what we’re going to cover in this guide:
- What is project management?
- 5 project management steps to follow.
- 4 project management tools to try.
- Conclusion and next steps.
Let’s get started!
What is project management?
Project management is the act of planning and executing steps to reach a goal or create a defined final product. The work is not a process or ongoing operation. The work is a one-time project with a clear start date, end date, set of requirements, and final product or objective.
The project may include multiple people who contribute to the project or one person executing a series of tasks. When multiple people are involved, there is often a project manager who uses methods and tools to move a project along on time, on budget and within the set requirements.
Project management is often associated with industries that have complex projects, such as tech, software engineering and construction. But mastering the art of project management steps is useful to businesses big and small.
Let’s look at how freelancers and entrepreneurs can properly implement project management phases to keep important initiatives on track.
5 project management steps to follow
From large projects with dozens of stakeholders to small projects with one deliverable, these project management steps can make it easier for business owners to successfully complete projects.
- Project initiation
- Project planning
- Project launch
- Project monitoring and control
- Project closure
1. Project initiation
Project initiation is the project management step that kicks off the process. During this phase, you outline a:
- Project brief that describes the project.
- Business case and feasibility study that determines whether or not the project is a worthwhile endeavor.
One of the most important project management steps is deciding if you should start the project in the first place.
In some cases, it will be obvious. If you’re a freelance writer and a client asks you to create an ebook, you will likely be sure that the project is a go.
In other cases, the business case and feasibility study may show that the project isn’t a priority. For example, a social media software company may want to introduce a new feature, but then you view the study and determine that the project will require too many resources.
The project initiation phase helps you get the answers you need to determine what the project will entail and if you want to move forward with it. This phase has three essential steps:
1. Create a project brief that defines the project
- What is the project’s objective? Is it to solve a problem, fill a business need or create a final product?
- What are the goals of the project? What general results to you want to produce?
- What is the final deliverable? What will the final product look like?
- When does the project need to be completed? When is the final due date?
2. Use the brief to create a business case and feasibility study for the project
- Why is the project important?
- How does the project support larger brand goals?
- Is the project possible?
- Do you have the resources?
- Do you have the workforce?
- Do you have the budget?
3. Review the project brief and business case and feasibility study with key stakeholders
Once you answer foundational questions about the project, review it with the people who matter most — the key stakeholders.
Key stakeholders are the people most impacted by and interested in the project’s outcome.
They may include executives, department heads, team leaders or clients.
Gather the people who will be affected by your project, and review the details to determine that:
- You have accurate details and information.
- The project is feasible and needed.
- You have approval and authority to move forward.
Once you get the initial outline and buy-in during this project management step, you can get into more detailed project planning.
Related: Why a discovery session is crucial for web designers and developers
2. Project planning
The project management phases continue with project planning. Project planning is the phase when you start getting into the fine details. You define a clear roadmap that outlines the project and helps everyone get and stay on the same page.
Scope
The scope defines the extent of the project. What will be done? What are the constraints on the project? Knowing the answers to these questions helps prevent scope creep, where the project begins to take on tasks outside of the original plan.
Budget
The budget outlines the total amount of funds allocated for the project as well as the budget for certain sections of the project.
Workflow
Workflow describes the steps that must happen in the project and the order of those steps. Some steps must be completed before others can be started, so lay out the full process to shape the entire plan.
Deliverables and milestones
Depending on the type of project, you might have deliverables (tangible items) that need to be submitted at certain points of the project. Or, you may have milestones (key points in the project) that will mark progress points.
Approval process
Once you identify deliverables and milestones, define the approval process for them. Who has the authority to approve each deliverable? How long is the approval process?
Set guidelines that won’t hold up the progress, and consider what should happen if the approval process takes too long.
Team members
List the people who will be involved in the process. Include every person who can stall the project or is needed to keep it moving along.
Team responsibilities
Explain the roles of all people involved. Outlining responsibilities early on assigns accountability and ownership, and it also prevents roles from overlapping.
Communication plan
Once the project kicks off, you will need a centralized plan that allows all team members to communicate effectively. Decide how you will manage that communication. Will it be through weekly meetings or an app? Where will you document all communication?
Risk assessment
A risk assessment requires you to look at the project and identify any potential problems that could arise.
Look for possible issues that could halt progress and throw the project off of its path.
Also, outline solutions in advance if your project ends up hitting roadblocks.
With these details outlined, you are now ready to launch your project.
3. Project launch
Once you have the details of your project laid out, it’s time to launch. Take the project management steps needed to get the project up and running.
1. Lay out the workflow in a centralized Gantt chart
In a prior phase of the project management steps, you outlined the workflow that must happen to properly complete a project on a set schedule. Now, add that workflow to a centralized place where you and the rest of the team can monitor the project and view assigned tasks.
One of the most popular ways to organize a project workflow is through a Gantt chart.
A Gantt chart is a harmonogram or type of bar chart. It lays out each task, how they relate to other tasks and when they need to be completed. Tasks that need to be completed are set along the horizontal axis while the timelines are presented along the vertical axis.
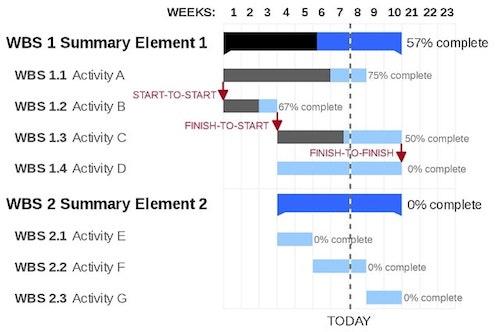
There are many different types of software that use a version of a Gantt chart. Later in this post, we’ll outline a few options you can use depending on your industry and size of project.
2. Assign tasks, deliverables and deadlines
Once all the tasks for the project are placed in order on your Gantt chart, start assigning each task with defined deliverables and deadlines. For each task, outline:
- Who is working on it? If it’s a team, assign a lead to the team.
- How should they do it? Include instructions that explain how the task should be executed and what is expected.
- When should they deliver? Clearly outline deadlines for each section of the project.
- What should they deliver? Describe how the team or person should wrap up their portion of the project, send deliverables and trigger the next phase of the project.
3. Assign KPIs
Deadlines are one way to monitor the progress of a project, but you may also decide that key performance indicators (KPIs) are needed as well.
KPIs are metrics tied to goals that measure progress and performance.
If your project doesn’t have one defined deliverable, KPIs can help you monitor the movement (or lack thereof) on a project.
Related: 10 KPIs to monitor back office productivity
4. Allocate resources
Review each task and what is needed to complete the task. Start collecting, organizing and distributing the needed resources so each team or team member will have what they need to execute.
5. Add flexibility to deadliness
Before you assign the project to your team, take one final look at the deadlines of the project.
The larger the project, the more likely it is that there will be delays, roadblocks and missed deadlines.
Plan for these delays by reviewing your deadlines one more time. Consider adding extra padding to places that were flagged during your risk assessment and throughout the project to have flexibility if something goes wrong.
6. Present to the team
Once all of the pieces are in place, it’s time to meet with the entire team or have individual meetings with stakeholders to kick-off the project. Go over the project as a whole, and discuss individual assignments with key players.
The goal of the kick-off meeting is to get everyone on the same page with a clear plan of action — and to identify any potential problems or issues.
Encourage the team to ask questions and point out any potential roadblocks. Make sure they have the time, resources and directions they need to execute on time and within the set expectations.
7. Adjust if necessary
If your team pointed out issues in the plan, adjust the workflow and timeline before you kick off. This will help prevent future problems and give you a better chance of completing your project on time and within budget.
8. Launch
Give the green light, and officially launch the project!
4. Project monitoring and control
Once the project is in motion, you can’t just kick back and hope that everything goes according to plan. You must monitor the project and ensure that everything and everyone stays on track. You need to look out for scope creep and make sure the project moves along on time, within budget and in the direction of the overall project goals.
1. Check on team members
Regularly check in with team members. Follow your communication plan and make sure team members have what they need.
2. Monitor the quality of deliverables
As deliverables come through, perform a quality control check to ensure that the task was completed properly.
3. Monitor team performance
Monitor KPIs and status reports to ensure that team members are performing and properly managing their responsibilities.
4. Monitor deadlines
Keep an eye on immediate deadlines as well as deadlines further down the road, and adjust the schedule if needed.
5. Monitor budget
Manage the budget, and make adjustments to resources if unexpected expenses pop up.
6. Continue keeping an eye out for risks
Monitor risks outlined in the risk assessment, and look for new problems that could arise and derail the project.
5. Project closure
If you follow all of these project management steps, you will eventually find yourself at the end of a successful project! But that doesn’t mean the work is over just yet.
Go through these six important steps of project closure to properly wrap up the project and identify information that can help you improve the execution of future projects.
1. Review the project outcome
Compare the outcome of the project to the initial project plan. Ensure that you reached the goal, hit every checkbox and produced all deliverables.
2. Create a final report and save files
Save all related files in one central location, and create a report that outlines all of the details for the project such as:
- Name
- Goals
- Start date
- Planned end date
- Actual end date
- Project budget
- Actual budget
- Team involved
3. Plan to track results, if needed
Decide if there are any business metrics or KPIs you need to continue to monitor to gauge the success of the project. Set up a system and calendar for continued monitoring.
4. Conduct a team wrap-up
Include your team in the closure phase of project management.
- Present the final product. Let your team see the results of their work by giving them a look at the final product.
- Recognize valuable participants. Highlight and offer praise to effective team members who helped the project be a success.
- Collect feedback from the team. Conduct a survey or interview team members to learn about their experiences and get information that could help with the next project.
- End engagements with contractors. Offer final payment to all contractors or other freelancers.
5. Review the project and conduct a post-mortem
Take time to assess the outcome of the final product as well as the overall project management.
Look back and identify what was successful so you can recreate it in the future.
And, review what went wrong so you can prevent it in the future.
- What problems occurred?
- What dates and timelines didn’t work?
- What risks weren’t identified early in the project?
- What went well?
- How can it be re-created in the future?
- Is this a good story for a case study?
6. Celebrate!
You did it! The project is finally over, and you can start looking ahead to your next endeavor.
4 project management tools to try
To help you through the five project management phases, try one of these four tools.
1. Monday
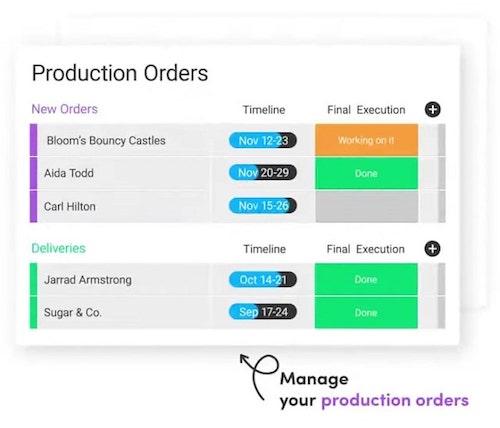
With Monday, you can add all tasks to a Gantt chart view as well as a calendar, files, map and timeline view, making it simple to keep your tasks organized and easy to follow.
Monday works for teams of all sizes and in all industries.
2. Smartsheet
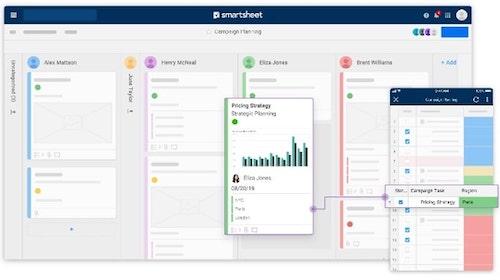
Smartsheet also uses a Gantt chart that can be viewed in different variations. You can turn tasks into a grid, card, project or calendar view. It’s easy to rearrange tasks and update projects, making it a good option for projects with a lot of team members involved.
3. Asana
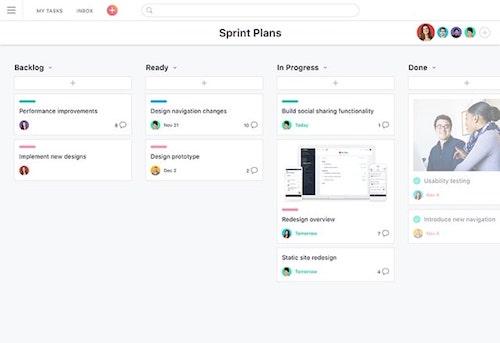
Asana is similar to other project management tools that showcase multiple views to monitor projects. But, it is unique in that it plans for agile projects that have sprints, launches and multiple iterations of projects or tasks.
It’s a top tool for IT and software projects.
4. Trello
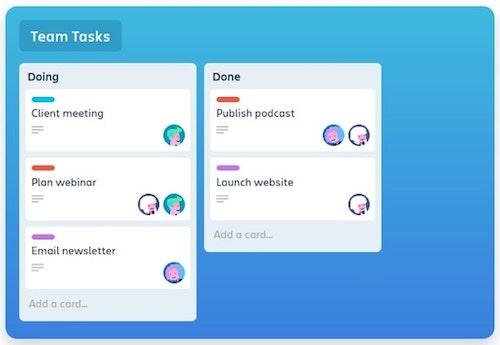
Trello organizes your project information by placing it on boards, lists and cards. This display works for small teams, but is very useful to individuals.
If you’re running a lot of solo projects or projects with teams of fewer than five people, Trello is a good option.
Conclusion and next steps
By knowing these five project management steps and four tools, you are ready to launch projects both big and small for your business.
Whether you’re a freelance writer planning the steps to create an ebook or a business owner getting ready to launch a new website, you can use these project management phases to outline and execute your new project. You can confidently go into your project with the tools and know-how you need to successfully launch your next big thing.
Meet the 27-hour day.
We built The Hub by GoDaddy Pro to save you time. Lots of time. Our members report saving an average three hours each month for every client website they maintain. Are you adding that kind of time to your day?


