As a web designer or developer, your goal is to deliver results. If your clients want to sell products online or increase sales, these tips and tricks are designed to help increase product visibility using WooCommerce. The combination of WooCommerce and WordPress is a powerhouse of eCommerce goodness.
Get started with a hosting account with WordPress and WooCommerce. Speaking of, Managed WooCommerce Stores have everything you need to get started.
The trick to product visibility isn’t as much about SEO as using a few of the tools built into WooCommerce for better SEO and conversion. You’ll want to install a good SEO plugin if you don’t already have one.
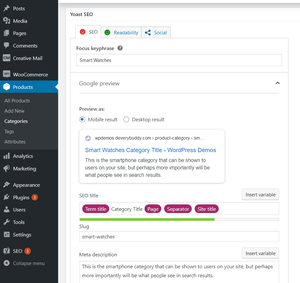
We mainly want this to change the titles and descriptions that will be shown in search engines while keeping the category, tag, and attribute names short in menus on the website.
Let’s get started.
1. Optimize categories
The point here is to create a starting point and help search engines index products.
In WooCommerce, you can set up main product categories and subcategories for products. By default, you’re able to create a title and description for those categories. As you may know, having a long descriptive title and lengthy text on your page can boost SEO.
There’s a problem, though.
Long titles and long blocks of text before product listings aren’t great for shoppers. I’ll show you how to fix this.
Creating category titles
You’ll want to have the SEO plugin (like Yoast SEO) already installed before getting started.
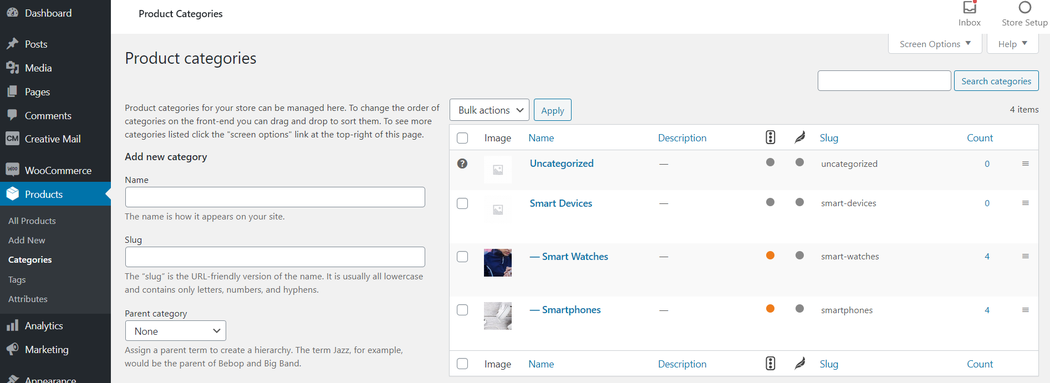
- In WordPress admin, go to Products in the left menu, and then click Categories.
- Give the category a short title that will easily fit into sidebars and menus.
- Add a short, keyword-packed sentence for the description.
*Later you can go back and link those individual keywords to relevant sections of your website. You don’t have to link those right away, but they’ll be there when you’re ready. - In the right-hand panel, go to the category you just created, and then click Edit.
*If you’re using Yoast, you can scroll to the bottom of the edit page to create a longer title and a good longer description.
These will be displayed in search engine results, but not on the category front-end.
Don't you just love minimalist design?
Setting up product categories this way keeps product archives neat and tidy for shoppers. Nobody likes going to a web page where they are forced to scroll past several paragraphs to get to what they were looking for.
Some WordPress themes come with an extra section where you can create a description below the product archives. For long text blocks on your archive pages, this is a key feature to look for when recommending a good theme.
Bringing product listings to the forefront and getting long text out of the way is great for sales conversion. Get customers to the cart as quickly as possible.
Pro Tip: Use the “Short Description” area of individual product listings to populate keyword-rich text on archive pages for even more SEO boost. This makes each product in that archive, and the archive itself, contextually relevant.
Adding category titles to menus
Once a few categories are set up you can use them in the site's menus.
Create a header section drop-down menu specifically for categories and name it something like "Shop by Category.” This approach brings products into focus on every page of the website.
If a visitor found this site from a blog post or other non-shop page, you still want them to know there are products for sale, right? If you're not familiar with setting up product category menus check out the WooCommerce Menus guide using their StoreFront theme.
Using categories to spotlight products
You can also use categories to sort and display important products on the website's homepage or custom sales pages using WooCommerce widgets. This is one of the smaller details that clients will see and love.
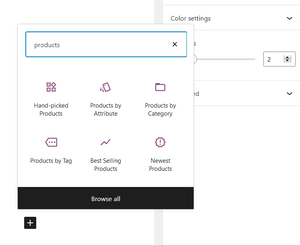
It’s easy to set up great-looking pages with the default WordPress block editor for dropping WooCommerce product widgets into pages. This creates sleek-looking product displays and layouts.
Following the tips above you’ll get the best of both worlds in search engine visibility and on-site visibility for categories. This setup yields an easy, distraction-free experience, while providing plenty of keyword-rich and contextually relevant text to help the search engines find, index and rank your client’s content.
2. Optimize product tags
The idea here is to show "hot products" and increase search engine traffic. Product tags are somewhere between categories and attributes in terms of functionality. They’re not hierarchical like categories, and they’re not required for variable products like attributes.
A good way to think of tags is as keyword hints for search engines and even visitors.
Some plugins use tags to sort and display products in sections of a website, as well, with the help of widgets.
Creating product tags
Product tags can be created using the same method used to create categories.
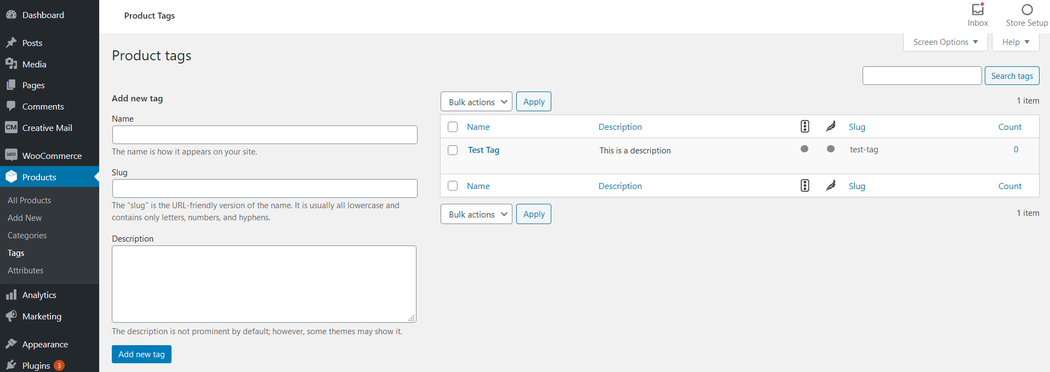
- From WordPress admin, go to Products, and then click Tags.
- Give the tag a title and short description.
- Mouse over the tag you just created, and then click Edit.
- Fill in the details for the SEO plugin (long title and description), and then click Save.
A good use for product tags could be tying a category to an attribute (more on attributes later). Just as an example, a client might have noticed they’re selling a lot of blue T-shirts lately. You can help them sell more by bringing these products to shoppers' attention.
Using tags to spotlight products
You set up a category T-shirts and an attribute of color with "blue" as an option. Just create the tag Blue T-shirts, and then assign it to all of the blue T-shirt products. You might even add the Blue T-Shirts tag to the site's menu under "Popular Products" or create a page with all of the popular product tags and add that page to the site's menu.
Those products are hot for a reason. Get more eyeballs on them.
When properly set up, tags can provide more specific product details, and help tie together related products — even across multiple categories. This will help bring more products that visitors are interested in to the forefront providing greater visibility to products that might otherwise have gone unseen.
As with categories, I recommend keeping tags short, yet very descriptive. You can also use the tags you created to help your plugins sort related products in custom product layouts such as grids, lists, and more. Tags are useful in narrowing product search results as well.
Using tags to boost SEO
In addition to enhancing the on-site visibility of products, tags can give an SEO boost and increase traffic from search results. If you’ve allowed tags to be archived and indexed, they can be found in search results.
Remember our Blue T-shirts example? By creating a tag for them, you've created an archive for search engines to crawl and index.
You now have a chance for people to find all of the client’s blue T-shirts directly from the search engine results pages. Pretty powerful stuff for the often-overlooked, humble product tag isn't it?
Pro Tip: Remember when we created those keyword-rich sentences for your categories? Go back and link some of those keywords to tags. In the text editor just highlight the text you want to link, and then click the chain link icon in your editor to add your link.

Don’t forget to save. You now have contextually relevant links as well as text in the site’s categories.
Double bonus.
3. Optimize your attributes
Now we’re going to do a little magic to uncover similar products, keep customers shopping, and increase search traffic.
Attributes are not hierarchical like categories, but are required for variable products. While it is possible to use attributes across multiple categories, try using unique attributes in each category to help keep their archives contextually relevant for better SEO (and product visibility via search engines).
Remember discussing tags (I used blue T-shirts as an example)? Attributes work much the same way.
If you have a category for T-shirts and one of the color attribute terms is blue, WooCommerce is going to create an archive for "blue." So if your attribute spans multiple categories, everything you've assigned to the color attribute "blue" will display in that archive (shirts, phones, whatever).
That's pretty general and not great for targeted search engine traffic or converting visitors into customers.
The fix: In the scenario where the same attribute term needs to span multiple categories, try being more specific with main attributes.
Getting more specific with attributes
Instead of simply "colors" as an attribute across all categories, try creating attributes specific to a category such as "clothing colors" for all clothing, "T-shirt colors" for just T-shirts, or "phone colors" for phones.
Give each of those its own term of "blue" individually. This helps to keep similar products listed together under attribute archives.
Again, contextual relevance is key for better search engine visibility for products, and helps target specific products visitors are interested in buying.
By default, Woocommerce will show attributes on the product page under the Additional Information tab near the product description. If you’ve allowed product attributes to be archived, they’ll be clickable and linked to an archive of other products with the same attribute.
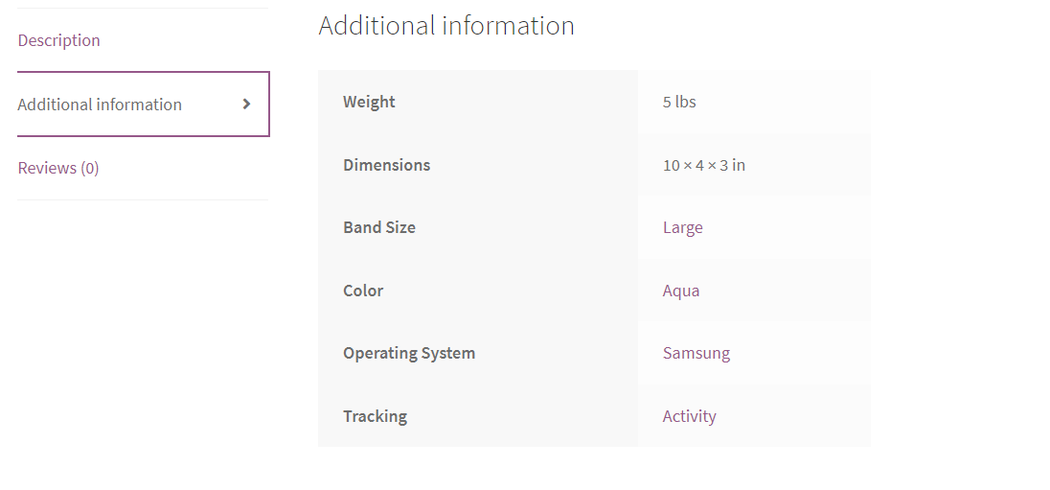
This helps to display similar items that share the attribute a customer has zeroed in on. For whatever reason it is important to them, so give them more choices to increase chances of showing the perfect product to someone who is ready to buy.
Using attributes for product listings
As mentioned before, attributes are used for variable products in WooCommerce. By using attributes for your product listings you can increase the chances of selling a product by making variations such as color available on a single product instead of listing the same product with the only difference being color, for example, separately.
Don't make visitors search more than they need to.
Give them as many options as possible on a single product listing. Make it easy for them to click and buy. Each product variation can have its own price too, so keep that in mind when creating bundles, different sizes, etc.
Using attributes in menus & widgets
Try adding popular attributes to a website's main menu for better product visibility. On my personal website Buckeye Web Development, I've created one menu for categories and use attributes in the main menu to help visitors find specific products faster. While sometimes sub-categories are necessary, attributes can help declutter your menus when used in place of sub-categories where possible.
They're a lot like categories in a way, but with superpowers.
As with categories and tags, attributes are often used in widgets that sort and display products on pages of your website. Combined with categories, widgets that use attributes to display products can produce some fantastic, highly targeted product listings and grids for your home and sales pages.
Configuring terms for attributes
Setting up product attributes is similar to setting up categories or tags, just choosing Attributes in the left admin panel of WordPress instead. Once you've created an attribute, you'll then need to configure terms.
Attributes themselves don't actually have archives, but their terms do.
When configuring attribute terms, be sure to create short default titles and descriptions for on-site display while adding longer titles and descriptions in the SEO plugin section for better search engine optimization.
Attribute terms can be found in search engines if you allow indexing.
It’s a good idea to treat each one as if it is just another page you want to have indexed and displayed in search. People who find those archives for any given attribute term in search engine results will see all of the product listings with that attribute term (providing they click on the page).
Using the tips above you'll increase search engine visibility and on-site product visibility for very specific product listings.
4. Optimize filters
Now we’re going to help visitors uncover relevant products, decrease back-clicks, and increase sales conversion with WooCommerce sidebar filters.
Filters, if done right, are where the magic happens.
They can keep visitors engaged which is good for both search engine rankings (time on site and reduced back clicks) and sales conversion. By default, WooCommerce lets users filter products by popularity, average rating, latest products, and price.
We can take things a step further using built-in, premium, or third-party widgets. For this example, we'll stick to techniques that can be used with the free WooCommerce Storefront theme using default settings… Easy!
Using WooCommerce’s built-in sidebar widgets we can enhance the sidebar navigation using a combination of categories, attributes, price, and active filters. WooCommerce will show results for a selected attribute term under a currently active category (the one you're in).
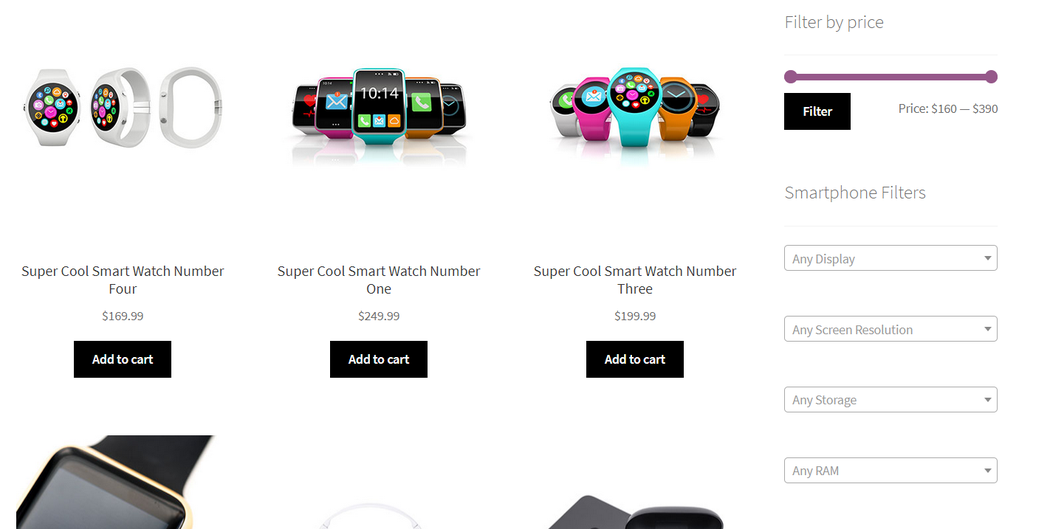
For example, if we are in the T-shirts category and select the term "blue" under our colors attribute, WooCommerce will show blue T-shirts.
In this scenario, if you've used the attribute "blue" elsewhere, you don't have to worry about those other products being shown under T-shirts (our active category). This isn't the case with archives though as was mentioned previously.
Supercharging the sidebar
Here is a little trick you can use without any third-party or premium plugins. We'll increase the visibility of products a customer might be looking for by turning the sidebar into a conversion powerhouse using filters.
We'll want to start with the categories filter since we want all related attributes to be shown under their perspective categories.
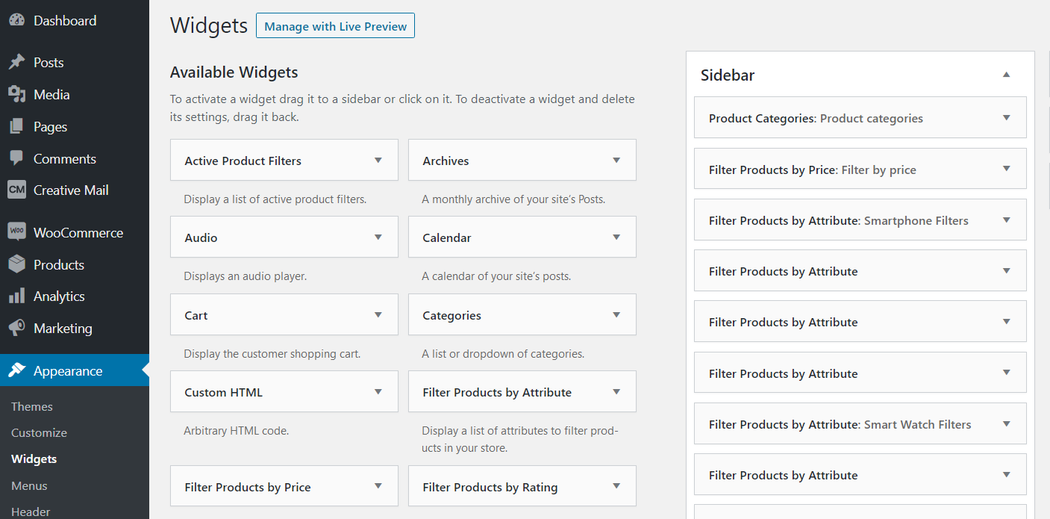
- From the WordPress Admin left menu, go to Appearance, and then click Widgets.
- Go to Available Widgets on the left, and then click Product Categories.
- Click the sidebar where you want to add this widget.
- On the right side of the page which holds all of the sidebars click the widget you just placed to configure it.
For the categories widget, I recommend clicking Hide Empty Categories. Set the rest up as you like, but I think keeping all of the other boxes un-ticked looks nicer, personally.
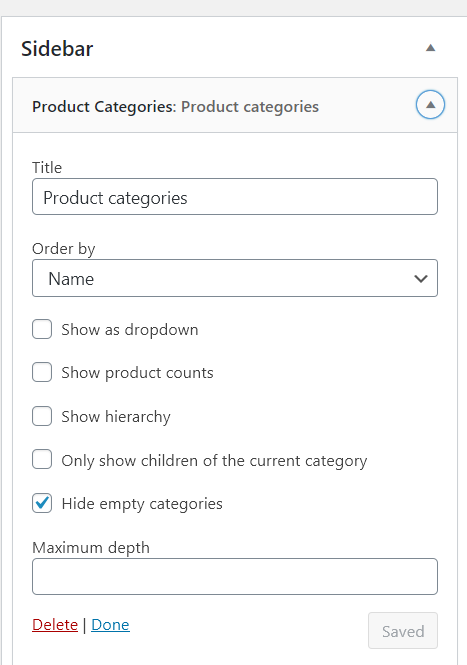
WooCommerce's price widget is a nice feature and looks good just below categories or just after attributes.
Adding custom price ranges
To add the price filter, just follow the same steps you used to add categories. But this time, choose the Filter Products by Price widget, and then just add a Title. The price widget by default will show your lowest and highest prices.
Customers can now drag the ends of the price widget bar toward the center, giving them a custom price range.
After you have your category and price widgets in place you can add the Filter Products by Attribute widget the same way you added the category widget. Things get slightly complicated here but bear with me.
It is 110% worth the effort.
Filtering products by attribute
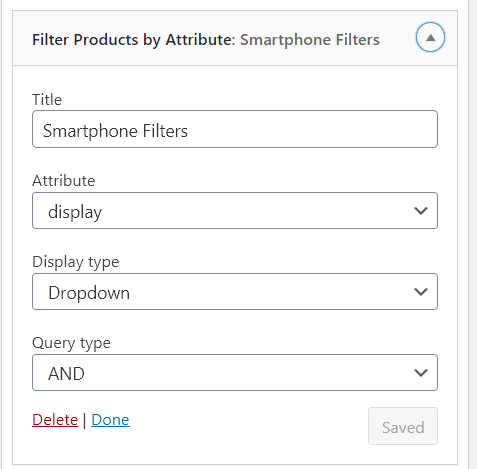
Think of attributes as groups. If we have the category of T-shirts we might have the attributes color, neck style, and fabric. You'll have to add the Filter Products by Attribute widget to the sidebar three times to get them all in there, since each widget will only display a single attribute.
Select the attribute you want to be displayed in each of the three (or however many you use) widgets and save. In this example, we have a group of three. Since it is a group we only need to fill in a title on the very top Filter Products by Attribute widget for that group.
We might give it the title "T-shirt Styles" or something similar.
Now when a customer is in the T-shirts category they will see the title "T-shirt Styles" with a group of attributes underneath which they can select terms for. Now just create a new group for each category giving only the top widget in each group a title.
Some themes come with options for adding swatches, images, and other enhancements to attribute filter widgets. With a theme that does not have those enhancements like WooCommerce's Storefront, I like to use the Dropdown option under Display Type in the Filter Products by Attribute widget settings.
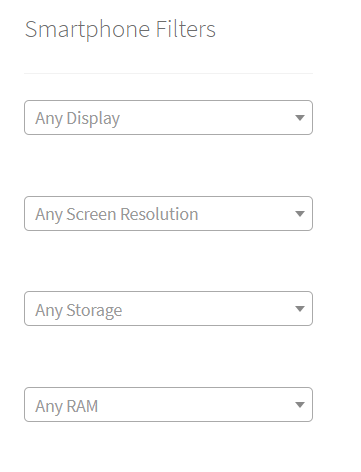
Visually, this gives the customer cues that they have options, which is what we want.
After setting up your attributes filter you may notice a pretty long list in the backend, but the front end only displays those attributes assigned to the category you're currently visiting in the shop.
That is except for the main shop page, which is normally under domain.com/shop.
On that page, the sidebar can get a bit long and confusing, but there's a fix. Don't link to that page from any menus. I think people sometimes get the impression that because it's the main WooCommerce shop page, that's where everyone starts shopping from.
This couldn't be further from the truth.
Chances are, people that find a client’s site will find the homepage first, or if you've done a good job with SEO, one of the inner pages. I recommend using the main menu for categories, popular or important attributes, and important pages on the site. The shop page can be left out. It just isn't that important in the overall scheme of things.
Next, we want to add the Active Product Filters widget to the very bottom of the shop's sidebar. Just follow the same steps you used to add the other widgets but this time select Active Product Filters.
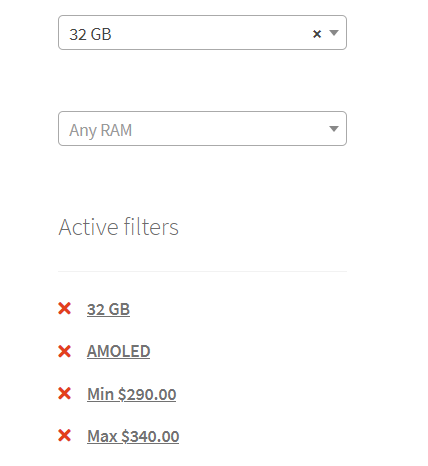
This will display a text list of filters a customer currently has active. In most cases, they can click these filters to view just the single filter or remove the filter to just view the remaining filters in place.
Parting thoughts
As you can hopefully see, taking time to set up categories, tags, attributes, menus and filters can really enhance the ability of a website to sell. Believe it or not, these are the basics. The problem is they're all too often ignored, overlooked, or simply rushed through in order to get products listed and a site completed.
Even the product listings themselves are too often rushed.
Take the time to set up all of the small parts for an amazing whole, and you'll really increase your odds for an expectation-defying project. There's much more that can be done to increase the visibility of products, like sharing buttons, newsletters, blogging and speed optimization.
But what I've shown here is a solid foundation from which to branch out.
In the end, increased product visibility means getting products in front of more potential customers and helping those customers sort through products in a way that is simple and engaging.
Efficiently deliver better results
When you use The Hub from GoDaddy Pro, suddenly there’s more time in your day to focus on what matters most. Forget about juggling admin tasks. Reclaim your time and use it to make clients feel like the center of your universe.


