As today is World Photo Day, I wanted to look back at the early years as a fledgling web developer when I first started learning image optimization for WordPress. I built an HTML website that finally started to get a smidgen of organic traffic from search engines. It was a comparative site that helped people find cheaper services. Visitors found services they were using or might use for a lower price, and I made a commission on any sales.
My very first commission made from that website was $110. I was hooked!
Wanting to reproduce the same result more frequently, I reached out to one of the sales managers to ask what I could do to increase sales volume. He looked at the webpage displaying the offer and suggested adding a button instead of a text link. “People love clicking buttons,” he said.
He was right.
I created a simple HTML button image, and placed it where the original text link was. Sales did in fact increase. A light bulb went off in my head and the marriage of web development, marketing, and optimization in all my future development projects followed.

Tying in image optimization for WordPress
So, by now you’re probably wondering why I’m talking about web development and marketing when this article is about optimizing images for WordPress. The short answer is because it’s all tied together. I created my first webpage button using an image with HTML markup.
I would later discover I could make buttons using images as a background with CSS which loaded a bit faster. I would eventually learn how to make a button with just CSS which loaded a lot faster.
Why did I want buttons to load faster? It wasn’t just buttons, it was everything.
If the website I built loaded faster and was aesthetically pleasing, it did better in search results. If the website did better in search results I made more sales. Website speed has been a ranking factor for as long as I can remember, though it’s only really been discussed at scale in recent years when Google started pushing the issue.
I won’t go into that here, but the point is to be competitive a website and it’s pages need to load fast.
Website images have an impact on a website's performance, both in terms of page load speed and visitor conversion.
All of that brings me to this: Image optimization for WordPress is important. It matters because when the typical visitor goes to a website they are far more likely to stick around if the website loads quickly enough and if they like what they see. I’ve seen various studies suggest a typical internet user's attention span is anywhere from about 2.5 to as long as 8 seconds. About that of a flea basically, and they can jump off just as fast!
The exact amount of time doesn’t matter as much as the concept.
There are only a few short seconds to show the visitor what needs to be shown and they’d better like it or they’re going to hit the back button faster than a toupee in a hurricane.
This behavior can have a negative impact on SEO (search engine optimization) efforts since it results in higher bounce rates. High bounce rates could lower a page’s position in search engine results. It also negatively affects conversion.
Conversely, if a visitor doesn’t have to wait long for a page to load, likes what they see, and clicks through to the next step or spends some time on the page it can have a positive effect on SEO efforts.
Search engine visitors who do not click back right away help lower bounce rates. Fewer bounces could result in higher positions for a page in search results. A low bounce rate increases the chance of better conversion rates for sales, newsletter signups, subscriptions, etc.
Blog images, portfolio images, product images, theme images, plugin images, they all have an impact on load time, aesthetics, and the outcome of the visit — the impact on conversion.
Images also have a big impact on your server’s storage space. If you have a limit on storage space in your hosting package images can gobble up that space quickly even when well optimized. Keeping the image file sizes small can free up some of that space.
So, how do we optimize our images for the web, and specifically optimize images for WordPress? Here is an overview of the topics that will be discussed in this article:
- Image types supported by WordPress
- Popular desktop applications for working with images
- Websites for working with images
- Tips for optimizing images for WordPress before uploading
-Sizing images to best fit a WordPress theme’s HTML containers
-Image optimization in relation to HTML attributes - Using plugins for bulk image optimization
Image formats supported by WordPress
Depending on your hosting environment your server may support hundreds of different image file types. WordPress by default allows uploading of images with .jpg, .jpeg, .png, .gif, .ico, and as of July 2021 .webp image file extensions. While any of these file types can and should be optimized for WordPress, WebP is particularly notable.
WebP is an image format that was developed by Google, who unless you’ve been living under a rock for the past decade you know, is speed obsessed. That’s not a bad thing. The WebP image format was designed to provide images with smaller file sizes than .jpg, .png, and .gif while retaining visual quality.
WebP was initially announced back in September of 2010, but widespread use has only been adopted in the last couple of years. It took a little time for modern browsers to catch up, but today more than 90% of web browsers support WebP. Still, the format isn’t 100% supported just yet, but there are some workarounds which I’ll discuss later in the article.
The reason I’m putting so much emphasis on WebP is because .jpg, .png, and .gif images can be converted to WebP.
When doing so you get either better visual quality for the same file size, or the same visual quality as the original at a reduced file size. WebP also supports transparency and animation for your .png and .gif files.
As mentioned previously WordPress now supports uploading of .webp file extensions as of version 5.8. More than 42% of websites use WordPress. That’s nearly 500 million websites. With Google pushing WebP, WordPress supporting WebP, and website owners competing for top positions in search results you can expect to see a huge increase in its use on the web. Now is a good time to start incorporating WebP image formats into your web development workflow.
Optimizing images for WordPress with desktop applications
Photoshop has long been the standard for photo editing. In addition to photo editing Photoshop works great for images used on the web both in terms of creation and editing. Graphic designers are far more likely to use Adobe Illustrator when it comes to image creation for purposes I won’t go into here. This will simply be a primer on how to optimize images using Photoshop for use on the web.
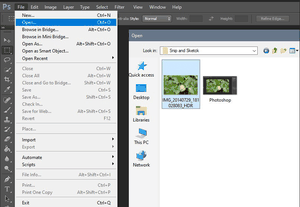
To open an image in Photoshop
- With Photoshop open click File in the top left corner then click open.
- Browse your computer’s folders for the image or photo you want to edit and click it.
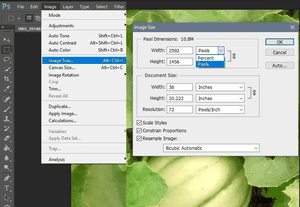
To resize an image in Photoshop
- With the image open click Image in the top menu then click Image Size…
- Change the width and height in the fields provided (in Pixels) then click OK
Optimize and save an image for the web in Photoshop
- From the top menu click File then click Save For Web…
- Choose your file type and quality options then click Save...
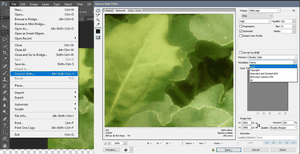
I want to quickly point out a couple of things about saving an image optimally in Photoshop. Notice the Metadata: menu. If None is selected, all of the metadata will be stripped from the image saving a bit more data in the images file size.
If your image has no transparency, and is not animated, saving as JPEG is going to result in the smallest file size in comparison to the same image in PNG or GIF format.
By default I like to set the image quality to 60 which is the lowest “high” setting.for JPEG images. Also be sure to have the Optimized box checked, and Embed Color Profile unchecked before saving. Experiment to see which quality settings give you the best looking images for the smallest file size.
WebP is going to be a more optimal format in terms of file size than JPEG, PNG or GIF, but Photoshop does not support the opening or saving of image files in WebP format natively. To save JPEG, PNG, and GIF as WebP in Photoshop you’ll need a plugin.
Fortunately You can use WebPShop from Google Developers to achieve this in Photoshop. WebP images will preserve transparency in PNG and GIF formats and animations in GIF with a smaller file size than PNG or GIF formats.
Photoshop is a bit pricey. There are other desktop applications that can be used for resizing and optimizing images, and some don’t cost a dime. Gimp is an open-source image editor that has been developed and maintained since 1998!
Because it’s been around for so long and the fact that it’s free makes it quite popular. If you know your way around Photoshop you should be able to catch on to Gimp fairly easily. If you’re new to Gimp there are lots of articles, videos, and tutorials you can find online that will help you get started. As an aside, Gimp does support the saving of WebP images by way of export instead of save or save as.
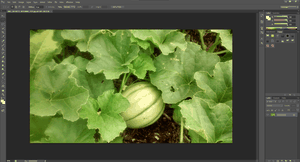
There are a few other decent image and photo editors out there, but in my opinion these two are the best. One paid, and one free. Take your pick.
Websites for working with images
There’s seemingly no end to the number of websites online that provide ways to edit images in one form or another. Even WordPress lets you resize and crop images in the default editor. Personally I avoid most online image editors as some seem a little sketchy. Besides that, most of them are pretty limited.
I’ll leave it up to you to find an online image editor you like. I have just one recommendation. Photopea.
Anyone comfortable with Photoshop will feel right at home with Photopea. The interface and menu options are very similar. What’s more, Photopea supports opening WebP files and exporting files as WebP.
All of the steps I mentioned previously for opening, resizing, and optimizing images for Photoshop are nearly the same in Photopea.
The main differences being you’ll export your finished files instead of saving. Since it is web based you’ll also be uploading images you want to edit and downloading them when you’re finished using Export as in most cases.
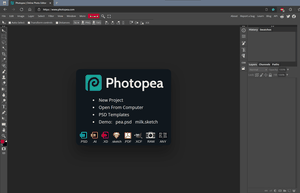
Photopea is free to use and includes all the features that come with a premium subscription which will remove ads and give you more steps in editing history. The free version should be plenty good enough for resizing, and converting.
Tips for optimizing images for WordPress before uploading
One of the first things I like to think about when optimizing images for Wordpress is the dimensions of the HTML and CSS containers they’ll be used in. Ideally the dimensions of an image would match the dimensions of the largest container.
Typically the largest container for a blog post would be a featured image which is often displayed before the actual post (at the top).
A WooCommerce product image is a little different since while viewing a product’s page the original featured product image will have already been downscaled to fit the container if the image is larger than the featured product image container.
When the featured product image is clicked or sometimes moused over the full sized image is displayed. Ideally the image would be 2 to 3 times the dimensions of the featured product container so the image upscales/downscales gracefully.
I mentioned these two scenarios because even when working with custom post types the two concepts here are most likely going to apply.
For featured blog post images, find the container’s width which should determine the image width. Decide on a height for those images. Do you prefer portrait or landscape mode? In your photo editor resize the image to those dimensions, optimize, save, and upload to WordPress.
For a WooCommerce featured image, find the featured product image container’s dimensions and multiply the width by two or three. Decide on a height for all of your product images and resize the images in the image editor accordingly.
Sizing images to best fit a WordPress theme’s HTML containers
In Firefox, Microsoft Edge, and Google Chrome you can get an HTML container’s dimensions by right clicking the section of the page you want dimension for then click Inspect. Hover your cursor over the HTML that is displayed until the section you’re looking for is overlaid (darkened) in the browser.
You’ll see a tooltip that displays the element, ID/classes followed by the container dimensions.
In the image below notice the tooltip displays the <figure> (our container) tag as having the dimensions 948.01 x 533.25. If you look just below that you’ll see the actual image HTML tag which shows the actual dimensions of the image as width=2560 and height=1440.
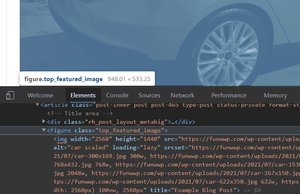
When the browser renders the full-size image (2560x1440) it is going to resize it to fit the container (948.01x533.25). Because the container width in this case is only 948 pixels there will never be a reason to have an image with a width more than 948 pixels. Anything beyond that is just additional data visitors have to wait on to be downloaded.
Don’t make them wait. Resize images in the image editor before uploading them to WordPress.
The smaller the dimensions of an image the less the overall file size is going to be in terms of data, so it is good practice to resize images to only the maximum dimensions needed to fill the container.
In this example, if you like landscape mode for images, 948x534 would be an acceptable convention to stick to for featured blog post images. The height is really going to be up to you. Portrait, landscape, it doesn’t matter. The main thing is to keep the dimension reasonable so download time can be reasonably fast. I like to keep things uniform because it just makes everything look neat and tidy.
Image optimization in relation to HTML attributes
Whenever an image is added to or opened from the WordPress media gallery there are fields available for the image’s ALT and Title attributes. These can be edited during the initial upload or at a later time.
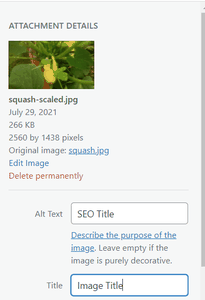
By default, WordPress will add attributes to <img> tags in the HTML of a web page. You can bump up your SEO game a little by writing well optimized ALT text. The ALT attribute works much in the same way a page’s title does in terms of search. It tells the search engine what the image is. The ALT attribute is also used by screen readers, so having good ALT text will help images be more accessible for the visually impaired keeping those visitors on the page longer.
Try incorporating the page’s focus keywords into the ALT text. Make sure it makes sense and actually represents the image accurately.
The title attribute will be displayed on the image’s attachment page (if enabled) as that page’s title via the H1 tag. That being said, it is a good idea to think of the title attribute in terms of SEO optimization in the same way you might think of a page title. That is if you have a use for the attachment pages.
If you’re using an SEO plugin like Yoast you could simply redirect all of these attachment pages to the actual image. Yoast states they make this feature available and recommend it because these attachment pages are often overlooked by developers and have little to no SEO value. I tend to agree.
It is worth mentioning there are other fields available under the ALT and Title fields, but those have little to do with optimizing, so I won’t discuss them here.
Using plugins for image bulk optimization
So maybe we’re dealing with an already established website. One that’s been around for awhile and has hundreds if not thousands of images already being used. In this case we can use a plugin to optimize images for WordPress.
So doing a quick Google search for “image optimization plugin WordPress” I get a list of plugins and an even longer list of blogs talking about those plugins.
I’ve used enough of them to know they all have pros and cons. Different ones may fit the needs of a particular website better than others. None that I know of are completely free. Some compress images, some resize images, some just use a CDN, some convert images, and some do several of those things.
Conversion I think is the best method, especially if there is a fallback for older (or stubborn… look’n at you Safari) browsers that don’t support WebP. If you are working for clients you definitely want this fallback capability. I’ve seen this done a couple of different ways.
One way I've seen is that both the original and a WebP version are added to the HTML of the page.
If the browser supports WebP then that version is shown. If not, the original is shown. I’m not a fan of this method. It is creating extra HTML that needs to be loaded and adding two versions of the same resource to the HTML. I mean the point is to speed things up right? I’ve seen this done for both converted images and those that are hosted on a CDN. If you use GTMetrix to test page speed you’ll get points knocked off for this.
No thanks, guys!
The plugin I like to use is WebP Converter for Media and here’s why: So far it doesn’t cost anything and the functionality is better thought out than most of its counterparts. The author only asks you to buy them a coffee. Deal! The way this plugin handles WebP files is by serving up either the original or the converted WebP image.
Not both. This is how you do it folks!
This plugin gets extra brownie points in my book because not only will it convert images from the WordPress media library, but can also convert images from themes and plugins. I’m not the only fan it seems as there are currently over 90,000 active installs and the plugin has a 5 star rating out of a current total of 346 ratings on WordPress.
Lastly, if you have WebP Converter for Media installed you don’t even have to worry about converting images to WebP before uploading them to WordPress since WebP Converter for Media can (depending on your settings) convert new images uploaded to the media library in .jpg, .jpeg, .png, and .gif format automatically.
In fact if you have clients this is really the way to go unless you want them complaining that certain customer’s can’t see images on their website. Not that it’s all that likely, but it can happen.
Your clients aren’t going to want to have to edit images and save them all as WebP to get that benefit anyway. They want to just keep working with the image formats they already use. This way they can.
Hey, you didn’t mention CDN! That’s right, I didn’t. Getting a CDN is a great idea, but optimizing images before using a CDN is an even better idea. That way the images served by the CDN are already optimized making your image load times even faster!
