ส่งออกหรือสำรองข้อมูลผู้ติดต่อ ปฏิทิน อีเมล และงานของฉัน
หมายเหตุ: คำแนะนำเหล่านี้มีไว้เพื่อการอ้างอิงเท่านั้น GoDaddy ไกด์ของเราไม่สามารถช่วยคุณส่งออกข้อมูลได้
สร้างไฟล์ข้อมูลสำรองของ Outlook เพื่อบันทึกและส่งออกข้อความอีเมล รายชื่อผู้ติดต่อ ข้อมูลปฏิทิน และงานต่างๆ จากนั้นคุณจะสามารถนำเข้าข้อมูลที่สำรองไว้ไปยังแผนอีเมลใหม่ บริการอีเมลใหม่ หรือ Outlook เวอร์ชันใหม่ได้ การส่งออกจะไม่รวมข้อมูลเมตา เช่น คุณสมบัติของโฟลเดอร์ (มุมมอง สิทธิ์ และการตั้งค่าการเก็บถาวรอัตโนมัติ) กฎของข้อความ และรายชื่อผู้ส่งที่ถูกบล็อค โปรดทราบว่า Microsoft ไม่รองรับ Outlook เวอร์ชันที่เก่ากว่า 2016 แล้ว
ต้องระบุ: เพื่อให้แน่ใจว่าระบบส่งออกข้อมูลของคุณครบทั้งกล่องจดหมาย ให้ปิดโหมด Cached Exchange มิฉะนั้นการส่งออกจะรวมเฉพาะข้อมูลในช่วง 12 เดือนที่ผ่านมา
เลือกแท็บที่เหมาะสมตามแพลตฟอร์มอีเมลที่คุณใช้
- ลงชื่อเข้าใช้ Outlook บนเว็บ ใช้ที่อยู่อีเมลและรหัสผ่าน Microsoft 365 (ชื่อผู้ใช้และรหัสผ่าน GoDaddy ไม่สามารถใช้ได้ที่นี่)
- ที่ด้านซ้ายสุดของหน้า ให้เลือก
 ผู้คน
ผู้คน - เลือกจัดการผู้ติดต่อ จากนั้นเลือกส่งออกผู้ติดต่อ
- เลือกว่าคุณต้องการส่งออกผู้ติดต่อทั้งหมดหรือเฉพาะผู้ติดต่อจากโฟลเดอร์ใดโฟลเดอร์หนึ่ง จากนั้นเลือก ส่งออก
ระบบจะบันทึกผู้ติดต่อของคุณเป็นไฟล์ .csv ซึ่งคุณสามารถนำเข้าไปยังแอปอีเมลอื่น (เช่น Gmail) หรือ Outlook เวอร์ชันอื่นได้
- เปิด Outlook
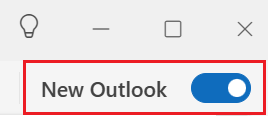
- หากคุณใช้ Outlook แบบใหม่ ให้เปลี่ยนกลับเป็น Outlook แบบเก่า ที่มุมขวาบน ให้ปิดปุ่มOutlook แบบใหม่ คุณอาจต้องยืนยันว่าคุณต้องการเปลี่ยนกลับ

- ที่มุมบนซ้าย เลือกไฟล์
- เลือกเปิดและส่งออก แล้วจากนั้นเลือกนำเข้า/ส่งออก
- เลือกส่งออกไปยังไฟล์ แล้วจากนั้นเลือกถัดไป
- เลือกไฟล์ข้อมูล Outlook (.pst) แล้วจากนั้นเลือกถัดไป
- หากต้องการส่งออกข้อมูลทั้งกล่องจดหมาย ให้เลือกชื่อบัญชีอีเมล จากนั้นดำเนินการขั้นตอนต่อไป หรือหากจะส่งออกเฉพาะโฟลเดอร์ปฏิทิน ผู้ติดต่อ หรืองานเพียงอย่างเดียว ก็ให้เลือกโฟลเดอร์ที่คุณต้องการส่งออก คุณสามารถส่งออกได้ครั้งละ 1 ประเภท คุณจึงต้องทำขั้นตอนเหล่านี้ซ้ำเพื่อส่งออกผู้ติดต่อ ปฏิทิน และงานแยกกัน
- ตรวจสอบว่าได้กาช่องกาหลายตัวเลือกที่อยู่ข้างๆ รวมโฟลเดอร์ย่อยแล้ว จากนั้นเลือกถัดไป
- เลือกเรียกดู เพื่อเลือกตำแหน่งที่จะบันทึกไฟล์ข้อมูล Outlook (.pst) ใส่ชื่อไฟล์ แล้วจากนั้นเลือกตกลง
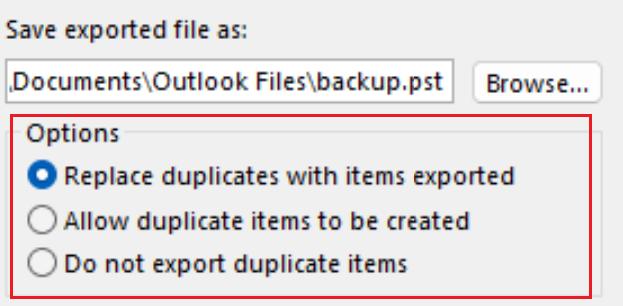
- หากคุณต้องการส่งออกไปยังไฟล์ข้อมูล Outlook (.pst) ที่มีอยู่ ในส่วนตัวเลือก ให้ระบุสิ่งที่ต้องทำเมื่อส่งออกรายการที่มีอยู่แล้วในไฟล์

- เลือก เสร็จสิ้น
- ระบบจะเริ่มทำการส่งออกทันที เว้นแต่จะเกิดสถานการณ์อย่างใดอย่างหนึ่งต่อไปนี้
- เมื่อกล่องโต้ตอบสร้างไฟล์ข้อมูล Outlook ปรากฏขึ้น ให้ป้อนรหัสผ่านในช่องรหัสผ่านและยืนยันรหัสผ่าน จากนั้นเลือกตกลง หรืออีกทางหนึ่งคือ หากต้องการดำเนินการต่อโดยไม่ต้องตั้งรหัสผ่าน ให้เว้นช่องรหัสผ่านไว้ แล้วเลือกตกลง
- หากคุณต้องการส่งออกไปยังไฟล์ข้อมูล Outlook (.pst) ที่มีอยู่แล้วซึ่งได้รับการป้องกันด้วยรหัสผ่าน ให้ป้อนรหัสผ่านในกล่องโต้ตอบรหัสผ่านของไฟล์ข้อมูล Outlook จากนั้นเลือกตกลง
- เปิด Outlook
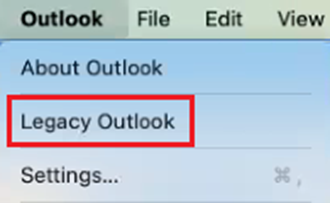
- หากคุณใช้ Outlook เวอร์ชันใหม่อยู่ ให้เปลี่ยนกลับไปใช้เวอร์ชันเก่า เลือก Outlook แล้วเลือก Outlook แบบเก่า คุณอาจต้องยืนยันว่าคุณต้องการเปลี่ยนกลับ

- เลือกไฟล์ จากนั้นเลือกส่งออก หน้าต่างส่งออกไปยังไฟล์ถาวร (.olm) จะเปิดขึ้นมา
- หากไม่เห็นส่งออก ให้เลือกเครื่องมือ แล้วเลือกส่งออกแทน
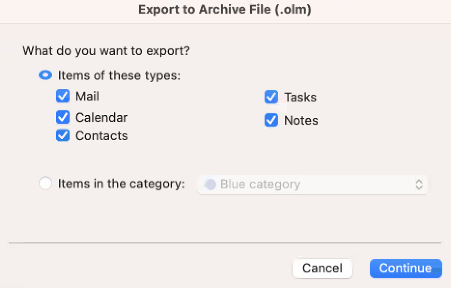
- เลือกสิ่งที่คุณต้องการส่งออก ตามค่าเริ่มต้น รายการทั้งหมดจะถูกเลือกไว้
- ในการส่งออกประเภทเหล่านี้ทีละรายการ ให้เลือกช่องกาหลายตัวเลือกถัดจากแต่ละรายการ

- เลือก ดำเนินการต่อ
- เลือกตำแหน่งในเครื่องคอมพิวเตอร์ที่คุณต้องการบันทึกไฟล์ จากนั้นตั้งชื่อไฟล์แล้วเลือกบันทึก ระบบจะส่งออกรายการของคุณ
- เลือก เสร็จสิ้น
ขั้นตอนที่เกี่ยวข้อง
- เมื่อข้อมูล Outlook ของคุณส่งออกเป็นไฟล์สำรองแล้ว ให้นำเข้าข้อมูลนั้นใน Outlook
ข้อมูลเพิ่มเติม
- ดูวิธีการส่งออกปฏิทินเป็นไฟล์ .ics จาก Microsoft
- ดูเพิ่มเติมเกี่ยวกับ การส่งออกและการนำเข้าไฟล์ใน Outlook จาก Microsoft
- อ่านบทความนี้จาก Apple เพื่อเรียนรู้วิธีการนำเข้าหรือส่งออกกล่องจดหมายใน Apple Mail บน Mac